WhirlWind Franchise+
Logging In to the Portal
About This Guide
This step-by-step training guide covers how to log in to the WhirlWind Portal for the first time and on an ongoing basis. Whether you are a new team member or returning after a password reset, these steps will walk you through the full login process.
- Navigate to the WhirlWind Portal login screen in your browser
- Enter your username and password credentials
- Successfully log in and verify your dashboard has loaded
- Identify your assigned store location
- Use the 'Forgot Password' feature if you cannot log in
Open Your Browser & Navigate to the Portal
Open Google Chrome (recommended) or another supported browser. In the address bar, type the WhirlWind Portal URL provided by your manager or Whirlwind Software onboarding team, then press Enter.
Locate the Login Screen
The WhirlWind Portal login screen will load in your browser. You will see the Snooze Mattress + Wellness logo at the top, followed by the Username and Password fields, and a green 'Log In' button below.
Enter Your Username
Click on the Username field and type your assigned username. Usernames are typically in the format of your name or email address as configured by your store administrator.
Enter Your Password
Click on the Password field and type your password. If you want to confirm what you are typing, use the 'Show' toggle (eye icon) on the right side of the password field to reveal the characters.
Click the 'Log In' Button
Once your username and password are entered, click the green 'Log In' button. The system will authenticate your credentials and redirect you to the main Portal dashboard.
Confirm the Dashboard Has Loaded
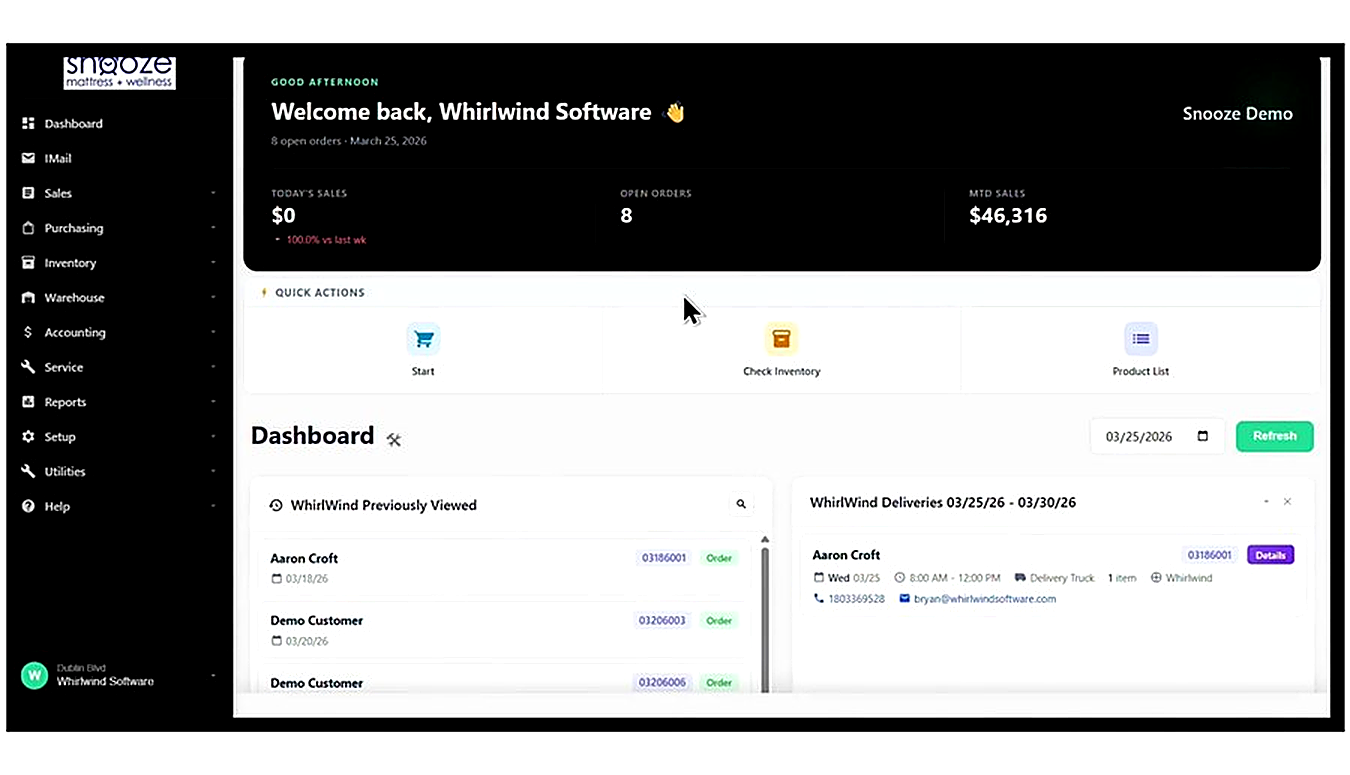
After a successful login, you will be taken to the Dashboard. Verify that the full left-side navigation menu is visible, showing sections including iMail, Sales, Purchasing, Inventory, Warehouse, Accounting, Service, Reports, Setup, Utilities, and Help.
Check Your Store Location
At the bottom of the left sidebar, locate the store information section. Confirm that your name and the correct store location (e.g., 'Dublin Blvd') are displayed. If the wrong location is shown, contact your system administrator.
Click 'Forgot Password?' on the Login Screen
If you cannot remember your password, click the 'Forgot Password?' link located below the password field on the login screen. A prompt will appear asking for your email address.
Enter Your Email Address
Type the email address associated with your WhirlWind Portal account and click the Submit or Send button. The system will send a password reset link to that address.
Open the Reset Email & Set a New Password
Check your inbox for an email from Whirlwind Software. Open the email and click the reset link. You will be directed to a page where you can enter and confirm a new password. Once saved, return to the login screen and log in with your new credentials.
Adding Products to a Shopping Cart
About This Guide
This step-by-step training guide covers how to add products to a Shopping Cart in the WhirlWind Portal when a customer is in store. You will learn how to open a cart, search for products, review specifications, set quantities and pricing, add accessories, and finalize the cart as a quote or order.
- Open the Shopping Cart from the Dashboard or Sales menu
- Understand the cart tabs and layout
- Open the Search Product/Service Catalog
- Search by brand, category, size, and firmness
- Use the Scan Label feature to look up products by barcode
- Read inventory results and product cards
- View full product specifications before adding to cart
- Select a product and set its quantity, price, and notes
- Review and add recommended accessories
- Add the item to the cart and continue shopping or return to cart
- Review the filled cart, Order Summary, and finalize with Create Quote or Create Order
Navigate to the Shopping Cart
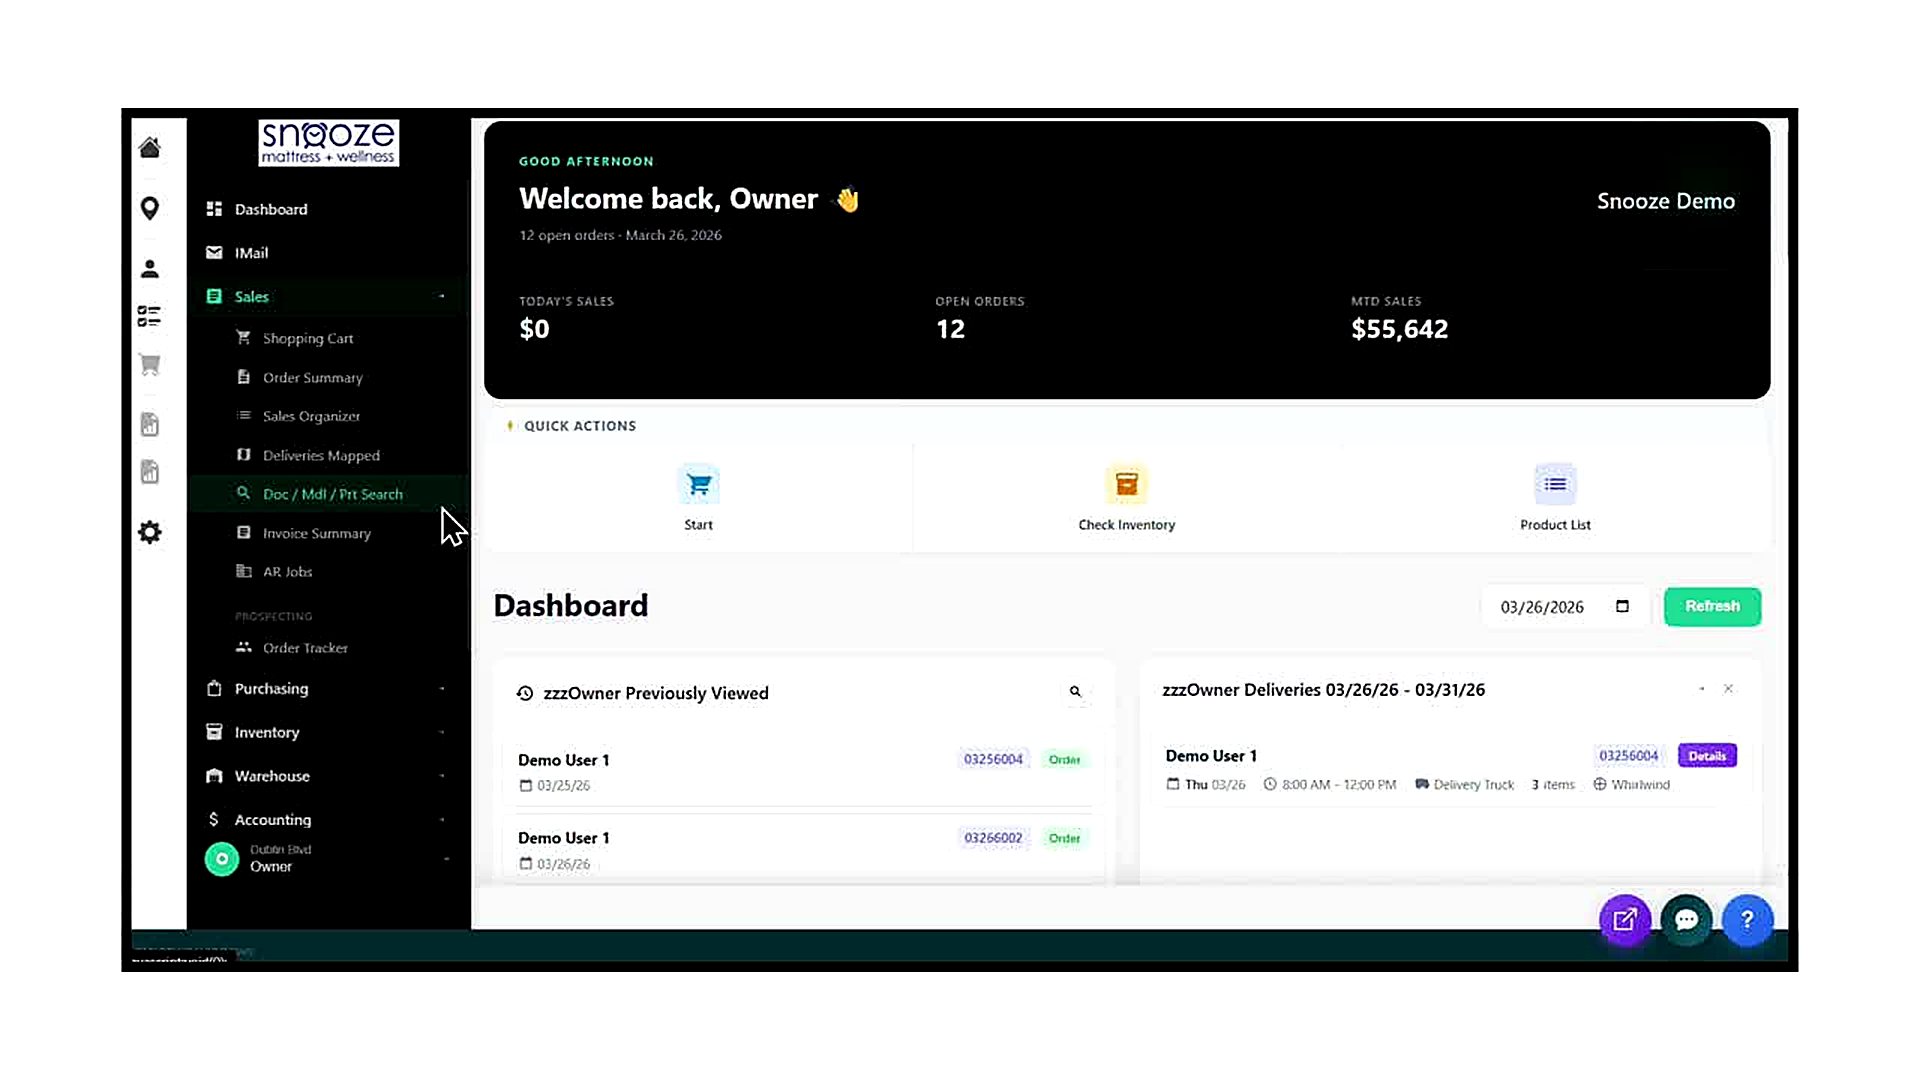
From the Dashboard, click the 'Start' Quick Action button (shopping cart icon) in the Quick Actions bar. Alternatively, click 'Sales' in the left navigation menu, then select 'Shopping Cart' from the expanded sub-menu.
Review the Cart Layout
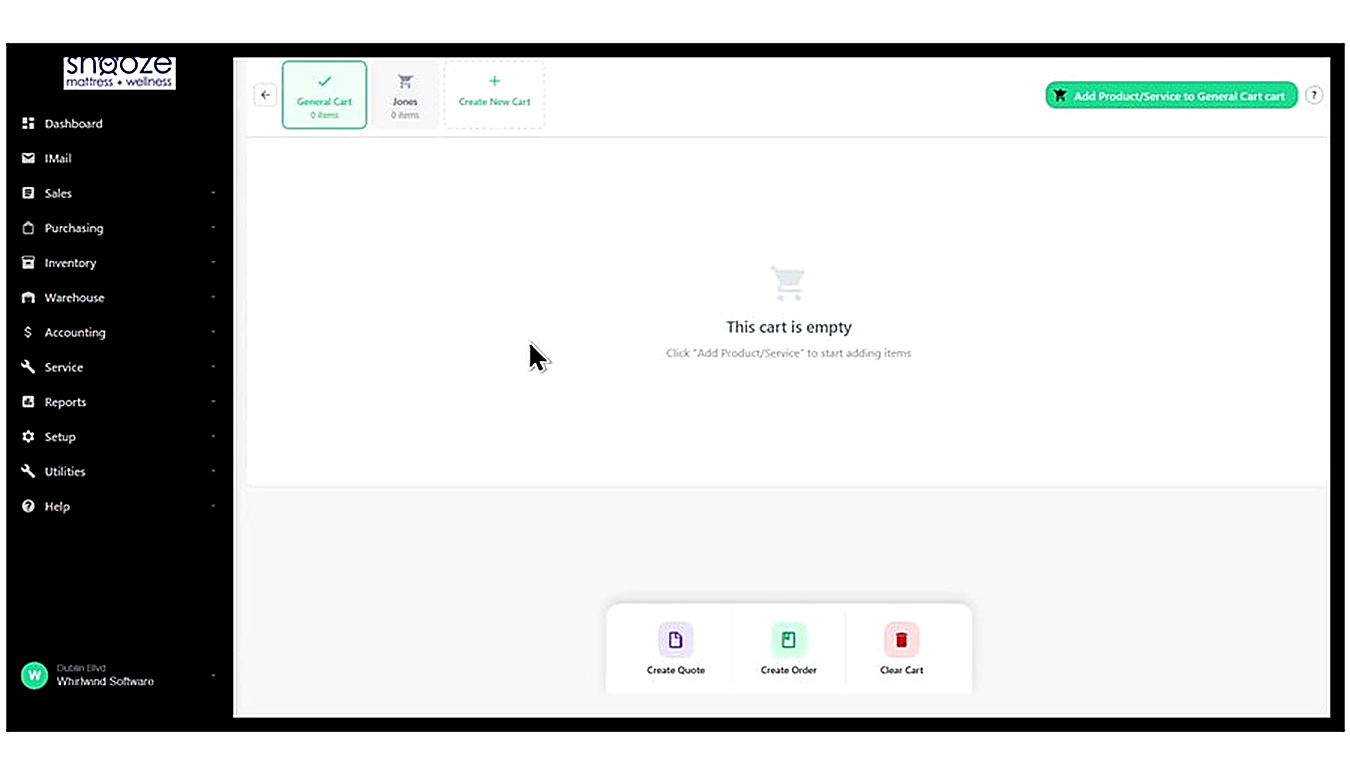
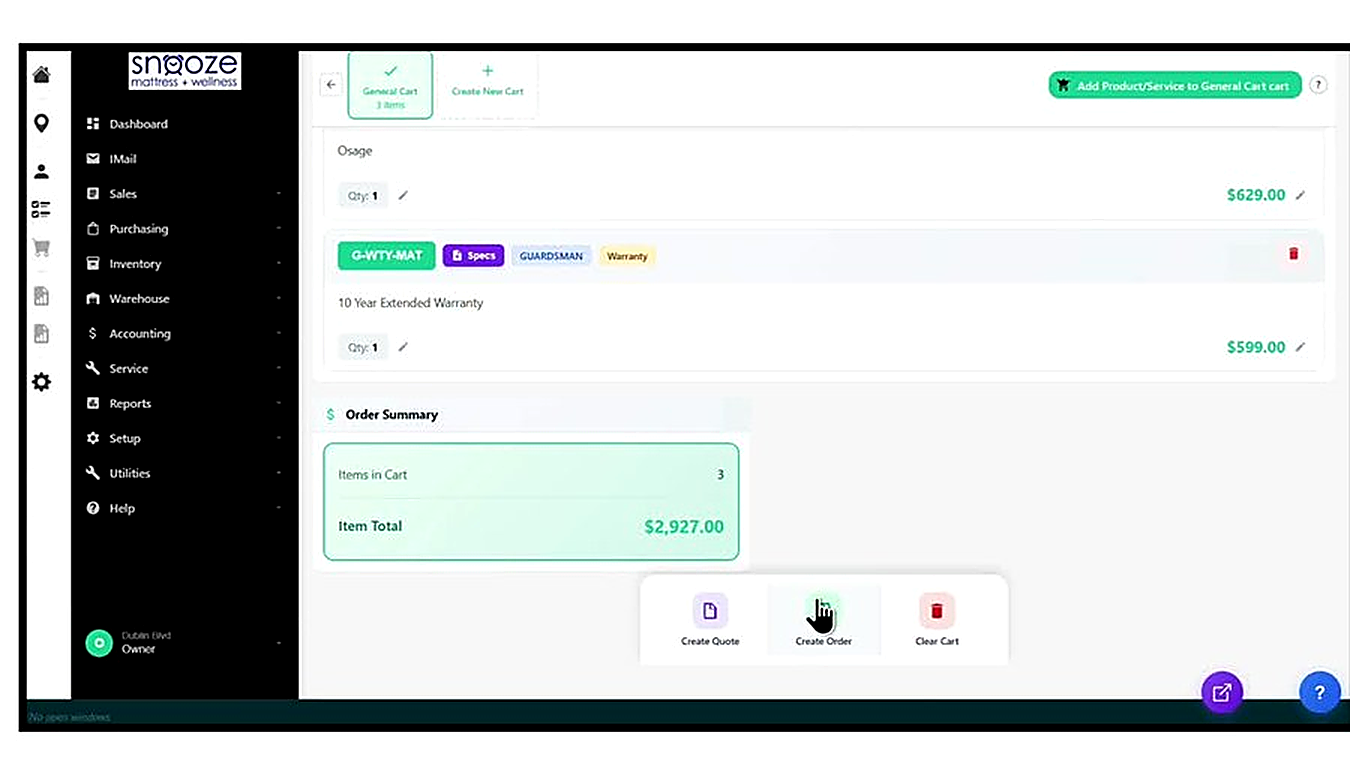
The Shopping Cart screen displays cart tabs along the top — each tab represents a separate open cart (e.g., General Cart, Jones). The currently active cart is highlighted in green. The center shows cart contents, and the bottom bar contains the action buttons: Create Quote, Create Order, and Clear Cart.
Start Adding a Product
Click the green 'Add Product/Service to General Cart' button in the top-right corner of the cart screen. This opens the Search Product/Service Catalog where you can find the item to add.

Use the Search Filters to Find a Product
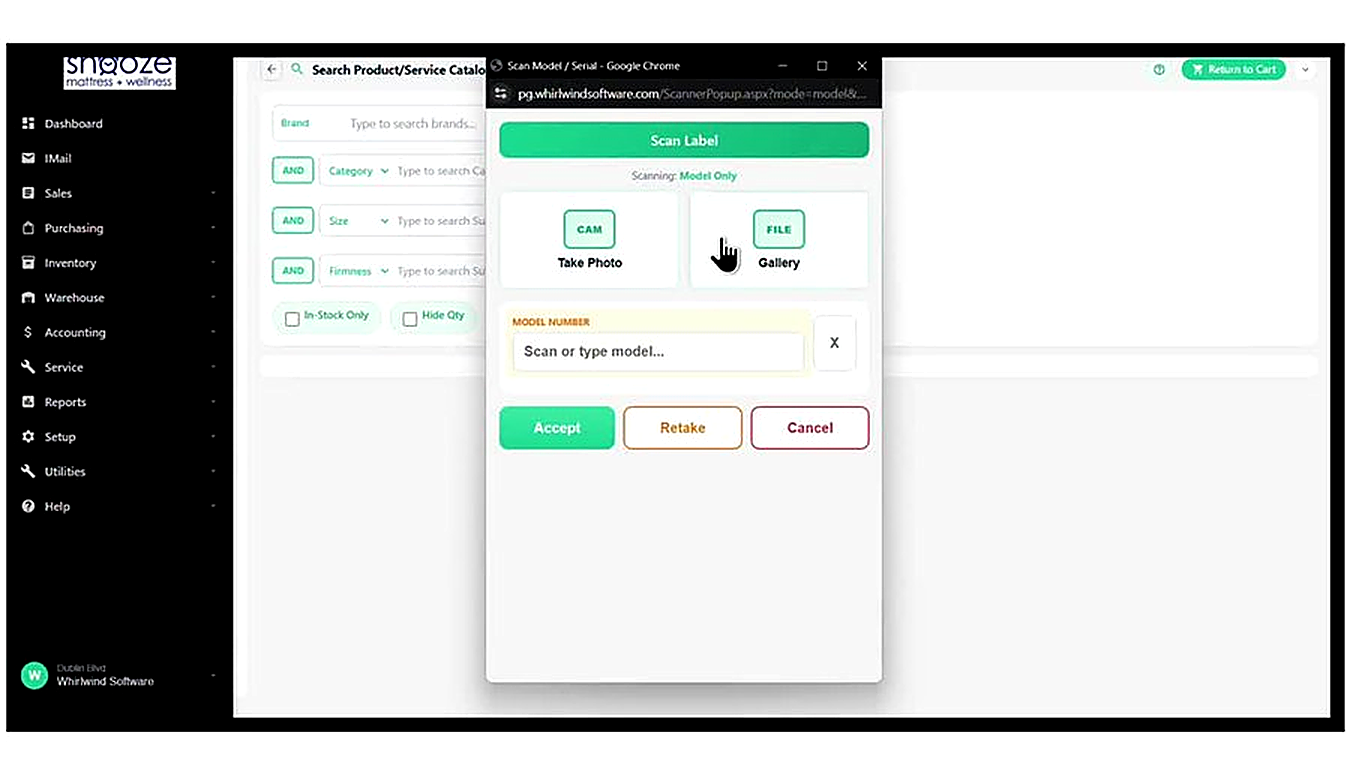
The Search Product/Service Catalog screen appears. Use the filter rows to narrow down your search: type into the Brand field to filter by manufacturer, and use the Category, Size, and Firmness dropdowns to refine further. Click the green 'Search' button to run the search.
Scan a Product Label (Optional)
To quickly look up a product by its barcode or label, click the orange camera icon next to the Brand field. The Scan Label popup opens. Choose 'Take Photo' to use your device camera to scan the barcode, or 'Gallery' to upload a photo of the label. You can also type the model number directly into the Model Number field and click Accept.
Review the Inventory Results
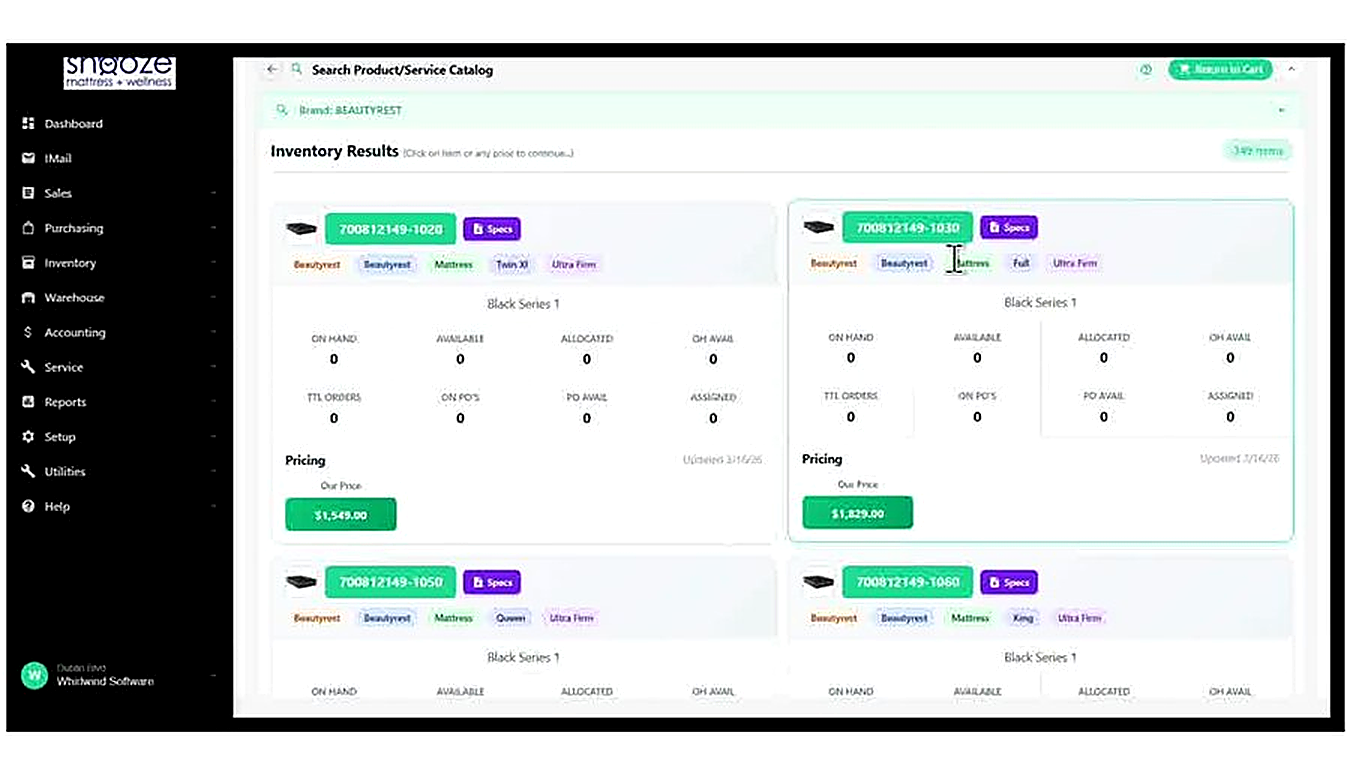
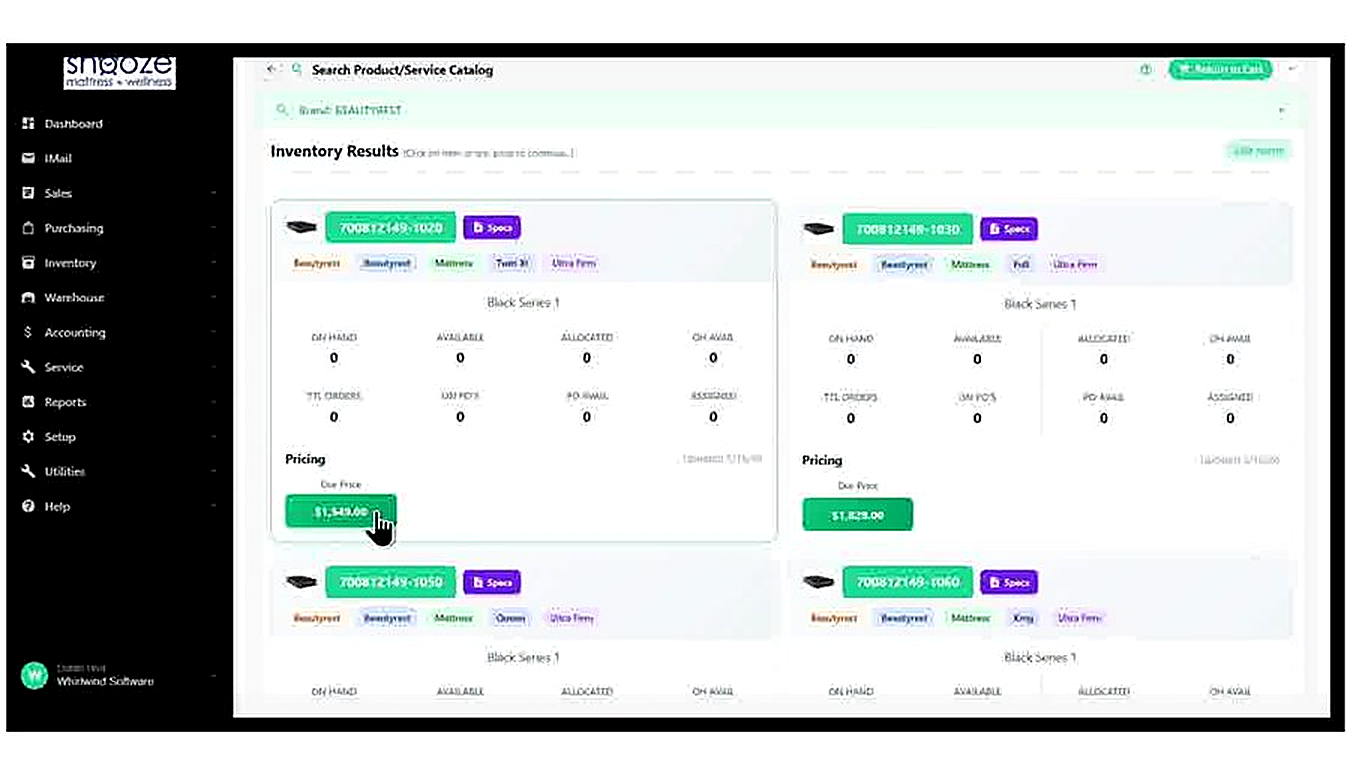
After clicking Search, the Inventory Results section displays matching product cards. Each card shows: the model number (green button), brand and category tags, product name, and a full inventory breakdown — On Hand, Available, Allocated, OH Avail, TTL Orders, On PO's, PO Avail, and Assigned counts. The Our Price is shown as a green button at the bottom of each card.
View Full Product Specifications (Optional)
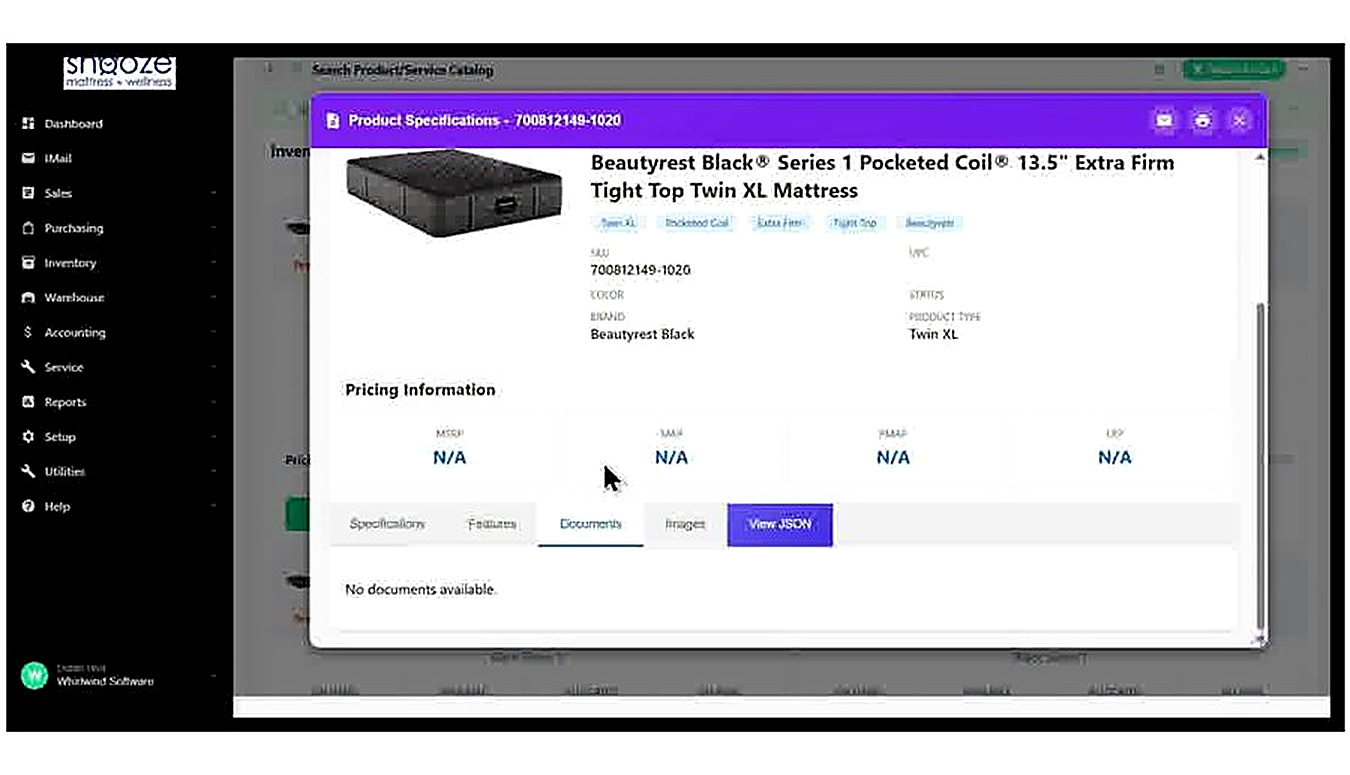
Click the blue 'Specs' button on any product card to open the Product Specifications popup. This shows the full product name, SKU, brand, product type, color, status, and pricing tiers (MSRP, SAM, PMAP, LFP). Use the tabs at the bottom — Specifications, Features, Documents, Images — to explore further product details before presenting to the customer.
Select a Product by Clicking Its Price
To add a product to the cart, click its green 'Our Price' button on the product card. This opens the Product/Service Details screen for that specific item. You can also click anywhere else on the product card row to open the same screen.
Review and Confirm the Product Details
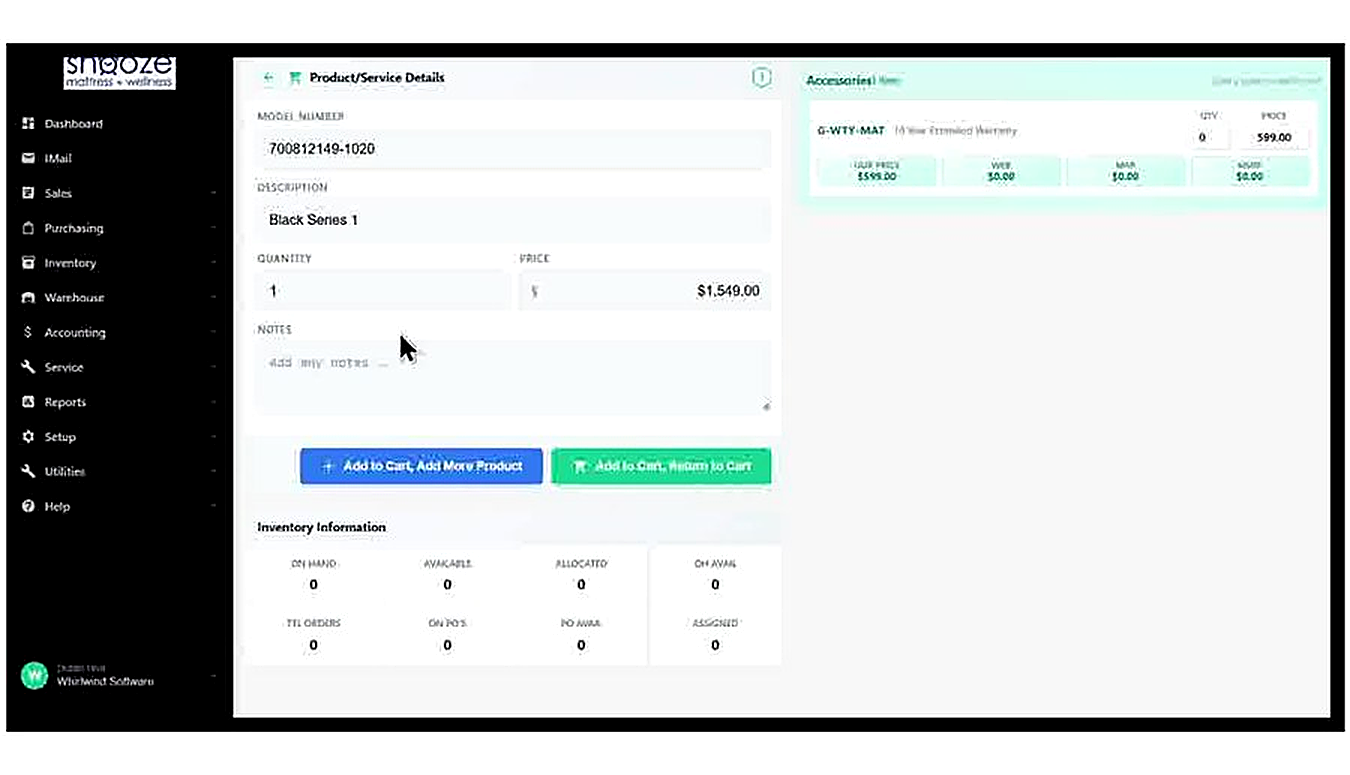
The Product/Service Details screen shows the Model Number and Description (pre-filled from your selection), Quantity (defaulting to 1), Price (pre-filled with Our Price), and a Notes field for any free-text comments. The Inventory Information section at the bottom shows real-time stock counts for this specific model.
Adjust Quantity and Price if Needed
Change the Quantity field to match how many units the customer wants. If the sale price differs from the pre-filled amount, click into the Price field and type the new value. Use the Notes field to add any relevant comments that should appear on the order line.

Review and Add Accessories
The Accessories panel on the right side of the Product/Service Details screen shows recommended add-on products — for example, an extended warranty (G-WTY-MAT) at $599.00. Pricing tiers (Our Price, Web, MAP, MSRP) are shown for each accessory. To add an accessory, set its QTY field to 1 (or the desired quantity) by clicking on a price tier button.
Choose How to Add the Item
At the bottom of the Product/Service Details screen, two green buttons control how the item is added. Click '+ Add to Cart, Add More Product' to add the item and immediately return to the Search Catalog to add another product. Click 'Add to Cart, Return to Cart' to add the item and go back to the main cart view.
Review the Cart Contents
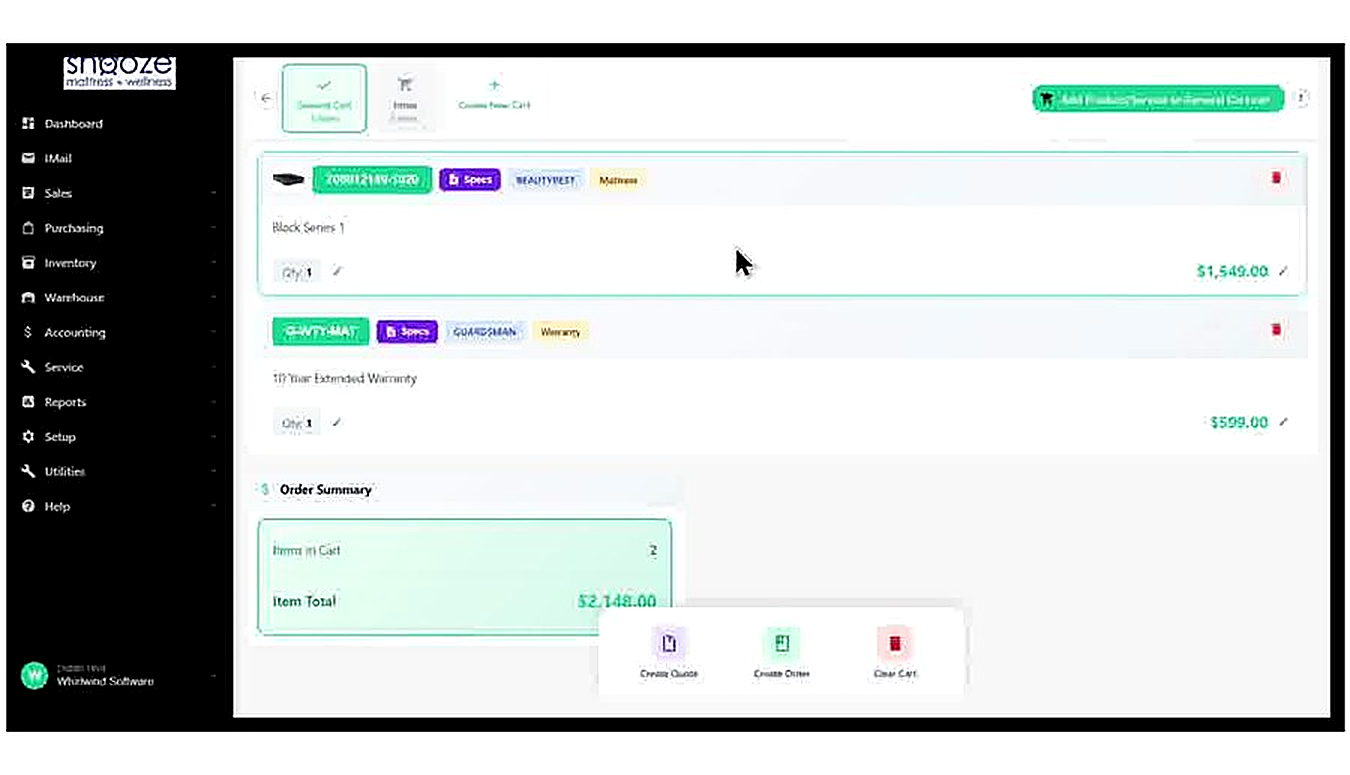
After returning to the cart, all added items are listed with their model numbers, tags, descriptions, quantities, and line prices. Each item has a Specs button for quick reference and a red trash icon to remove it. Review the list with the customer to confirm everything is correct before proceeding.
Review the Order Summary
Below the item list, the Order Summary box shows the total number of items in the cart and the Item Total price. Confirm this with the customer before finalizing. If any changes are needed, make them before proceeding.
Finalize with Create Quote or Create Order
Once the cart is confirmed, use the buttons in the bottom bar to finalize. Click 'Create Quote' to generate a quote document for the customer to review and approve later. Click 'Create Order' to convert the cart directly into a sales order. Click 'Clear Cart' to remove all items and start over if needed.
Creating a Quote from a Shopping Cart
About This Guide
This step-by-step training guide covers how to create a quote from a Shopping Cart in the WhirlWind Portal. You will learn how to select or create a customer, complete the quote form, review the resulting quote document, and send the quote to the customer by email.
- Review a filled Shopping Cart before creating a quote
- Click Create Quote to begin the quote process
- Search for and select an existing customer
- Create a new customer record if needed
- Review and complete the New Quote form (Bill To, Ship To, Order Details)
- Understand the created quote document and its navigation tabs
- Review products, line item pricing, and inventory badges on the quote
- Confirm Order Details fields: Sales Rep, Tax Group, Location, Payment Terms, and Shipping Method
- Review the Order Summary panel showing SubTotal, Sales Tax, and Total
- Set a Target Date and check the Deliveries and Action Log sections
- Email the quote directly to the customer using the Email button
- Compose a personal message and preview the email before sending
- Print the quote using the Print button
- Understand what happens to the cart after a quote is created
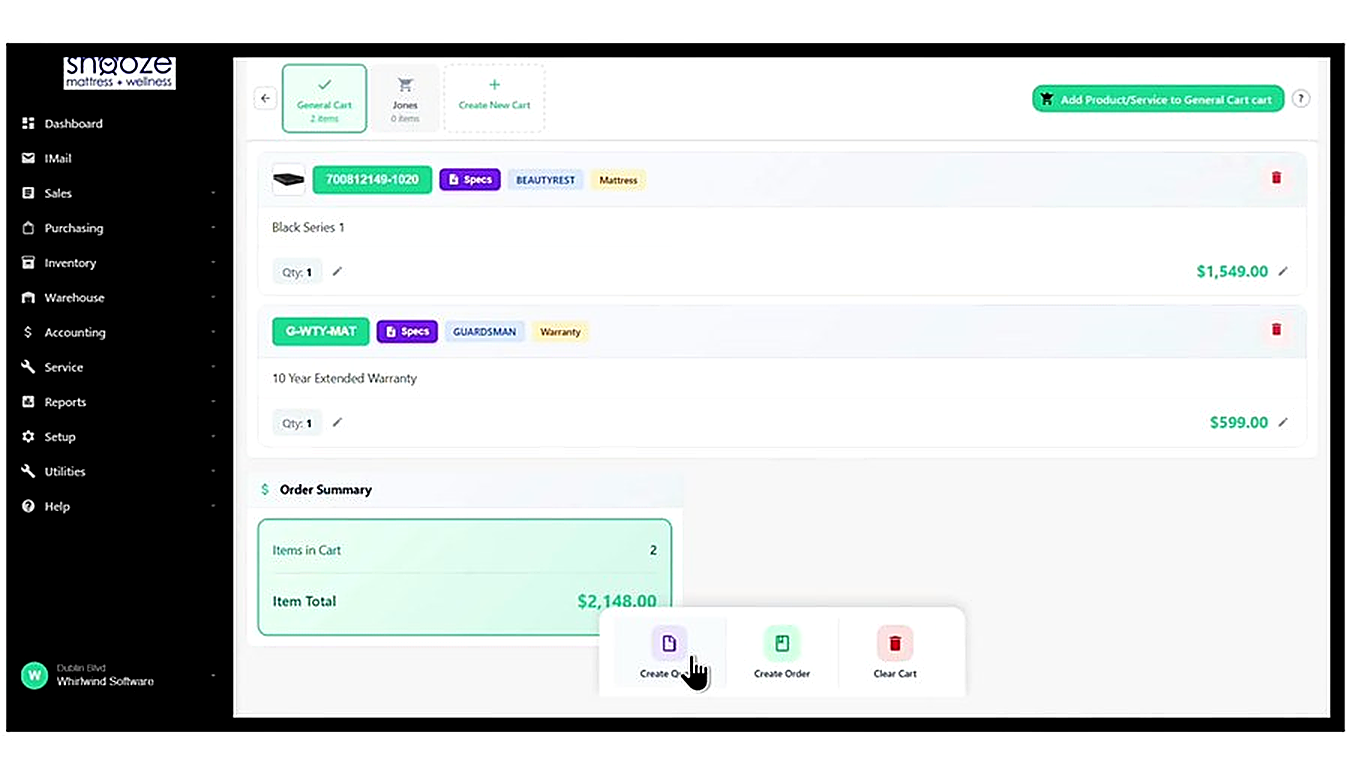
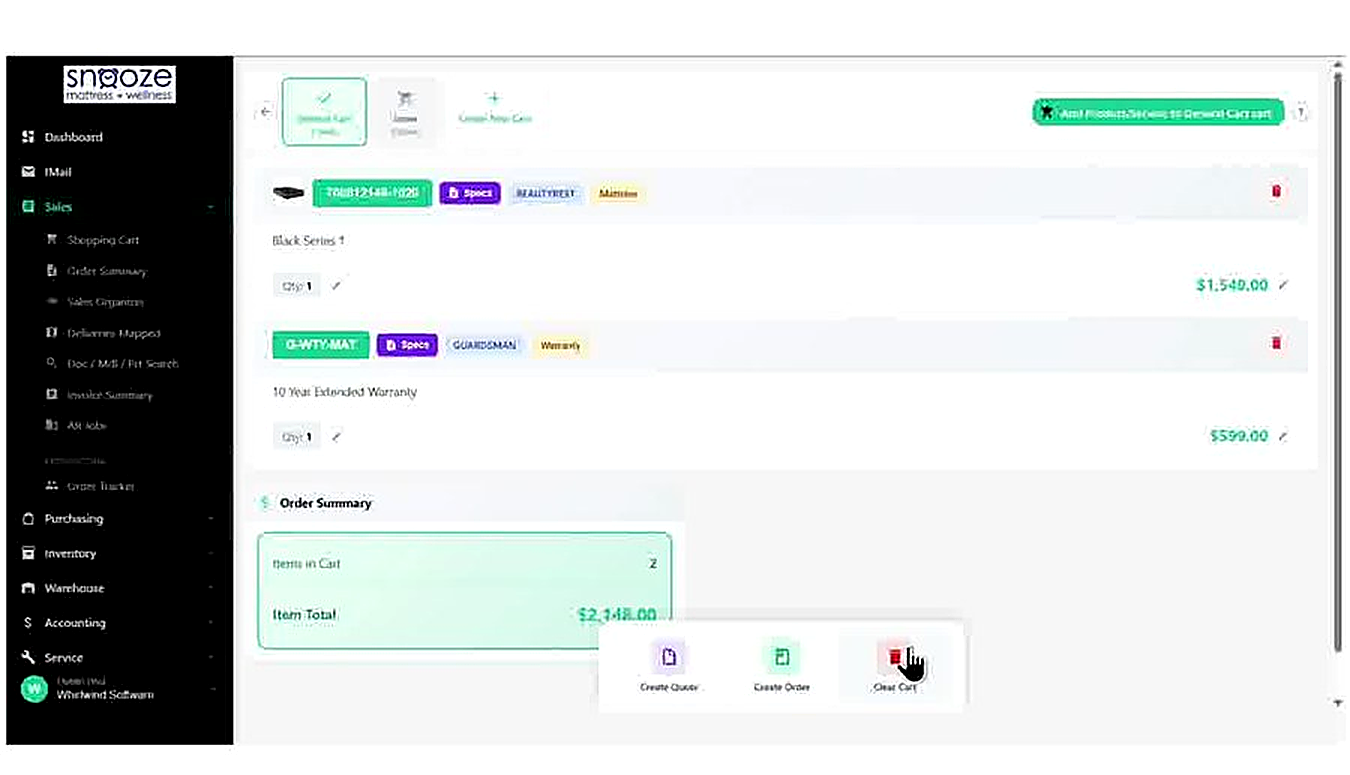
Review the Cart Contents Before Creating a Quote
Before creating a quote, confirm that all the correct items are in the cart with the right quantities and prices. The Order Summary at the bottom shows the Item Total. Use the pencil icon next to any line price to adjust it, and the red trash icon to remove any item.
Click 'Create Quote'
At the bottom of the Shopping Cart screen, click the 'Create Quote' button (document icon with a purple ribbon). This begins the process of converting the cart contents into a formal quote document and opens the Search Customer List screen.
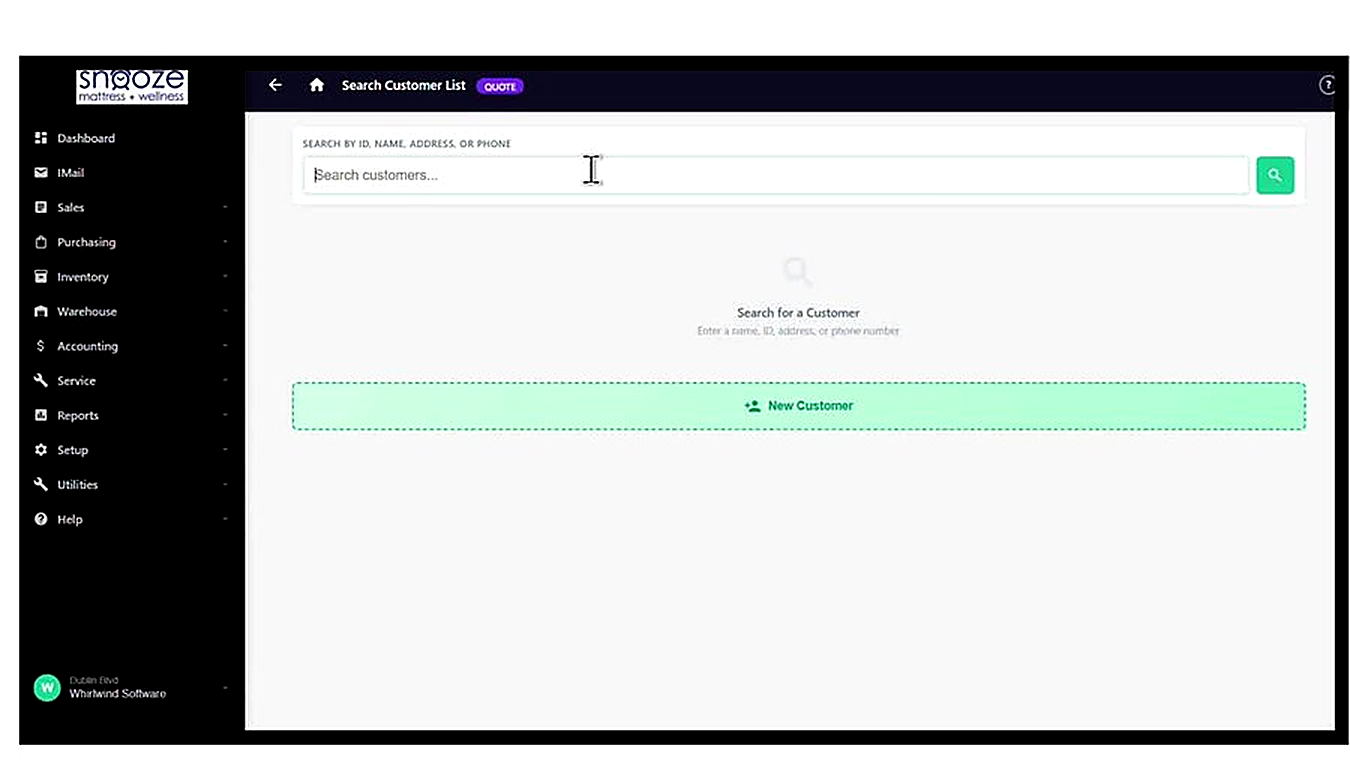
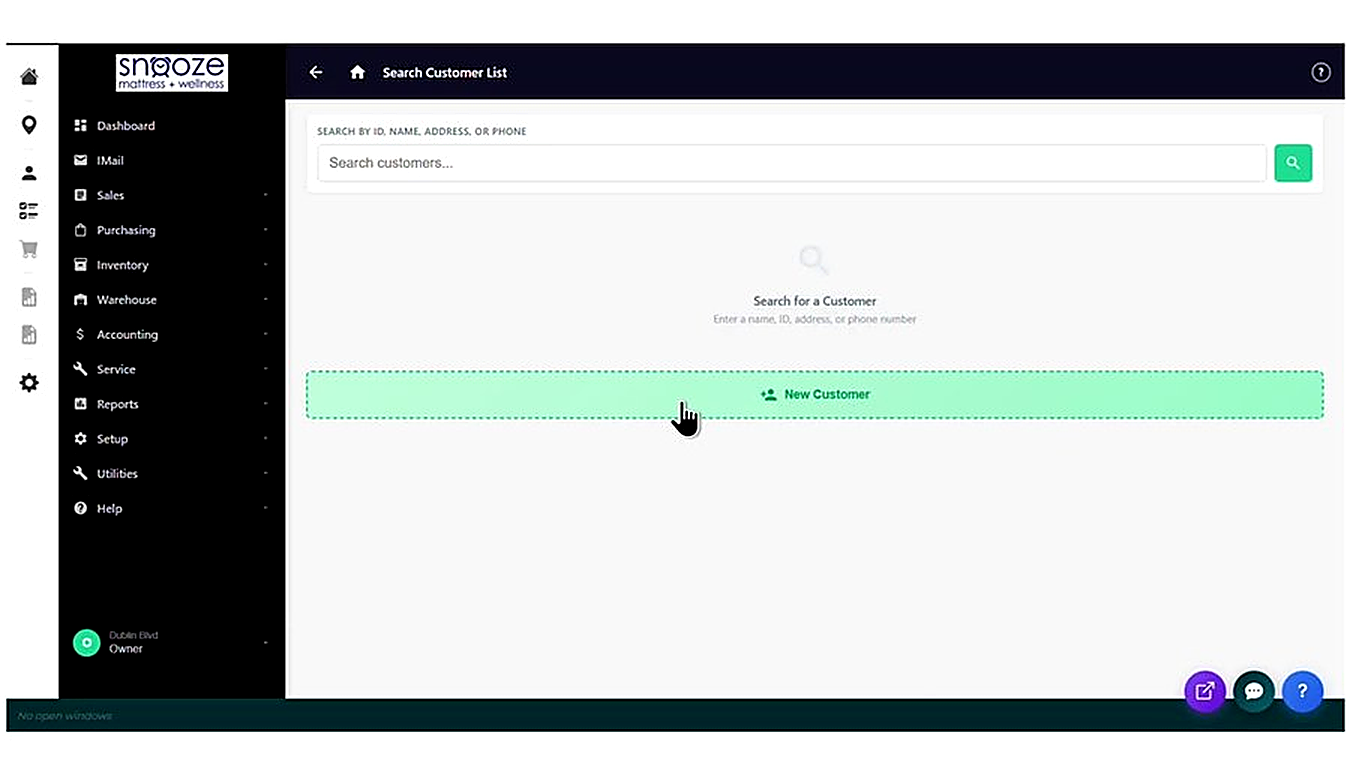
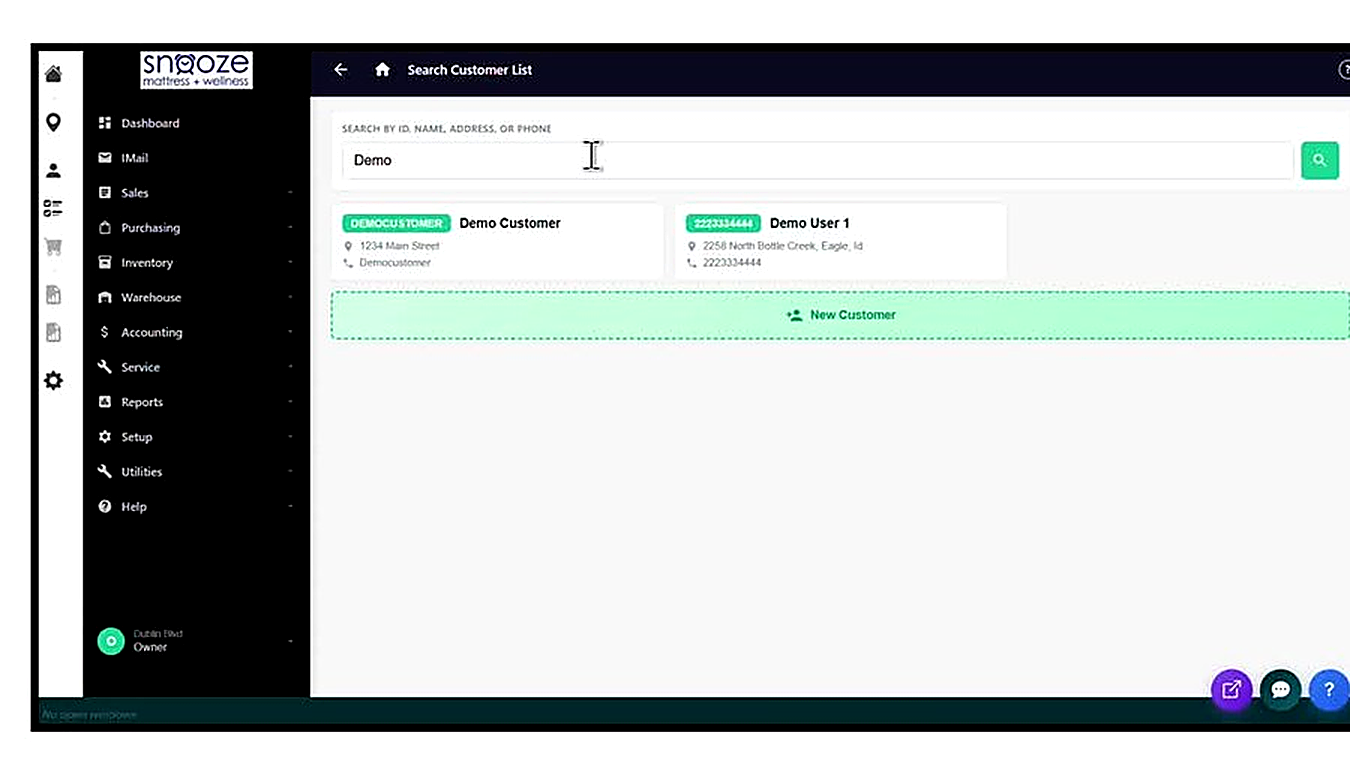
Search for an Existing Customer
The Search Customer List screen opens automatically after clicking Create Quote. Type the customer's name, ID, address, or phone number into the search field and click the green search icon. Results will appear below the search bar as matching customer records.
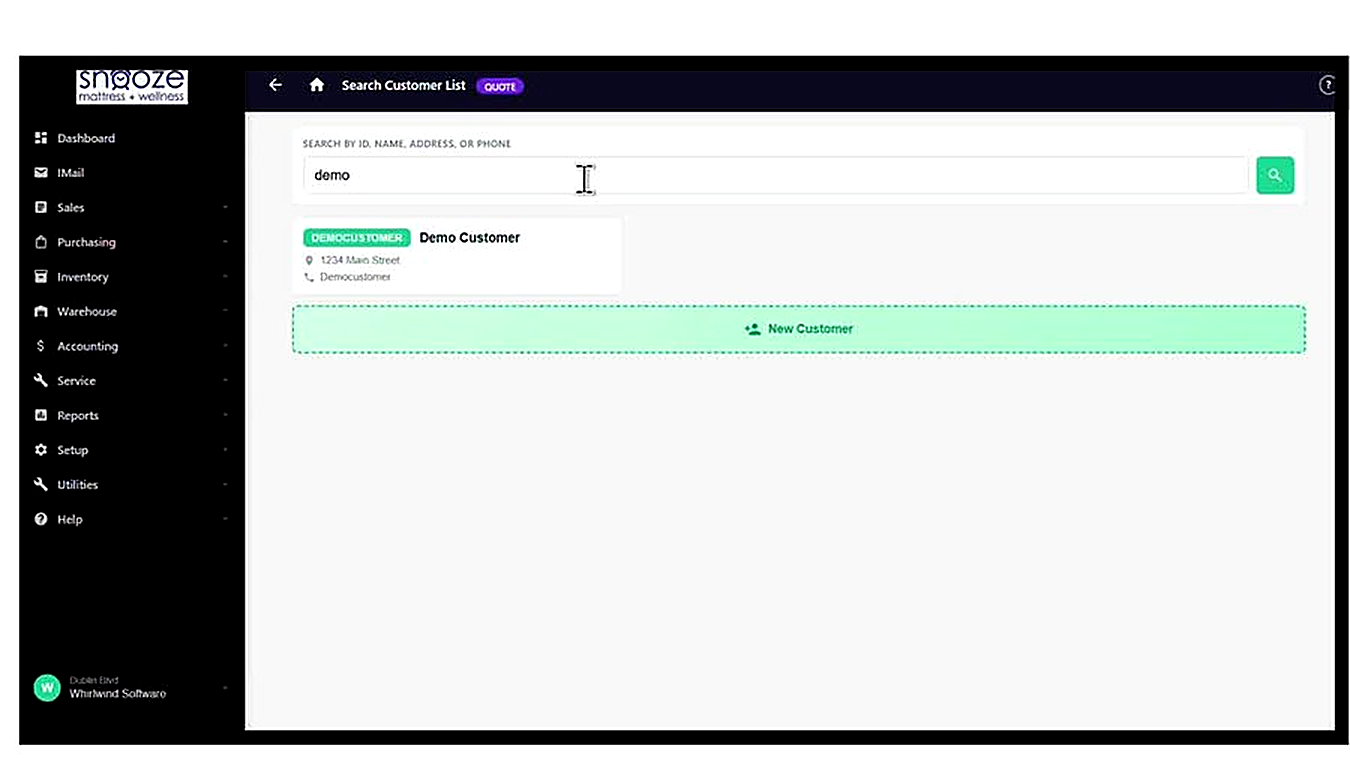
Select the Customer from the Results
Click on the correct customer card in the results list to select them. The system will pre-fill the customer's Bill To and Ship To information on the New Quote form. If no matching customer is found, click the green 'New Customer' button at the bottom to create a new record.
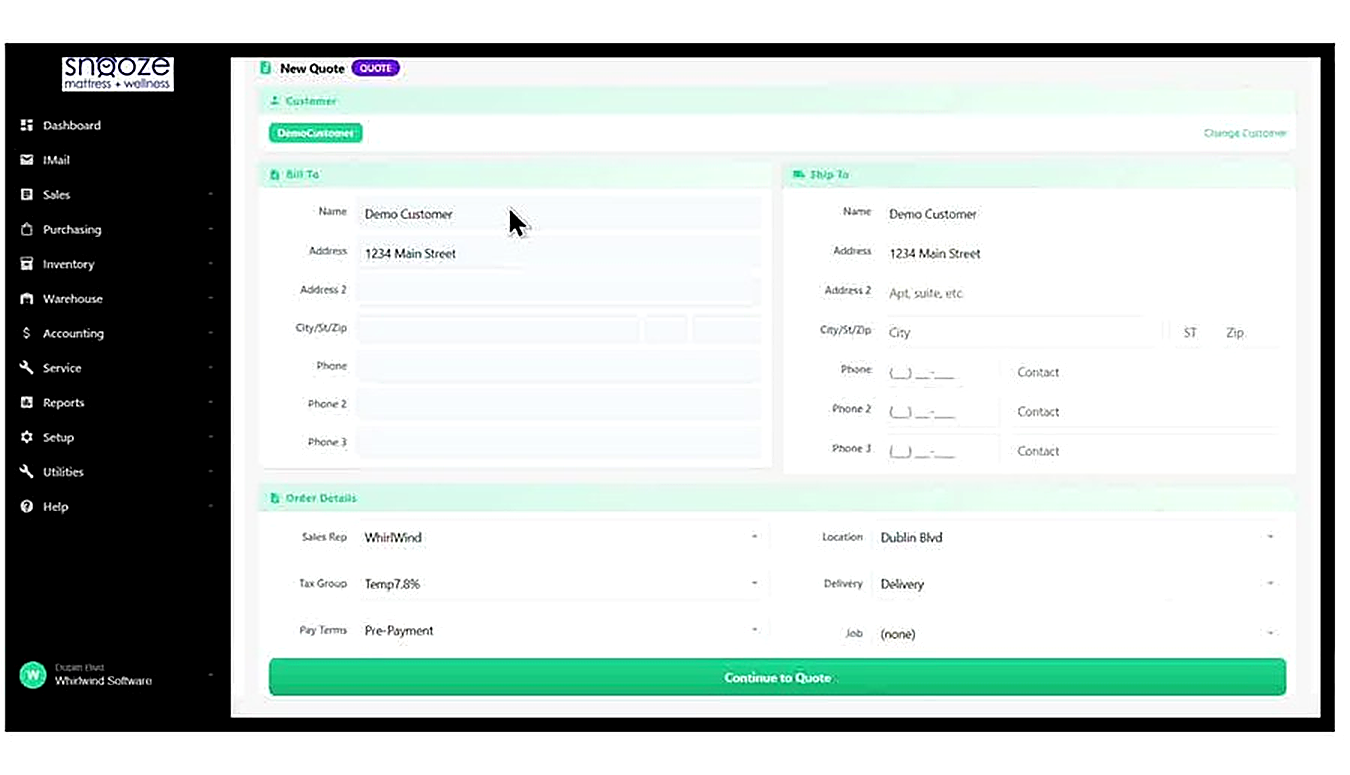
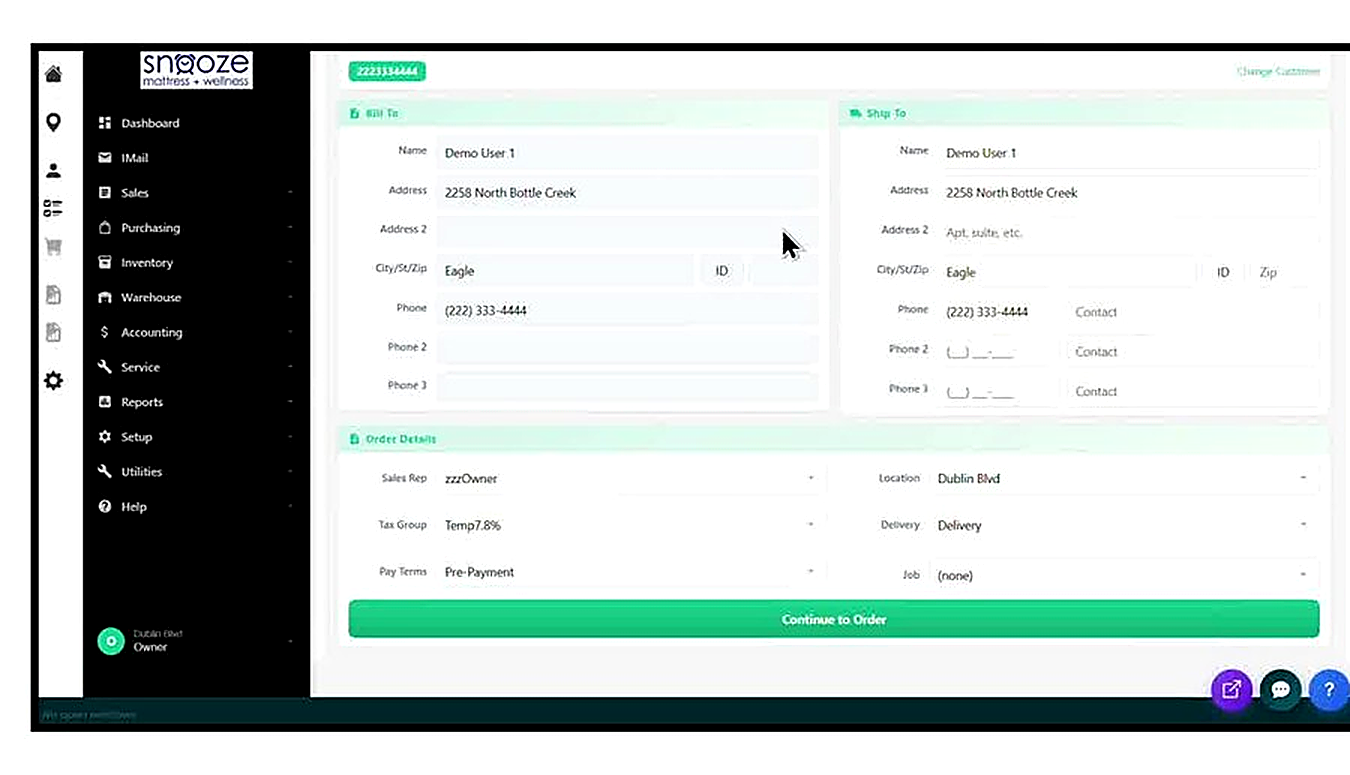
Review the Bill To and Ship To Details
Once a customer is selected, the New Quote form opens showing the customer's Bill To information (name, address, phone numbers) on the left, and the Ship To address on the right. Verify both are correct. If the delivery address differs from the billing address, update the Ship To fields before proceeding.
Review and Set the Order Details
Below the address sections, the Order Details area shows key quote settings: Sales Rep (assigned to you by default), Tax Group, Location (your store), Delivery method, Pay Terms, and Job. Confirm each field is correct before proceeding. Adjust any that need changing using the dropdown menus.
Click 'Continue to Quote'
Once all details are confirmed, click the large green 'Continue to Quote' button at the bottom of the form. The system will process the request — a brief 'Creating Quote...' loading screen will appear — and then open the completed quote document.
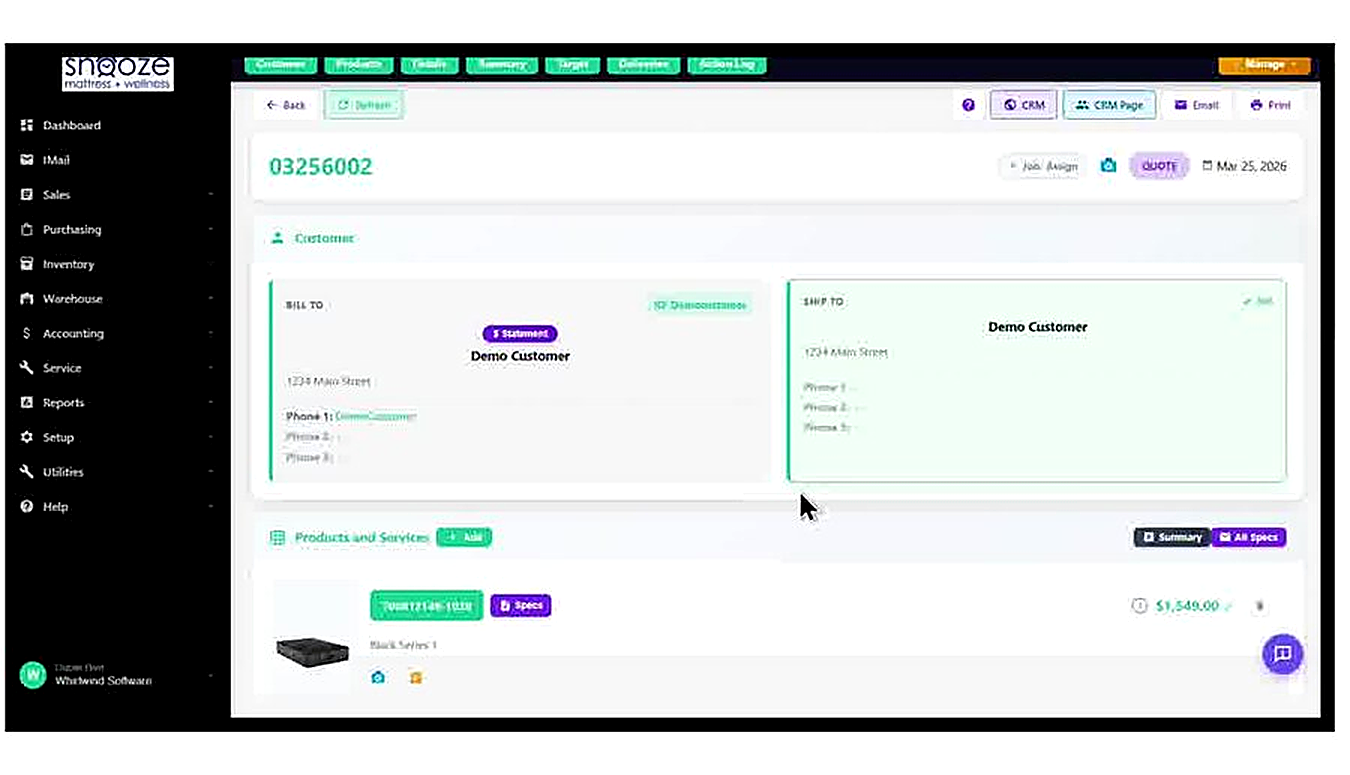
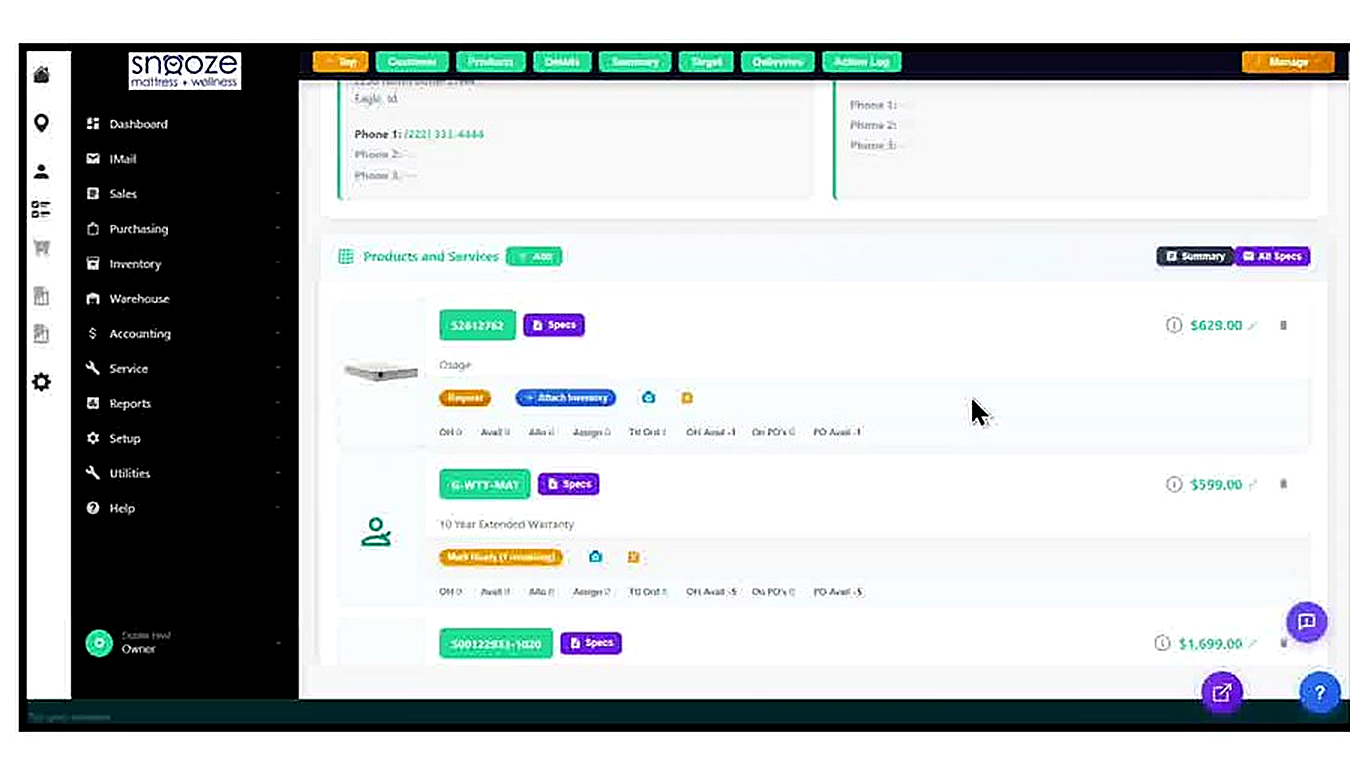
Note the Quote Number and Status
The quote is now created and assigned a unique document number (e.g., 03256002). The purple 'QUOTE' badge appears next to the number, and the date is displayed. This number can be used to look up the quote later via Doc / Mdl / Prt Search. The navigation tabs across the top let you jump to any section of the quote.
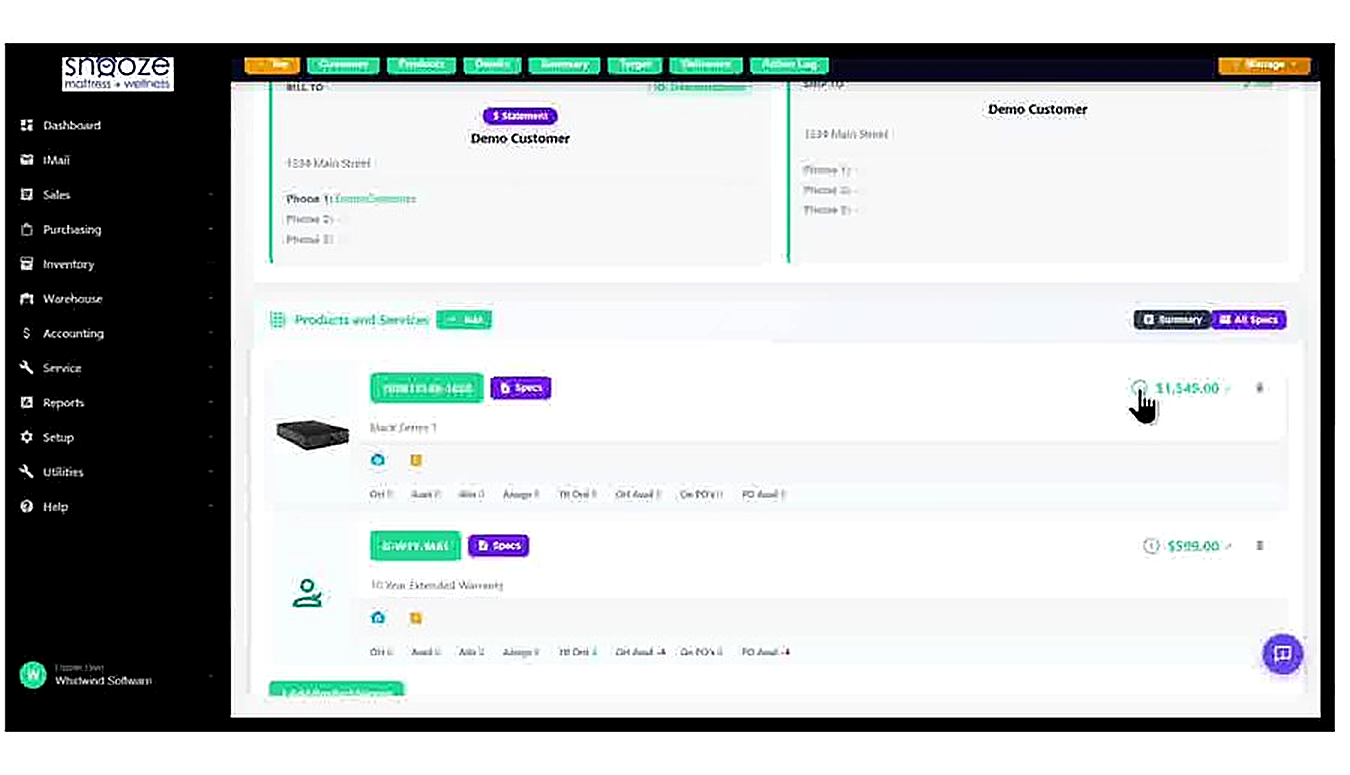
Review the Products and Services Section
Scroll down to the Products and Services section to confirm all items from the cart have carried over correctly. Each line item shows its model number, description, price, and inventory status badges (On Hand, Available, Allocated, etc.). Use the '+ Add' button to add more items, or the trash icon to remove any.
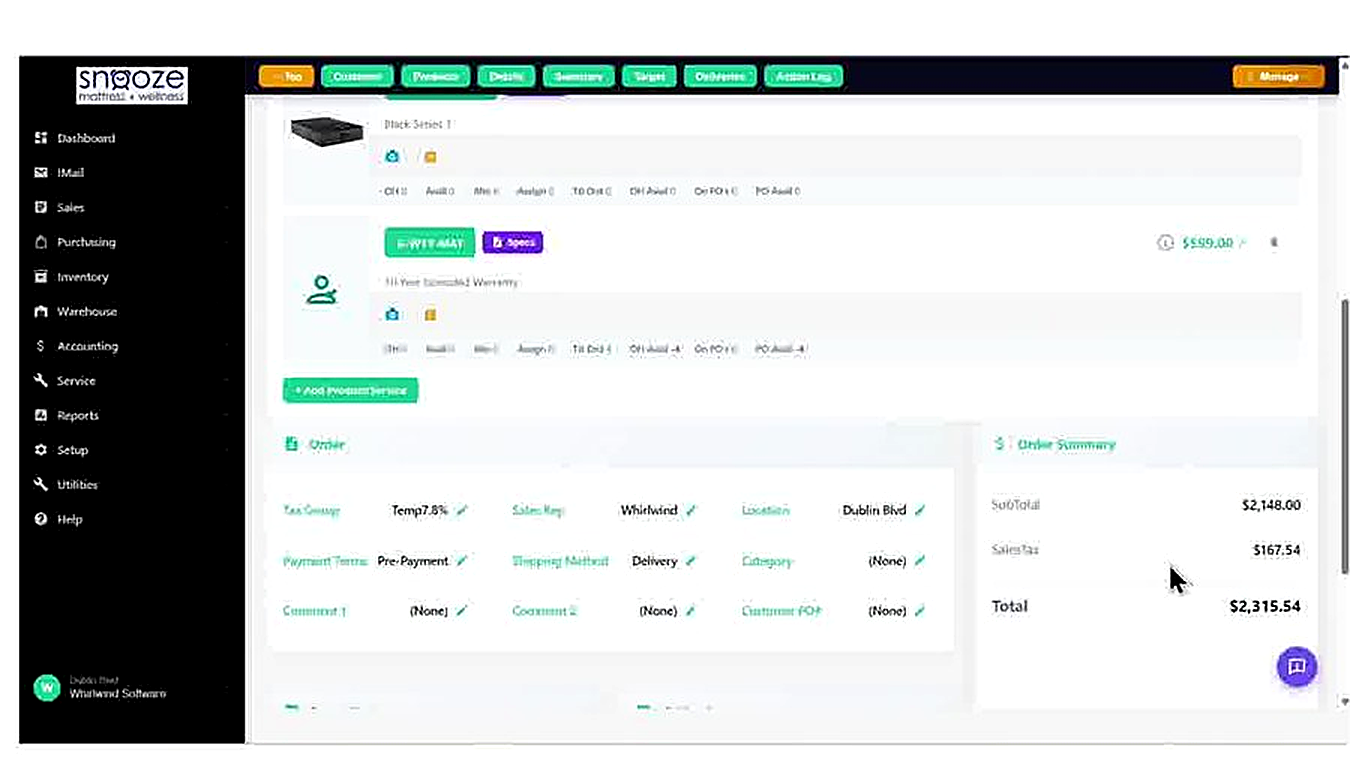
Review the Order Details Fields
Scroll down to the Order section to review all editable fields: Tax Group, Sales Rep, Location, Payment Terms, Shipping Method, Category, Comment 1, Comment 2, and Customer PO#. Click the pencil icon next to any field to edit it directly on the quote. These details will appear on the printed and emailed quote document.
Confirm the Order Summary Totals
The Order Summary panel on the right shows the SubTotal (before tax), SalesTax amount, and the final Total. Confirm these figures are correct before sending the quote to the customer. If pricing needs adjustment, edit the individual line item prices in the Products and Services section above.

Set the Target Date
The Target Date field shows the expected fulfillment date for the quote. Click the pencil icon to edit it. The Reminders section below the date allows automated reminder intervals to be set (e.g., 8, 4, 2, 1 weeks before the target). This helps ensure the quote is followed up before it expires.
Review the Deliveries and Action Log
The Deliveries section shows any scheduled deliveries linked to this quote — at the quote stage this will typically show 'No deliveries scheduled'. The Action Log at the bottom records every system action taken on this document, including when it was created, emailed, or modified. This is useful for auditing and follow-up.
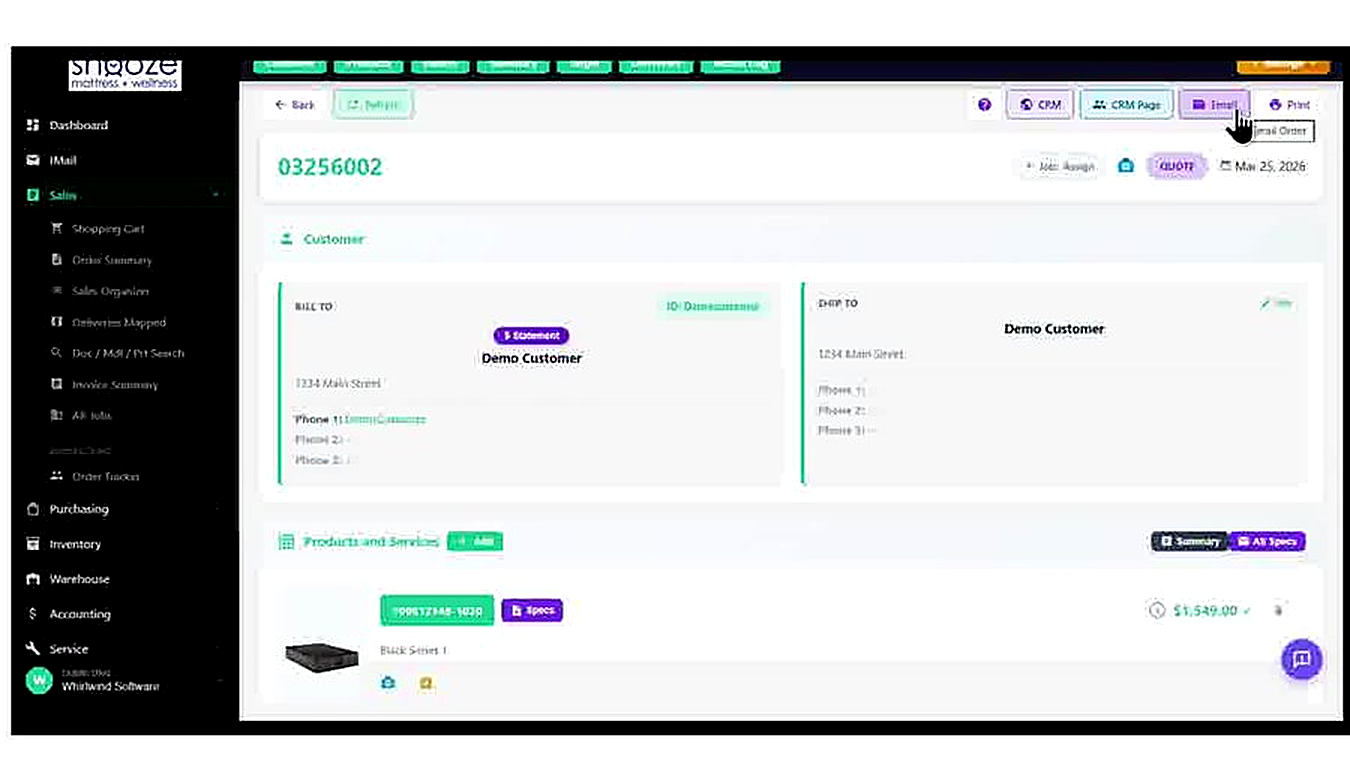
Click the Email Button
At the top of the quote, click the 'Email' button in the toolbar. A dropdown will appear with the option 'Email Order'. Click it to open the Email Order popup.
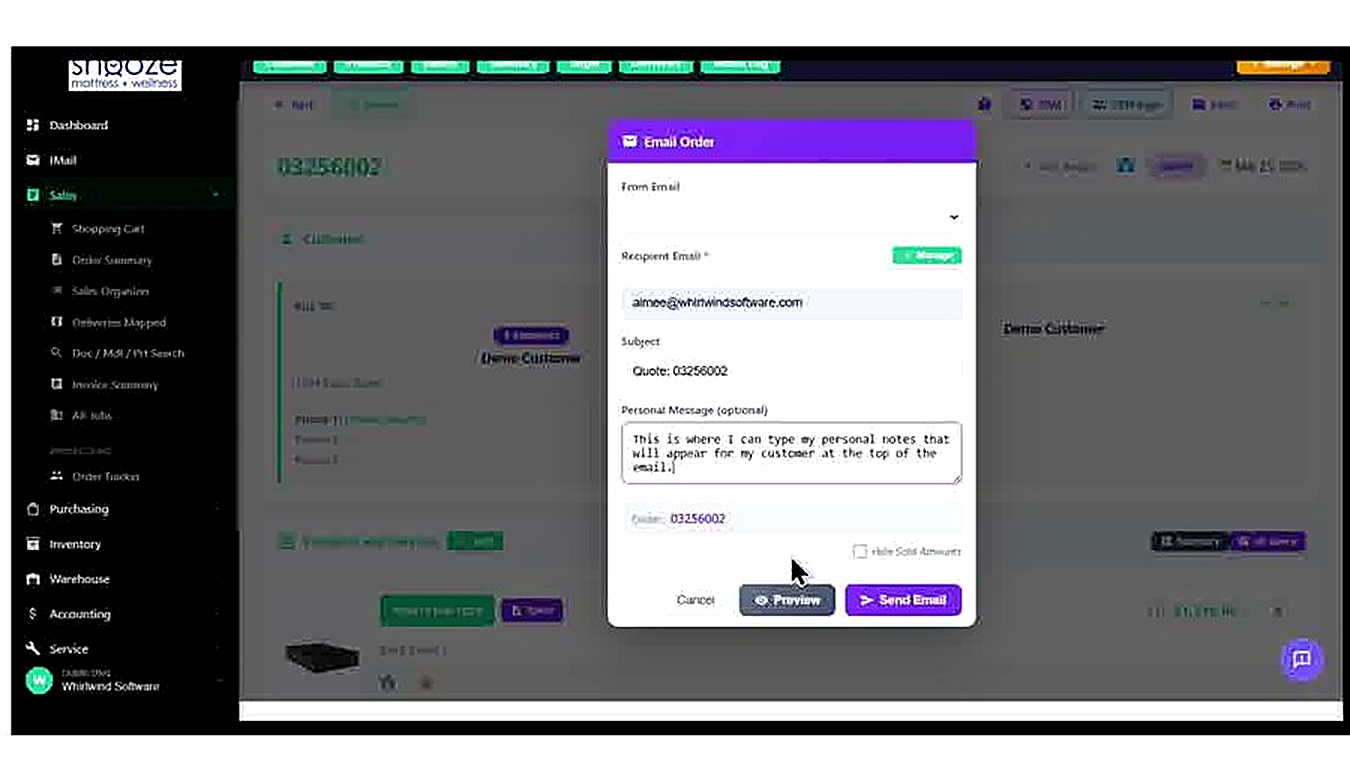
Complete the Email Order Form
The Email Order popup pre-fills the Recipient Email from the customer record and sets the Subject to 'Quote: [quote number]'. Select your store's From Email address from the dropdown. Optionally type a personal message in the Personal Message field — this text will appear at the top of the email the customer receives.
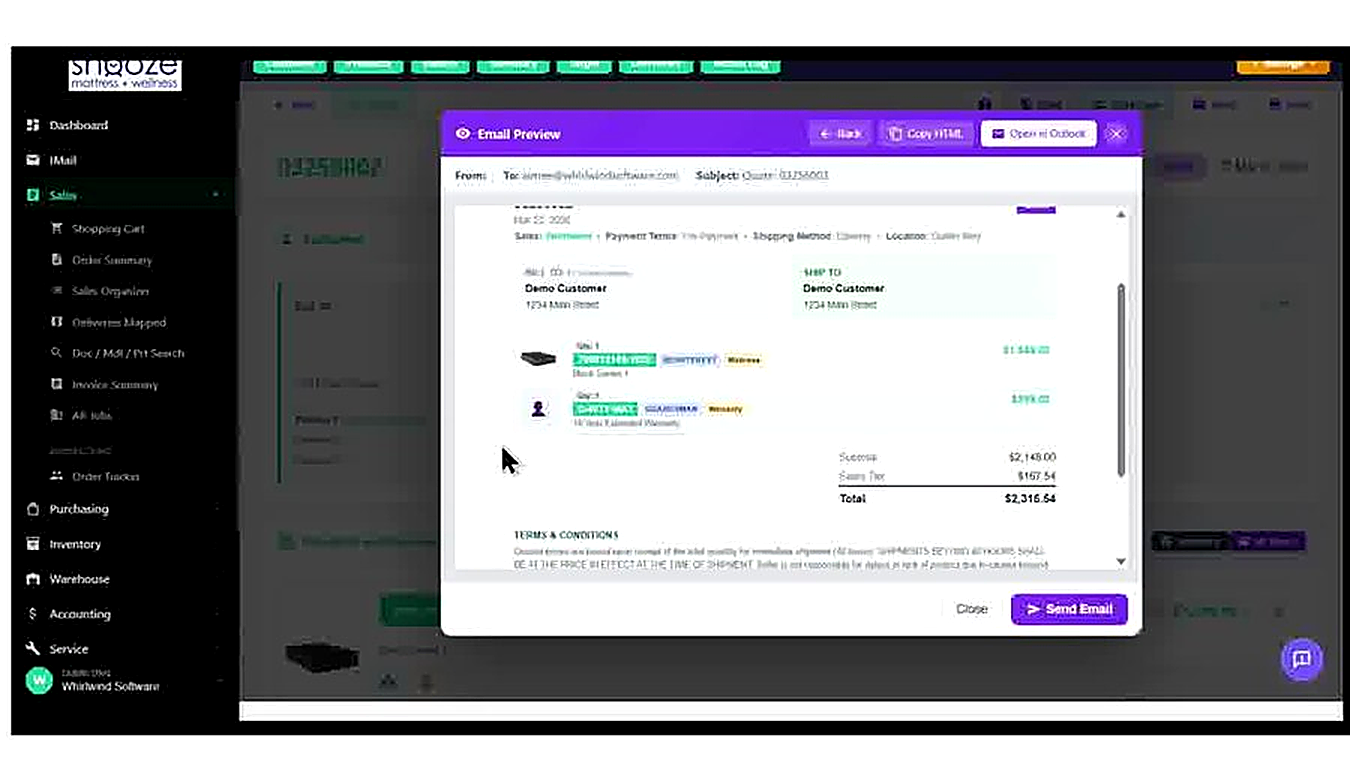
Preview the Email Before Sending
Click the 'Preview' button to open the Email Preview popup. This shows exactly how the email will appear to the customer, including the quote header, customer details, line items with pricing, SubTotal, Sales Tax, Total, and the Terms & Conditions section. You can also use 'Copy HTML' or 'Open in Outlook' from the preview.
Send the Email
After reviewing the preview, click 'Send Email' to send the quote to the customer. A confirmation will appear once the email has been sent. The Action Log on the quote will also record that the email was sent.
Understand What Happens to the Cart
After a quote is created, the items remain in the Shopping Cart — they are not automatically removed. This is by design, allowing you to create additional documents (such as a second quote or a sales order) from the same cart if needed. When you are finished, click 'Clear Cart' to empty the cart, or simply leave it — the cart will not affect any orders or inventory until a sales order is created.
Locate the Quote Later
The created quote can be found at any time by navigating to Sales > Order Summary, or by using the Doc / Mdl / Prt Search tool and entering the quote number. The quote will also appear in the customer's order history. From the quote, you can convert it to a sales order when the customer is ready to proceed by clicking 'Manage' and selecting the appropriate option.
Creating a New Customer
About This Guide
This step-by-step training guide covers how to create a new customer record in the WhirlWind Portal. You will learn how to search for an existing customer to avoid duplicates, enter a new customer's phone number as their ID, fill in their billing and shipping details, and confirm the new customer record when the order is created.
- Access the Search Customer List and the New Order customer search
- Search for a customer by phone number or ID to check for duplicates
- Confirm a customer ID is available before creating a new record
- Use the 'Create New Customer with This ID' option
- Fill in the Bill To section: name, address, city/state/zip, and phone numbers
- Use the city autocomplete feature to speed up address entry
- Add a Contact name alongside each phone number
- Copy the Bill To address to the Ship To section with one click
- Review the Order Details fields (Sales Rep, Location, Tax Group, Delivery)
- Understand the Save Address prompt that appears when the order is created
Always Search First to Avoid Duplicates
Before creating a new customer, always search for them in the Search Customer List screen. Type their name, phone number, or address into the search field and click the search icon. This prevents duplicate customer records in the system. Only proceed to create a new customer if no matching record is found.
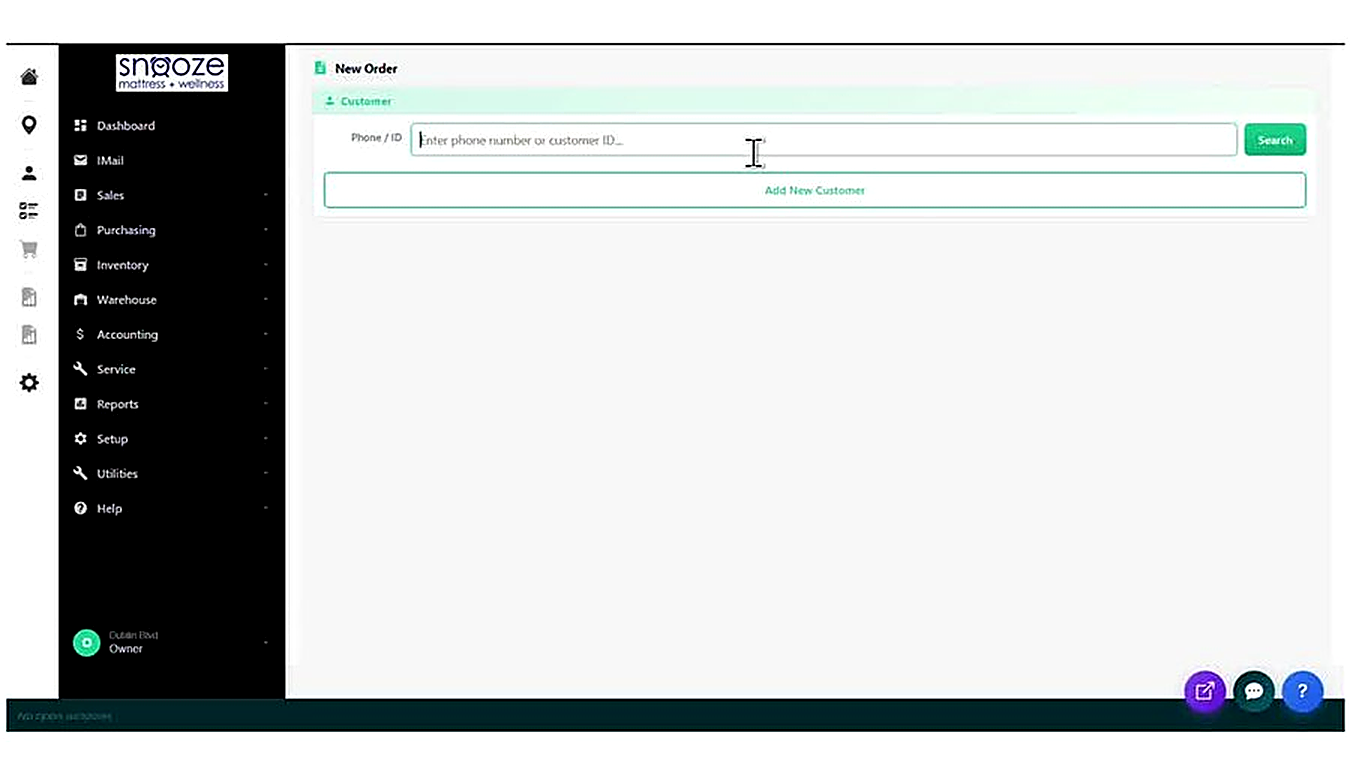
Open the New Order Customer Search
When starting a new order (via the Shopping Cart or Sales > Order Summary), the New Order screen opens with a Customer section at the top. In the Phone / ID field, type the customer's phone number — this will serve as their customer ID in the system. Click 'Search' to check whether this number already exists.
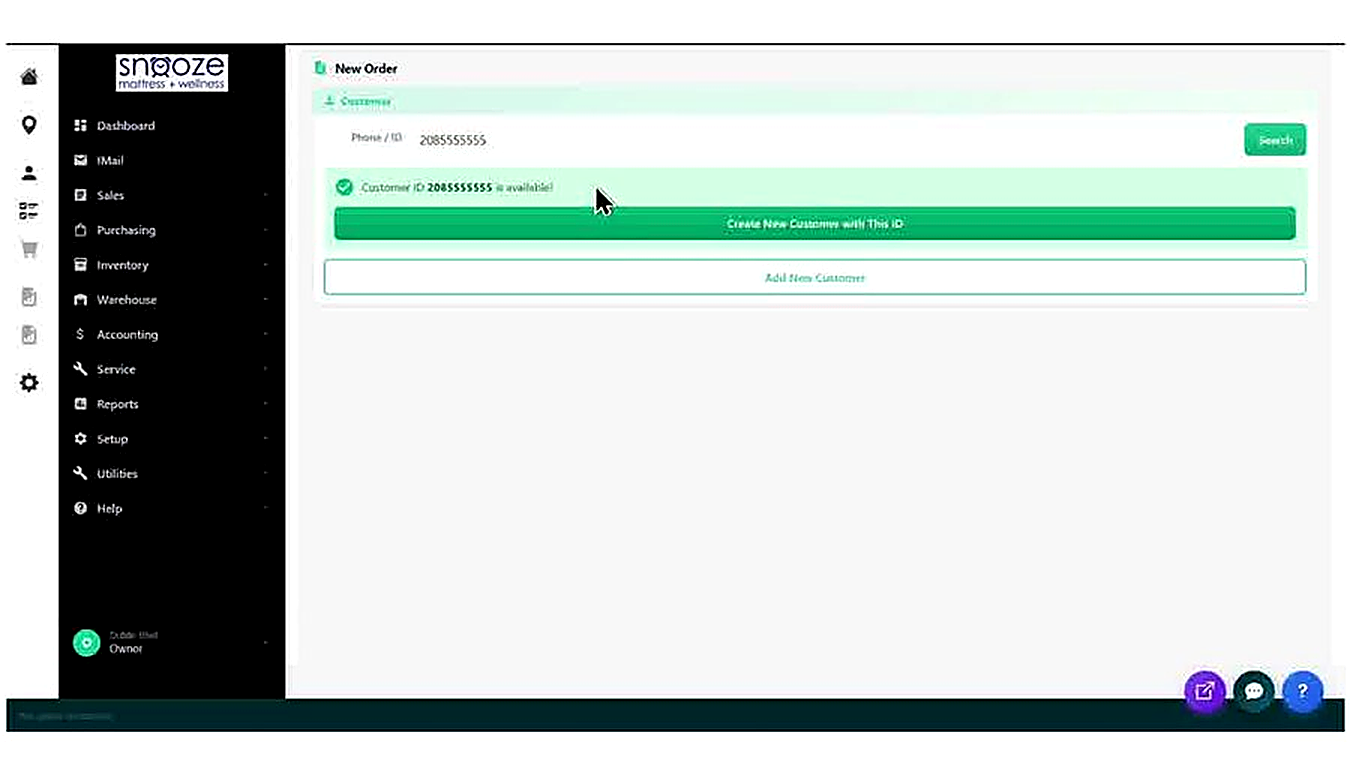
Confirm the ID is Available
After clicking Search, the system checks whether that phone number / ID already exists. If the ID is available, a green confirmation message appears: "Customer ID [number] is available!". A green 'Create New Customer with This ID' button appears below it. Click this button to open the New Order form and begin entering the customer's details.
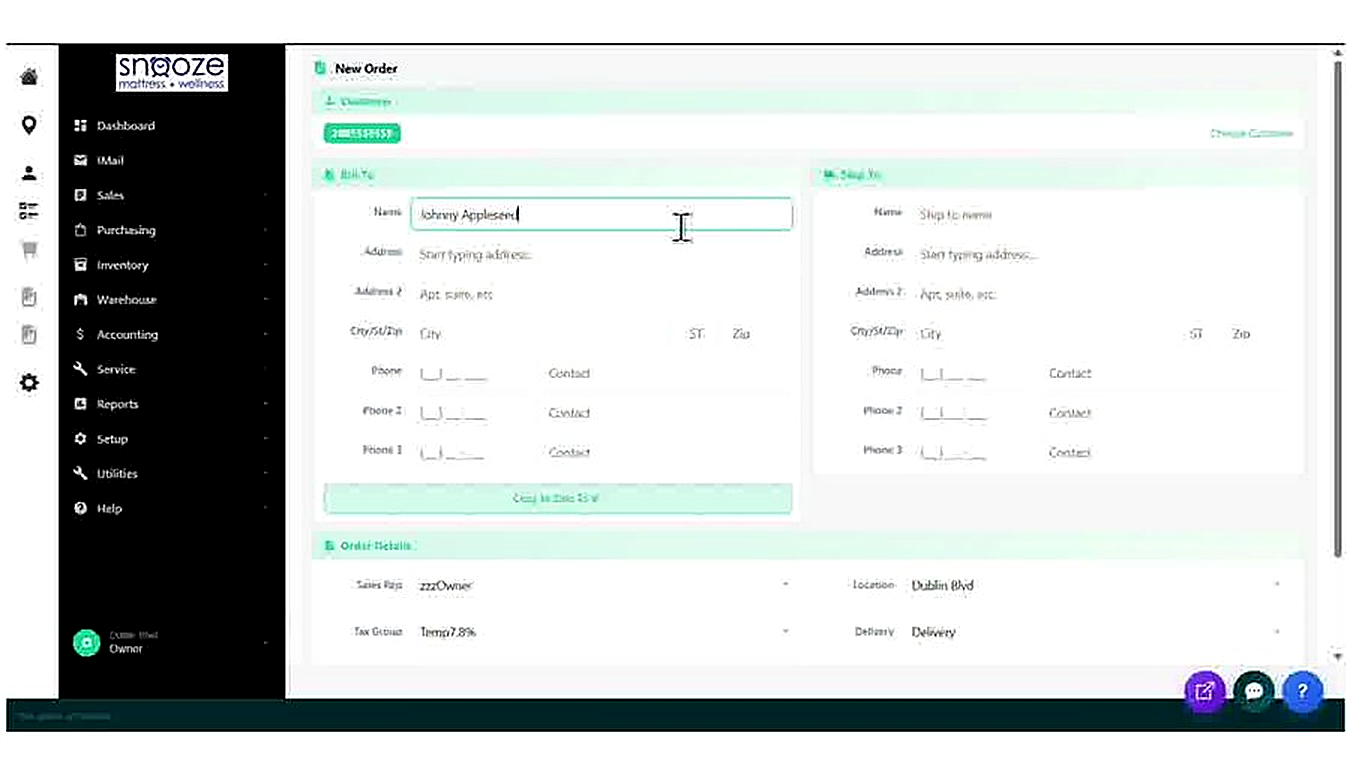
Enter the Customer's Full Name
In the Bill To section on the left side of the form, click into the Name field and type the customer's full name. This is the name that will appear on all quotes, orders, and invoices for this customer.

Enter the Street Address
Click into the Address field and type the customer's street address (e.g., 1234 Apple Lane). If the customer has a unit or suite number, enter it in the Address 2 field below.
Use City Autocomplete to Fill City, State, and Zip
Click into the City/St/Zip field and begin typing the city name. The system will display a dropdown of matching cities with their state and zip code. Select the correct city from the list — this automatically fills the City, State, and Zip fields all at once, saving time and reducing errors.
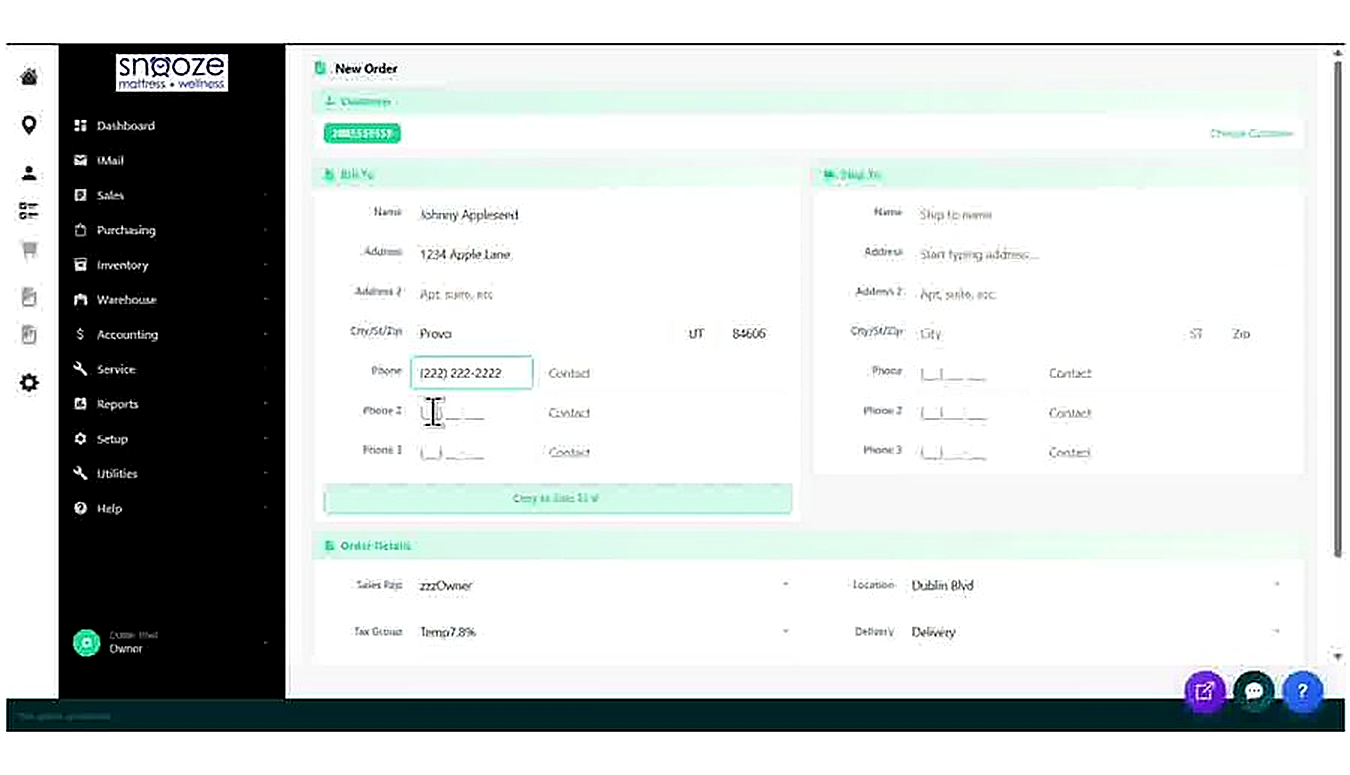
Enter the Phone Number(s)
Click into the Phone field and type the customer's primary phone number. The system formats it automatically as (XXX) XXX-XXXX. Optionally, click into the Contact field next to the phone number and type a contact name (e.g., 'Mobile', 'Home', or the contact person's name). You can add up to three phone numbers using the Phone 2 and Phone 3 fields.

Copy Bill To Details to the Ship To Section
If the delivery address is the same as the billing address, click the green 'Copy to Ship To' button between the two address panels. This instantly copies all Bill To fields — name, address, city, state, zip, and phone numbers — into the Ship To section, eliminating the need to type everything twice.
Update the Ship To Address if Delivery Differs
If the delivery address is different from the billing address, manually fill in the Ship To fields on the right side of the form: Name, Address, City/St/Zip, and Phone. This is common when a customer is buying a mattress for delivery to a new home before they have moved in.
Review the Order Details Section
Below the Bill To and Ship To panels, the Order Details section shows: Sales Rep (assigned to the logged-in user by default), Location (your store), Tax Group (pre-set), and Delivery method. Confirm these are correct. If the Sales Rep needs to be changed, use the dropdown to select the correct rep.

Proceed to the Order and Dismiss the Save Address Prompt
Once all details are complete, scroll down and click the green 'Continue to Order' (or 'Continue to Quote') button at the bottom of the form. The system creates the new customer record and opens the order or quote document. A browser prompt may appear asking to 'Save address?' — click 'No thanks' to dismiss it, as customer addresses are already saved within WhirlWind.
Verify the Customer Record is Created
After the order opens, confirm the customer's details appear correctly in the Bill To panel: their name, customer ID tag, address, and phone number. The customer record is now saved in WhirlWind and can be found via the Search Customer List in future visits by searching their name or phone number.
Creating an Order & Requesting Product
About This Guide
This step-by-step training guide covers how to create a Sales Order from a Shopping Cart in the WhirlWind Portal and how to manage line items that are out of stock. You will learn how to convert a cart to an order, understand item status badges, request product from the warehouse, and mark items as ready to invoice.
- Review a filled Shopping Cart and click Create Order
- Search for and select a customer to attach to the order
- Confirm the New Order form details and continue to the order
- Understand the created order document: order number, ORDER badge, and navigation tabs
- Read item status badges: Request, Attach Inventory, Mark Ready, and Ready to Invoice
- Use the orange 'Request' button to request out-of-stock product from the warehouse
- Complete the Request Information popup: comments for order personnel and location
- Understand the 'ON REQUEST' badge that appears after a request is submitted
- Use 'Attach Inventory' to link physical inventory to a line item
- Use 'Mark Ready to Invoice' to flag an item as received and ready to process
Review the Cart Contents
Before creating an order, confirm all items, quantities, and prices in the cart are correct. The Order Summary at the bottom shows the Item Total. Use the pencil icon to adjust any price, or the red trash icon to remove a line item. When satisfied, proceed to create the order.
Click 'Create Order'
At the bottom of the Shopping Cart screen, click the 'Create Order' button (green document icon). This opens the Search Customer List where you will search for and attach a customer to the order.
Search for the Customer
Type the customer's name, phone number, or ID into the Search Customer List field and click the search icon. Results appear as customer cards below the search bar. If multiple customers match, identify the correct one by comparing the address and phone number shown on the card.
Review the New Order Form and Continue
After selecting the customer, the New Order form opens with their Bill To and Ship To details pre-filled. Review the Order Details section: confirm the correct Sales Rep, Location, Tax Group, Delivery method, and Pay Terms are set. Adjust any fields as needed using the dropdowns, then click the green 'Continue to Order' button.

Note the Order Number and Status Badge
The order is now created and assigned a unique document number (e.g., 03256004). The green 'ORDER' badge appears next to the number, distinguishing it from a Quote. Record this number — it can be used to locate the order via Doc / Mdl / Prt Search at any time.
Understand the Line Item Status Buttons
After an order is created, each product line shows action buttons based on its current inventory status. Three key buttons may appear: orange 'Request' — the item is out of stock and needs to be requested from the warehouse or purchasing team; teal 'Attach Inventory' — allows a specific serial or unit to be linked to this line; orange 'Mark Ready' — the item is a non-inventory or service item that needs to be flagged as ready to invoice.
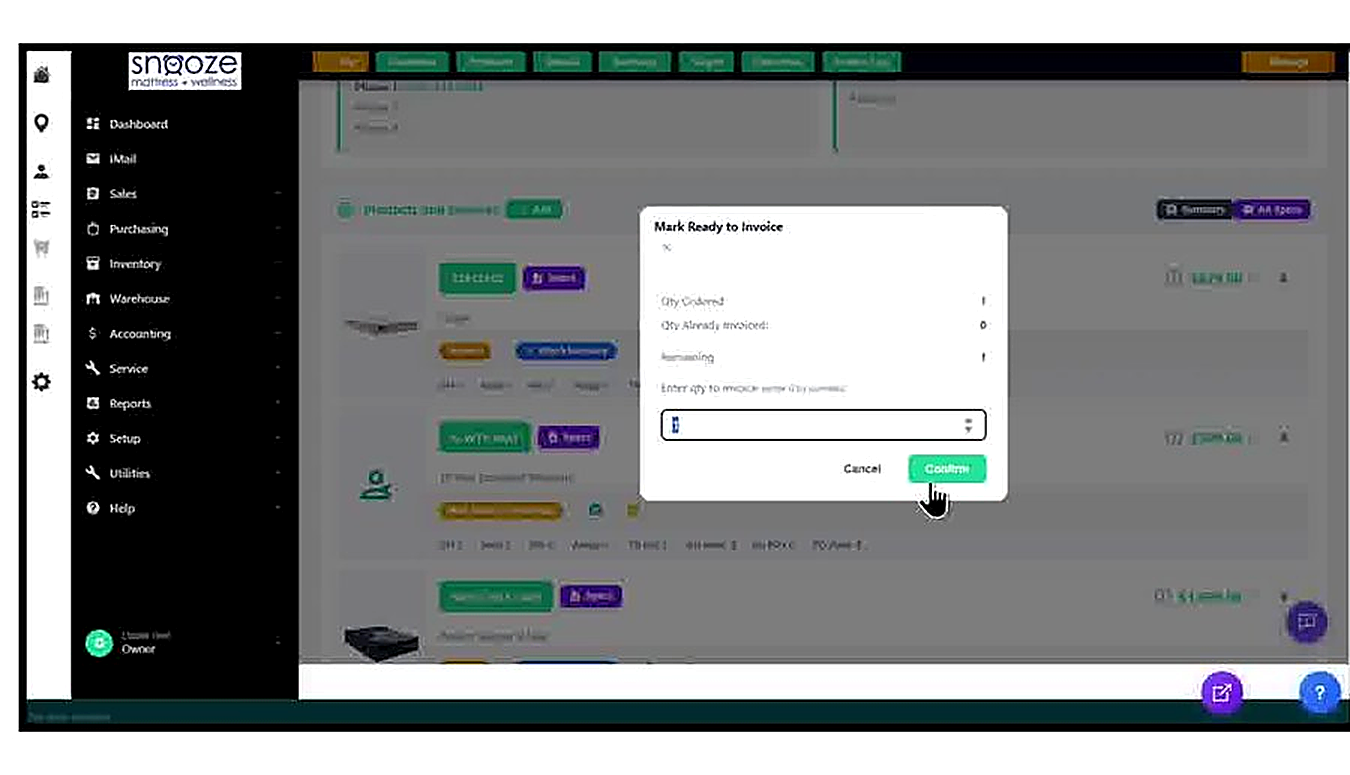
Click 'Mark Ready' on Applicable Items
For items like warranties or services that do not require physical inventory assignment, click the orange 'Mark Ready' button on the line item. The Mark Ready to Invoice popup opens, showing the quantity ordered, already invoiced, and remaining. Confirm the quantity in the entry field and click 'Confirm'.

Confirm the Ready to Invoice Badge
After clicking Confirm, the line item badge updates to green 'Ready to Invoice (1)' — showing how many units have been marked ready. This item is now flagged for billing. Other lines that still require stock fulfillment will continue to show the Request and Attach Inventory buttons.
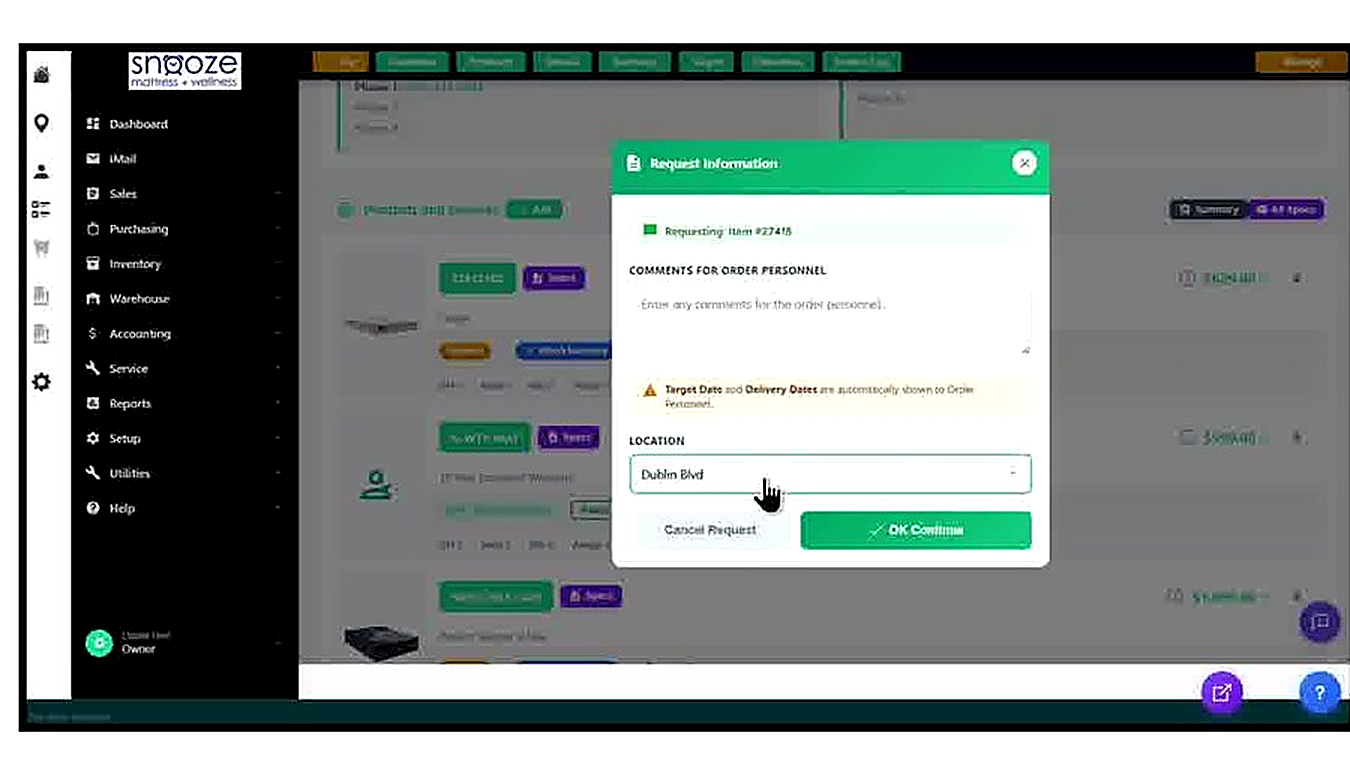
Click 'Request' on Out-of-Stock Items
For items that are out of stock, click the orange 'Request' button on the line item. The Request Information popup opens, showing the item number being requested and fields for: a Comments for Order Personnel free-text field, a note that Target Date and Delivery Dates are automatically visible to order personnel, and a Location dropdown confirming which store location needs the item.
Select the Location and Click OK Continue
Confirm the Location dropdown shows the correct store (e.g., Dublin Blvd). This tells the warehouse or purchasing team which location needs the product. Click 'OK Continue' to submit the request. If you need to cancel without submitting, click 'Cancel Request'.
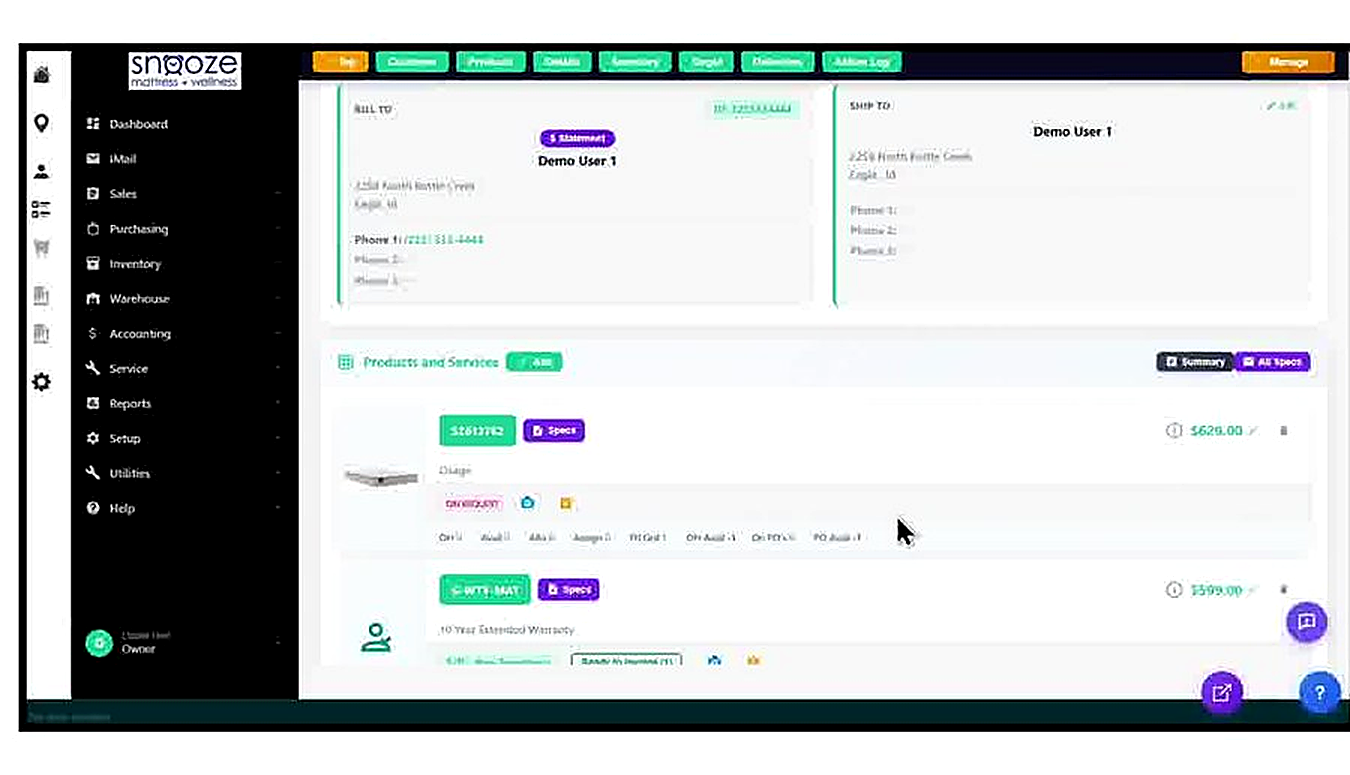
Confirm the ON REQUEST Badge
After clicking OK Continue, the line item badge updates to purple 'ON REQUEST', confirming the product request has been submitted to the warehouse or purchasing team. The order is now in the system with all items in their correct fulfillment states. Monitor the order for status updates as the warehouse processes the request.
Target Dates, Scheduling Delivery & Taking Payment
About This Guide
This step-by-step training guide covers how to set a Target Date on an order, schedule a delivery to a customer, add order items to that delivery, and take payment in the WhirlWind Portal.
- Set and update the Target Date on an order
- Enable delivery reminder notifications at 6, 4, 2, and 1 week intervals
- Open the Delivery Schedule calendar and read color-coded truck availability
- Use the Deliveries Mapped view to see truck assignments by date
- Configure Delivery Details including date, truck, time window, and delivery address
- Select order items and add them to a scheduled delivery
- Return to the order summary and verify the scheduled delivery
- Open the Take a Customer Payment screen and record payment by type and reference number
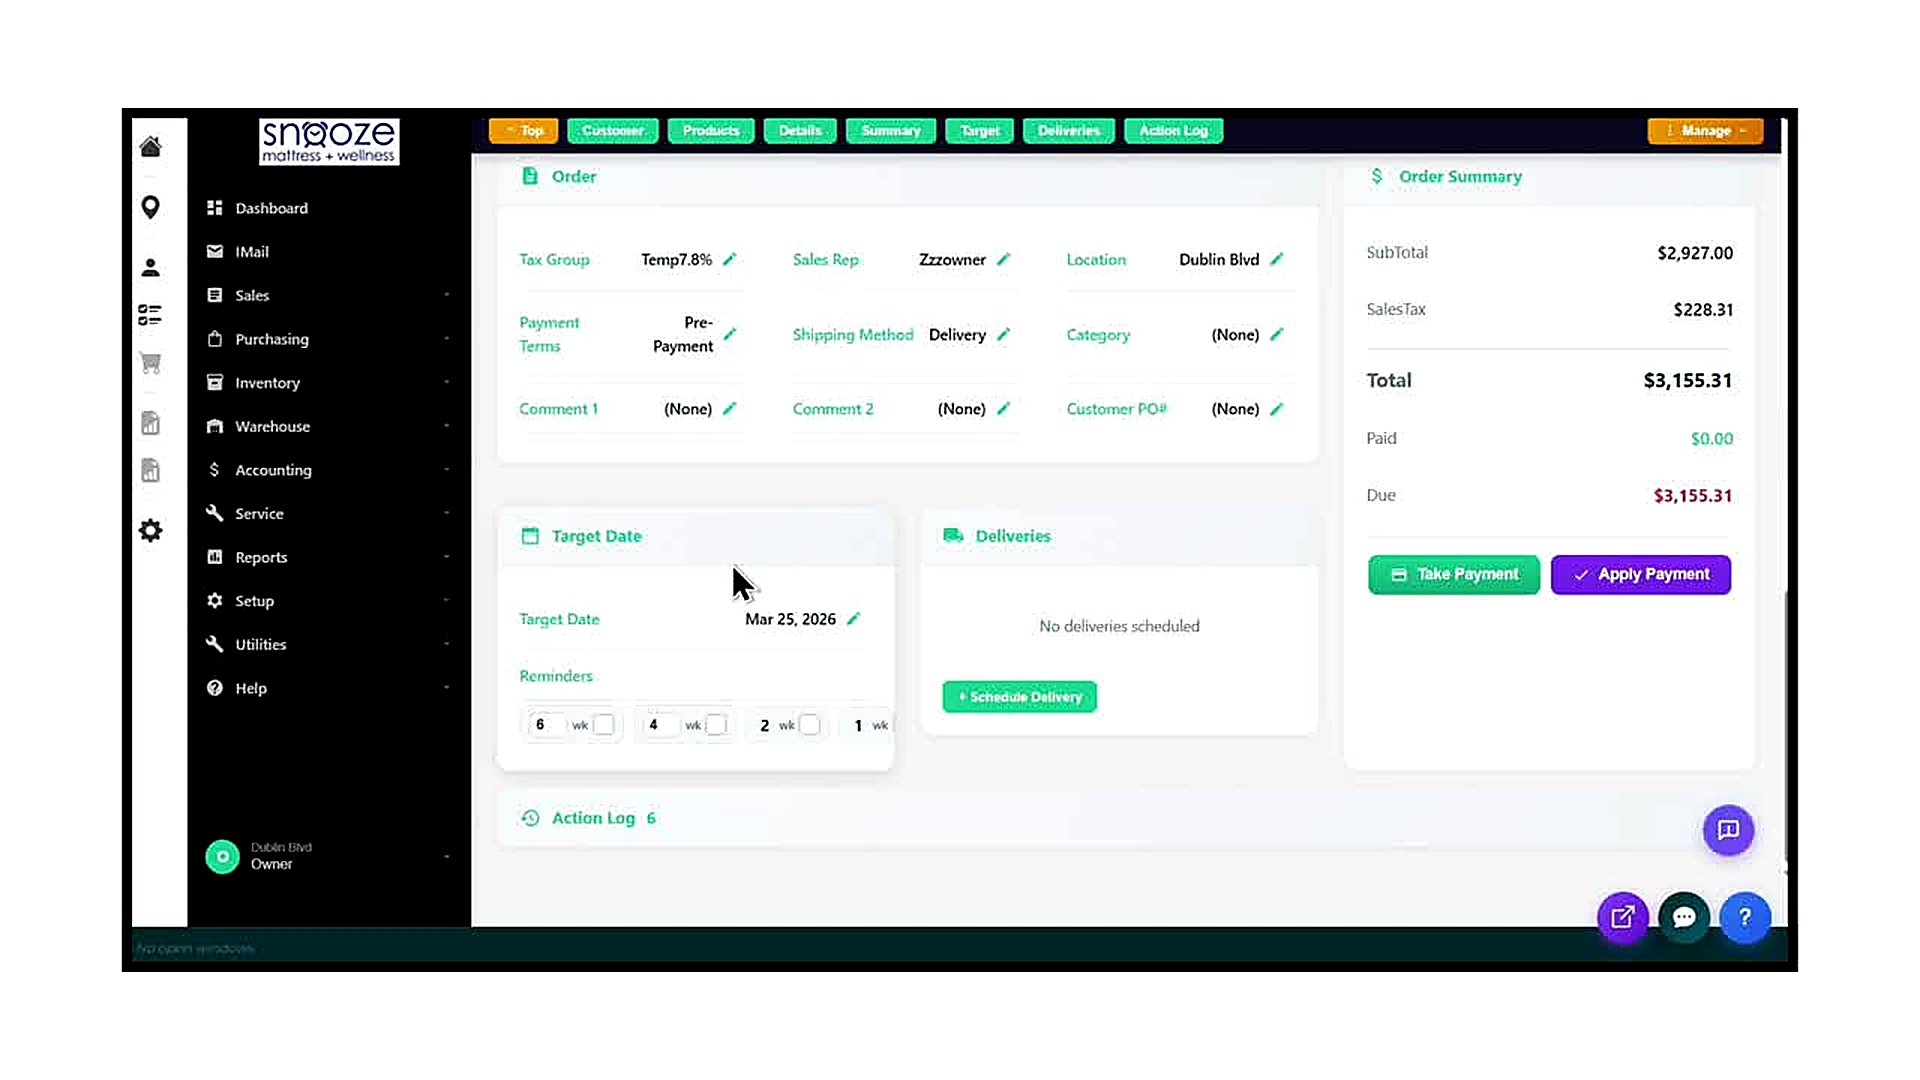
Navigate to the Target Date Section
Open the order in the WhirlWind Portal and scroll down to the Details tab. Locate the Target Date panel on the left side of the screen. This section shows the estimated date by which the order should be delivered or completed.
Set or Edit the Target Date
Click the pencil icon next to the Target Date field. Select the desired date from the date picker. Click to confirm. The date will appear in the field (e.g., Mar 25, 2026).
Enable Delivery Reminders
In the Reminders section below the Target Date, check the boxes for the intervals at which you want automated reminders to trigger: 6 weeks, 4 weeks, 2 weeks, and/or 1 week before the Target Date. Check any combination that applies to your workflow.

Open the Delivery Schedule
In the Deliveries panel on the order's Details tab, click the green '+ Schedule Delivery' button. The Delivery Schedule modal opens, defaulting to the Calendar view for the current month.
Select a Delivery Date
Click on a green (available) date on the calendar to see the delivery trucks running that day. Review the truck names, number of stops, and remaining capacity. Click on the truck entry to proceed to scheduling on that truck.
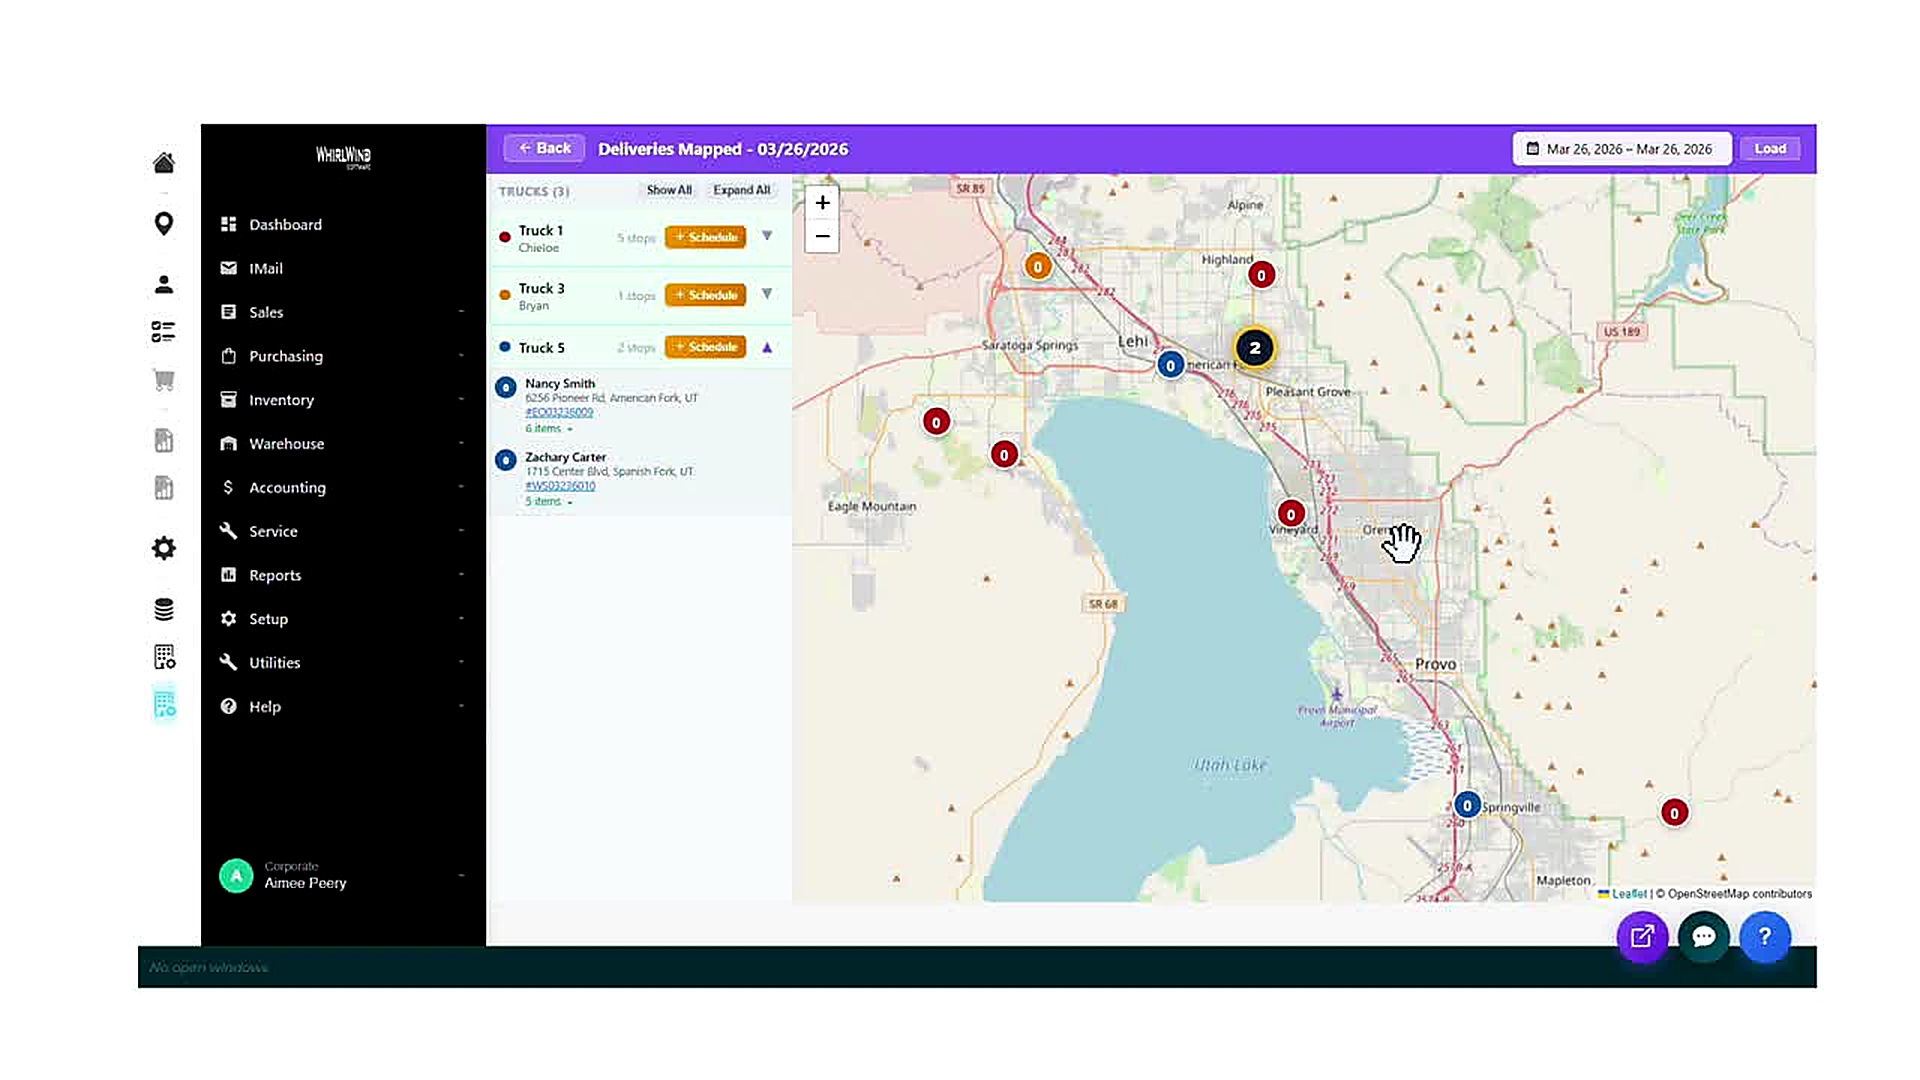
Review the Deliveries Mapped View (Optional)
If your store uses the Deliveries Mapped screen, you can see all truck routes for the selected date on a geographic map. Trucks are listed on the left with their driver name and number of stops. Use this view to assign deliveries to the most geographically efficient truck.
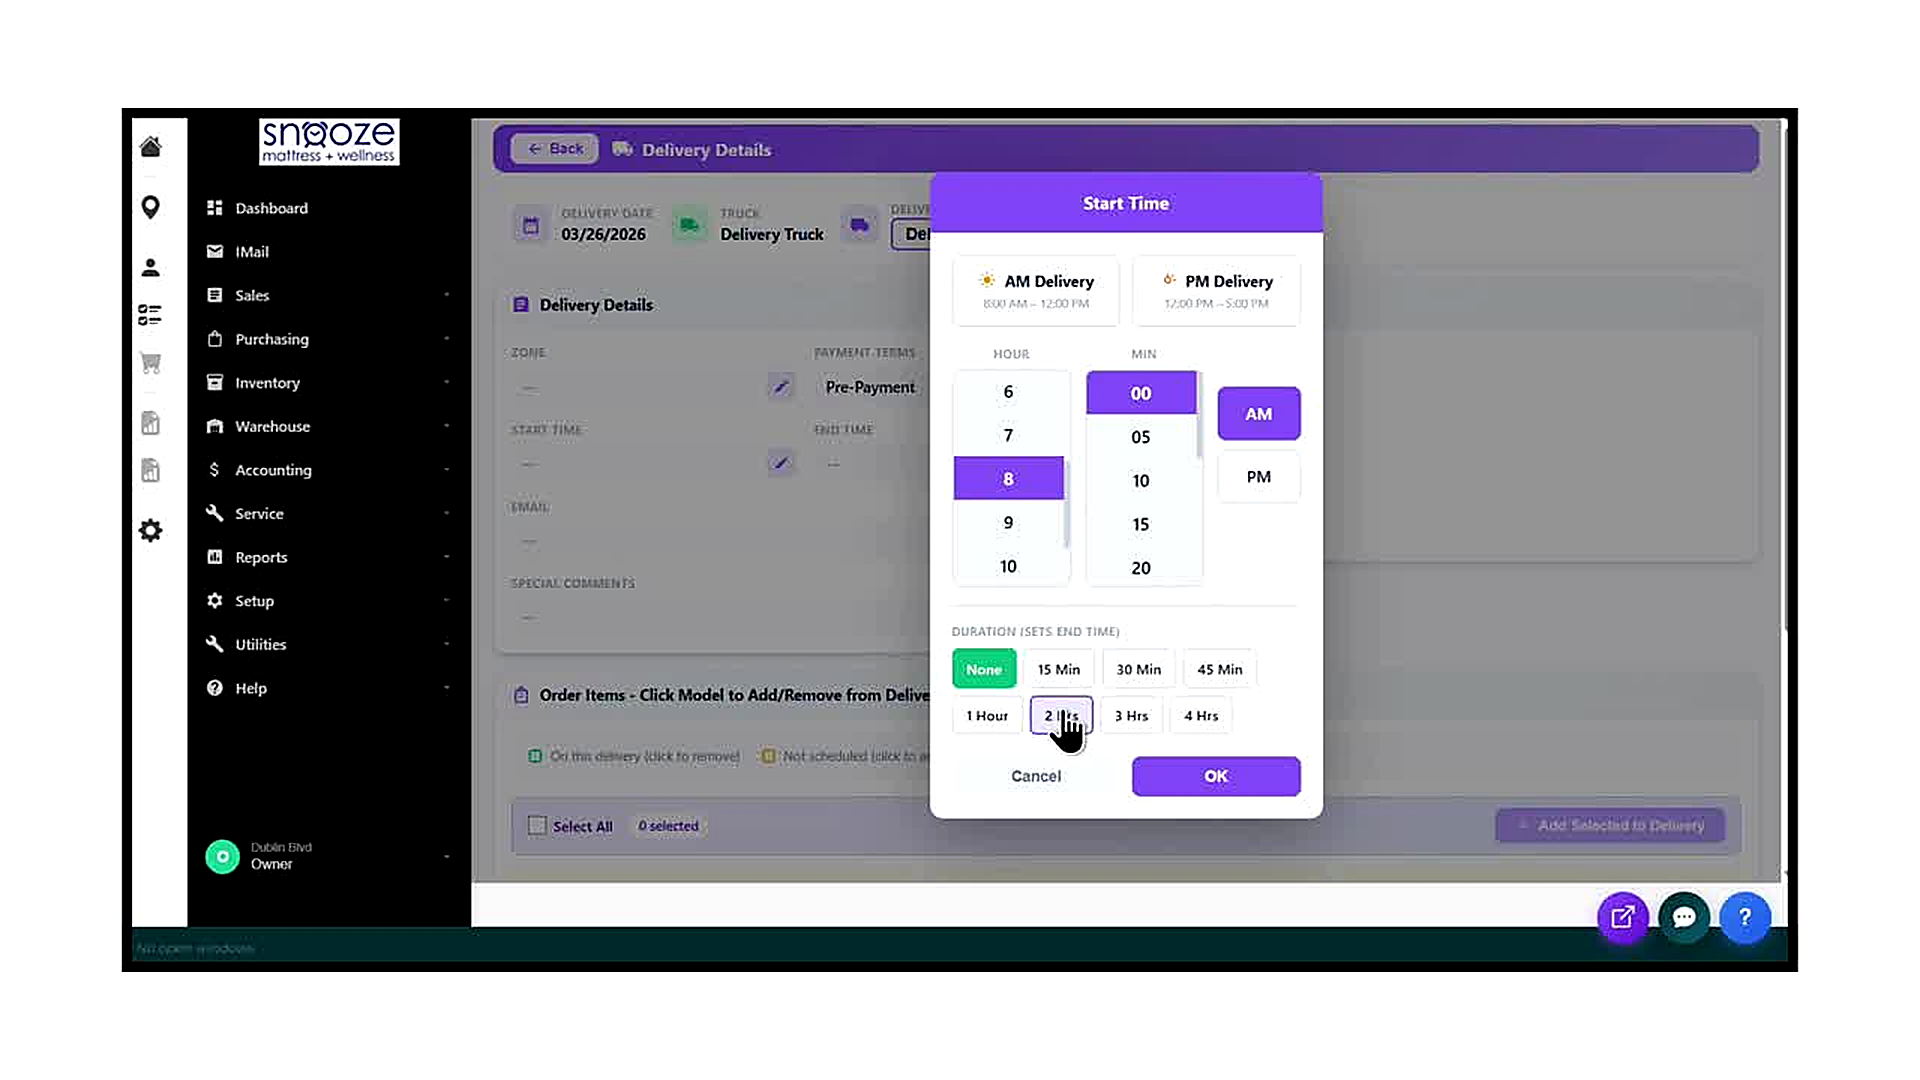
Confirm Delivery Details
The Delivery Details screen opens automatically after selecting a truck. Verify the Delivery Date, Truck name, and Delivery Type. Confirm the Payment Terms match the order (e.g., Pre-Payment). The Start Time and End Time show the delivery window — adjust these if needed by clicking the pencil icon.
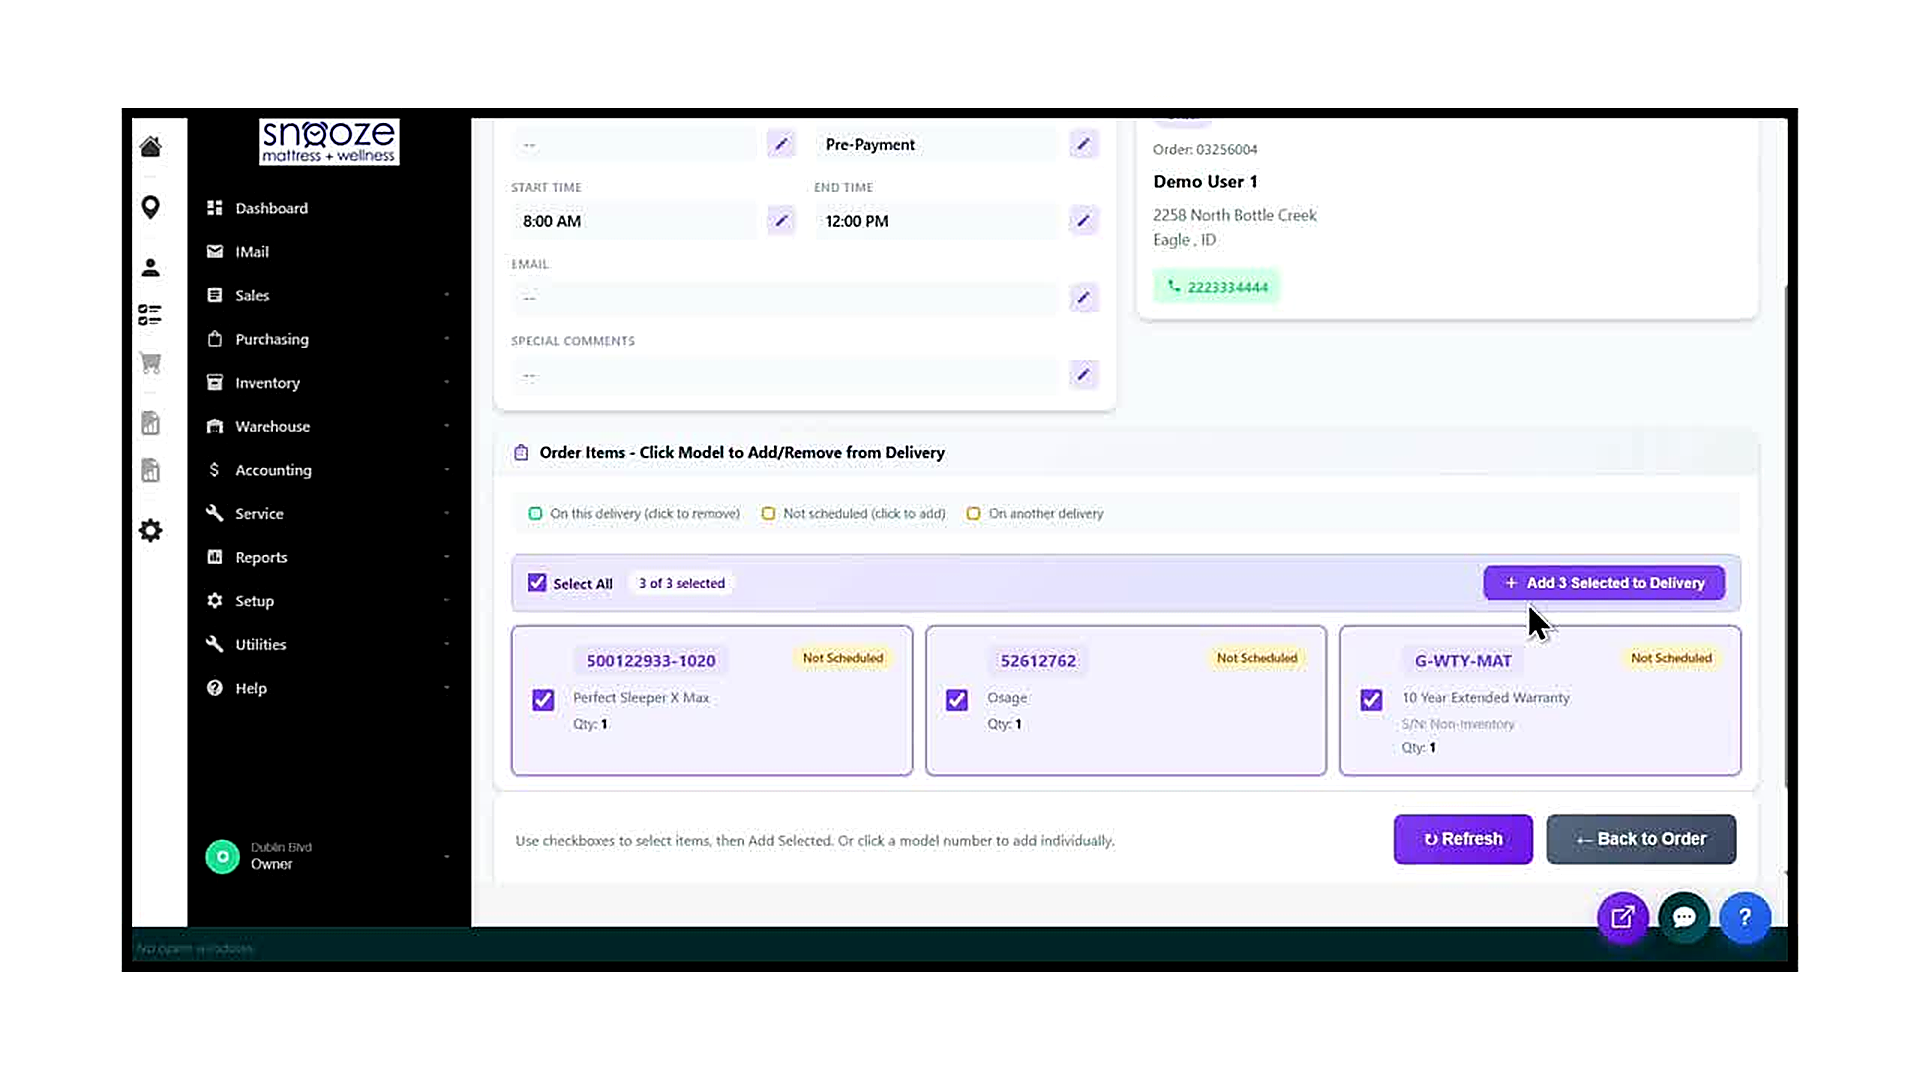
Select the Items to Add to the Delivery
Scroll down to the 'Order Items — Click Model to Add/Remove from Delivery' section. All unscheduled items appear with a 'Not Scheduled' badge. Check the 'Select All' checkbox to select all items at once, or click individual item checkboxes to select specific models only.
Add Items to the Delivery
Once items are selected, the purple button updates to show the count (e.g., 'Add 3 Selected to Delivery'). Click this button to add all selected items to the delivery. The items will now show as 'On this delivery' with a green indicator.
Return to the Order
Click the '← Back to Order' button at the bottom of the Delivery Details screen. You will be returned to the order's Details tab, where the Deliveries panel now shows the scheduled delivery: the date, truck, item count, delivery window, and delivery type.
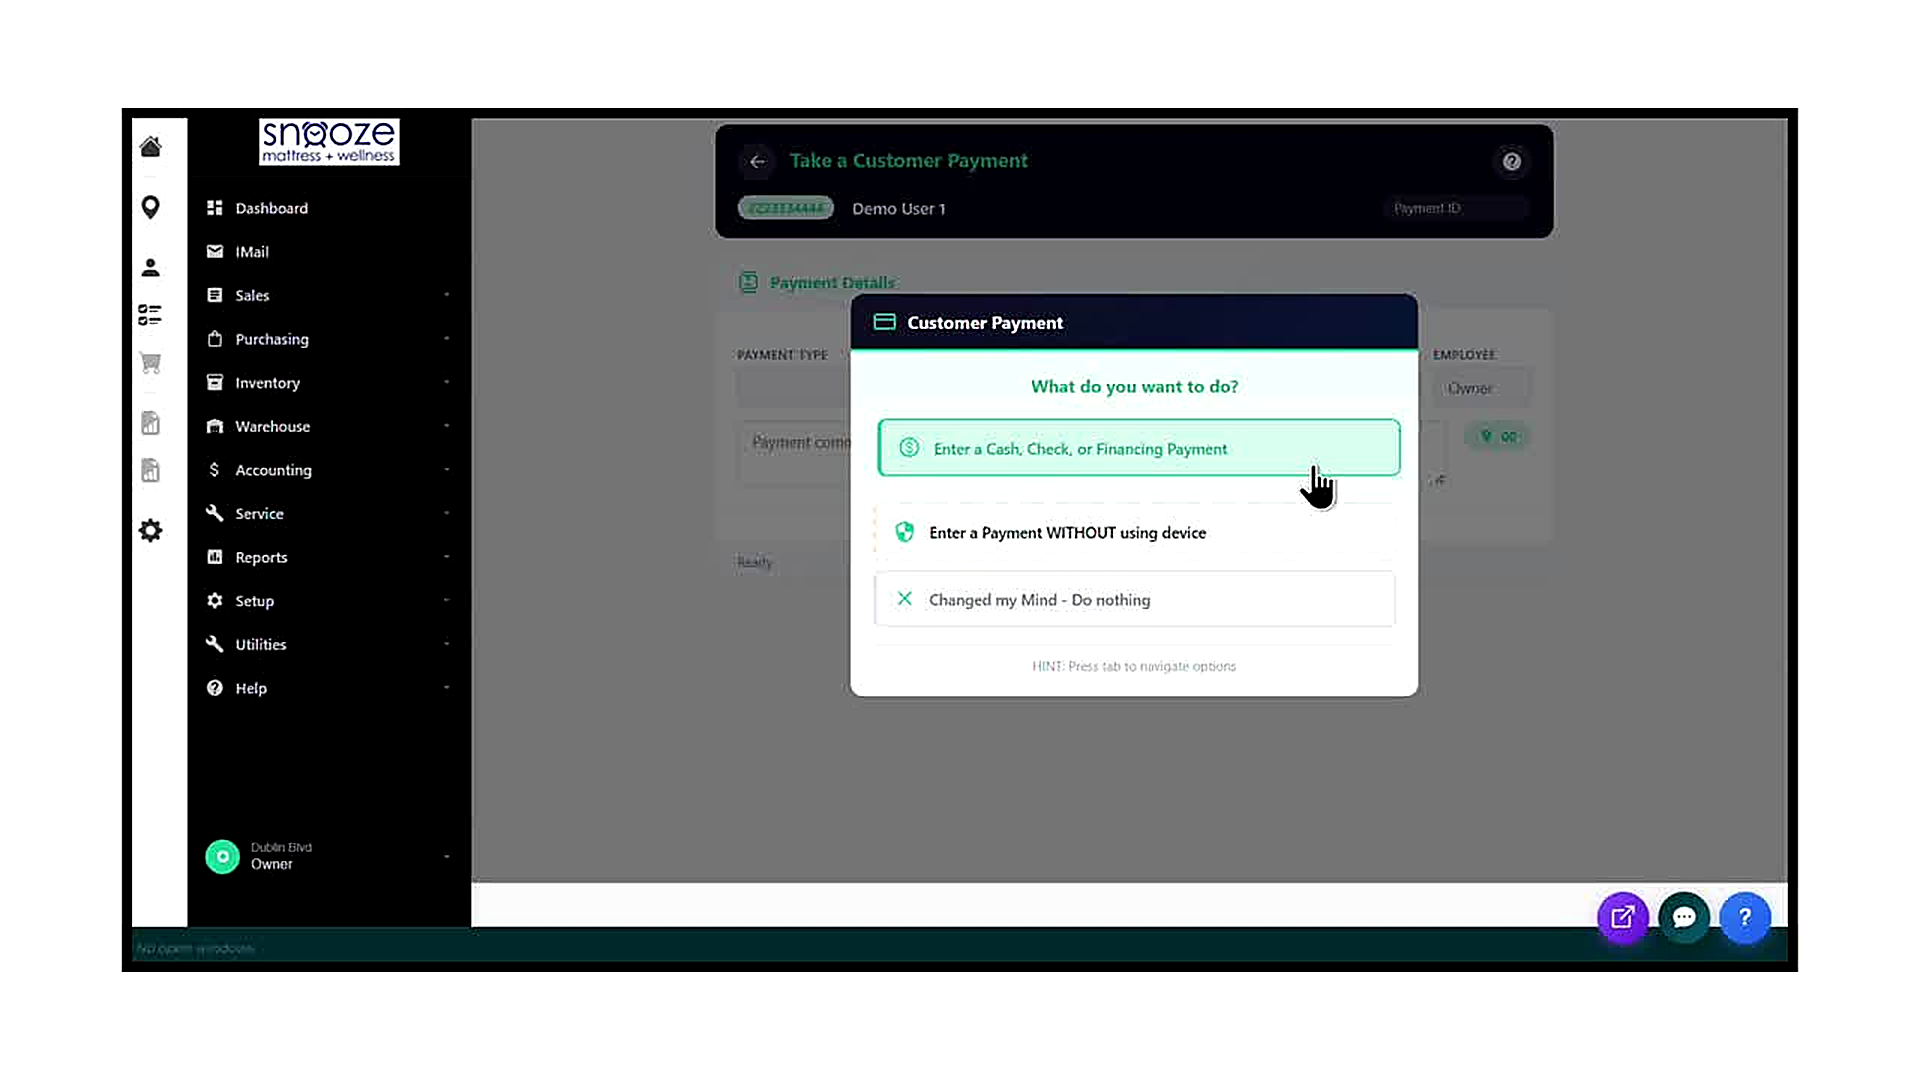
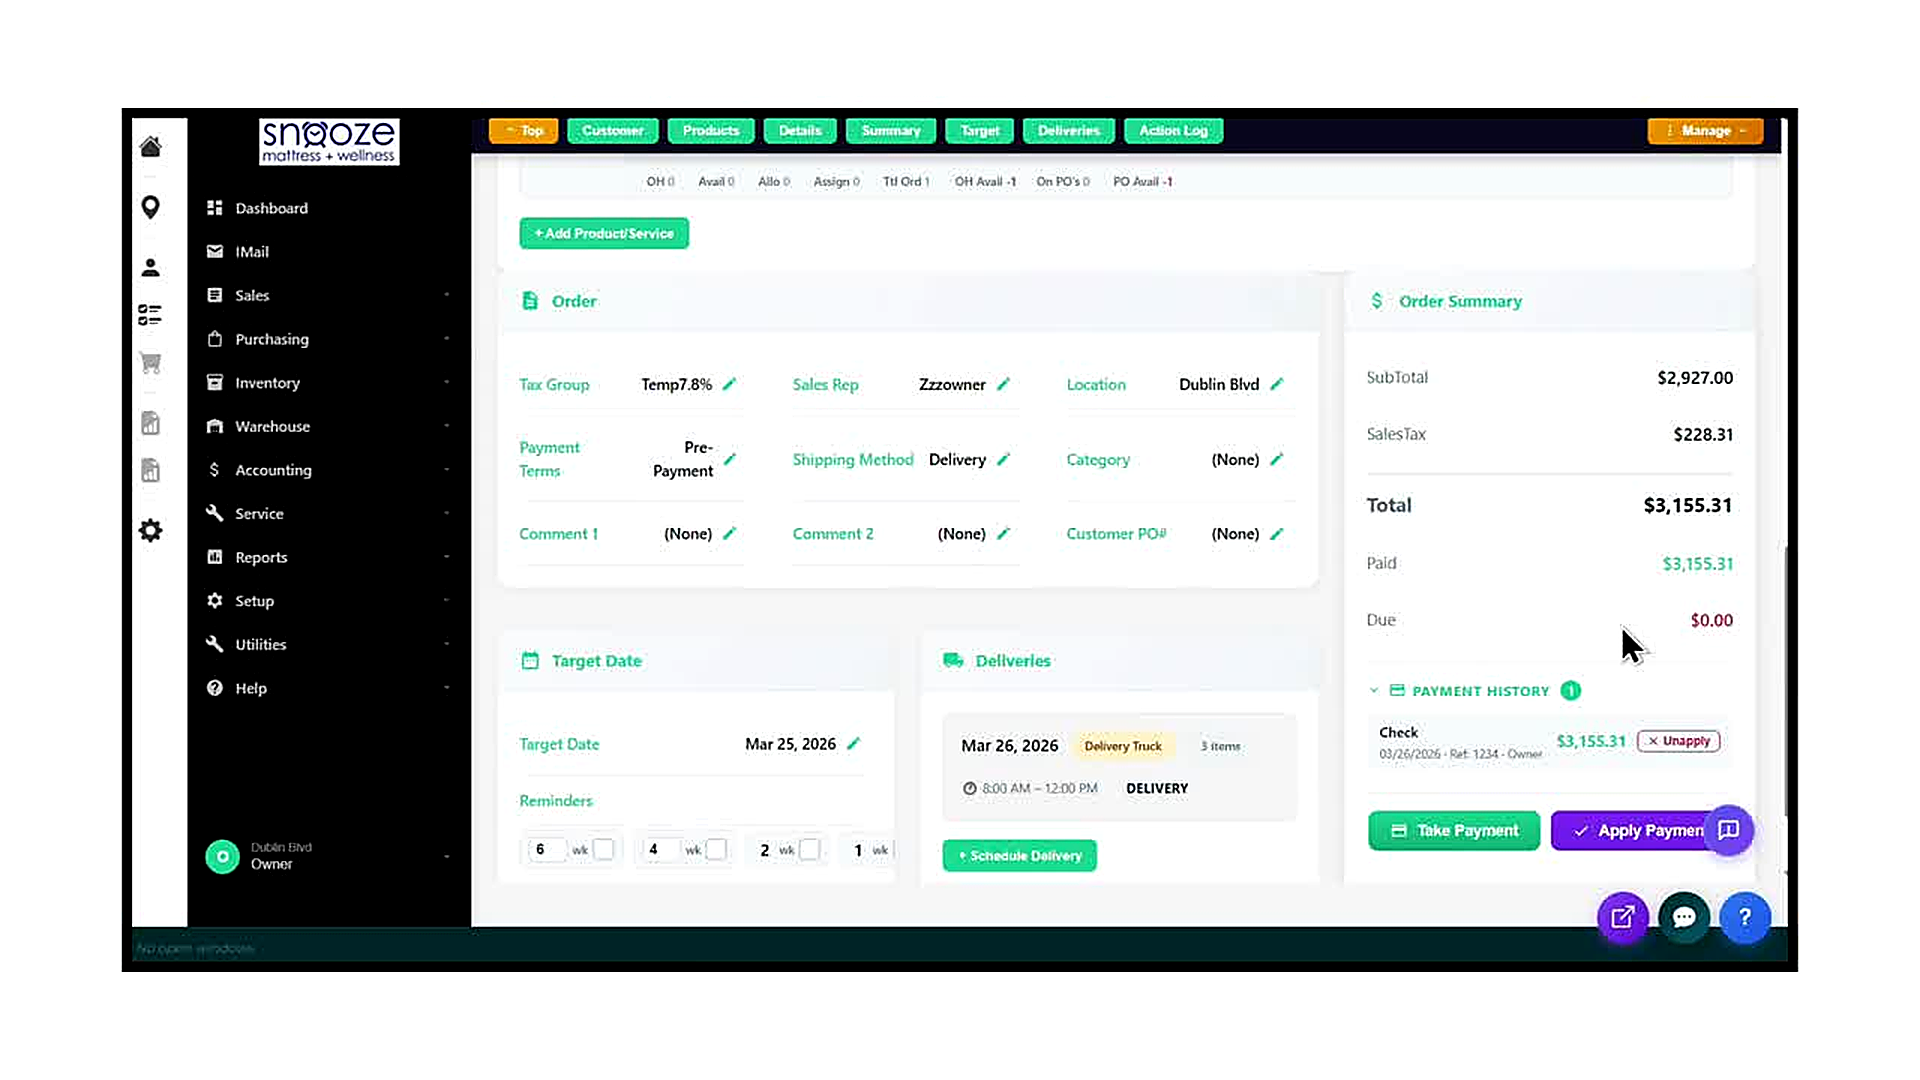
Open the Take Payment Screen
From the order's Details tab, locate the Order Summary panel on the right side of the screen. The Total, Paid, and Due amounts are displayed. Click the green 'Take Payment' button to open the Take a Customer Payment screen.
Select the Payment Type
In the Payment Details section, click the Payment Type field and select the method the customer is using: Check, Cash, Credit Card, Financing, or other options available at your location. The correct payment type is required for proper accounting.
Enter the Reference Number
Click into the Reference Number field and type the check number, authorization code, or other reference identifier for this payment. For cash payments, you may leave this blank or enter 'Cash' as a note.
Verify the Amount and Save
The Amount field is pre-filled with the full amount Due on the order (e.g., $3,155.31). Verify this is correct. If the customer is making a partial payment, edit the amount to match. Optionally add a note in the Payment Comments field, then click the green 'Save Payment' button to record the payment.
The Sales Organizer
About This Guide
This step-by-step training guide covers how to access and use the Sales Organizer in the WhirlWind Portal. The Sales Organizer is a powerful tool that gives you a consolidated, filterable view of all your open orders — helping you stay organized and manage your pipeline efficiently.
- Access the Sales Organizer from the Sales menu in the left navigation
- Understand the filter bar: View, Type, Search By, Date Range, Date, Sales, and Location
- Use the Stage filter and the Extended and Totals checkboxes
- Read the order list: order number, status tags, customer, sales rep, location, terms, target date, note date, touched and updated dates, ship address, and order total
- Filter the list by a specific Sales Rep to see only their orders
- Use the A–Z alphabet tabs to narrow results by customer last name initial
- Refresh or Export the filtered results
- Click an order number to open that order directly from the Sales Organizer
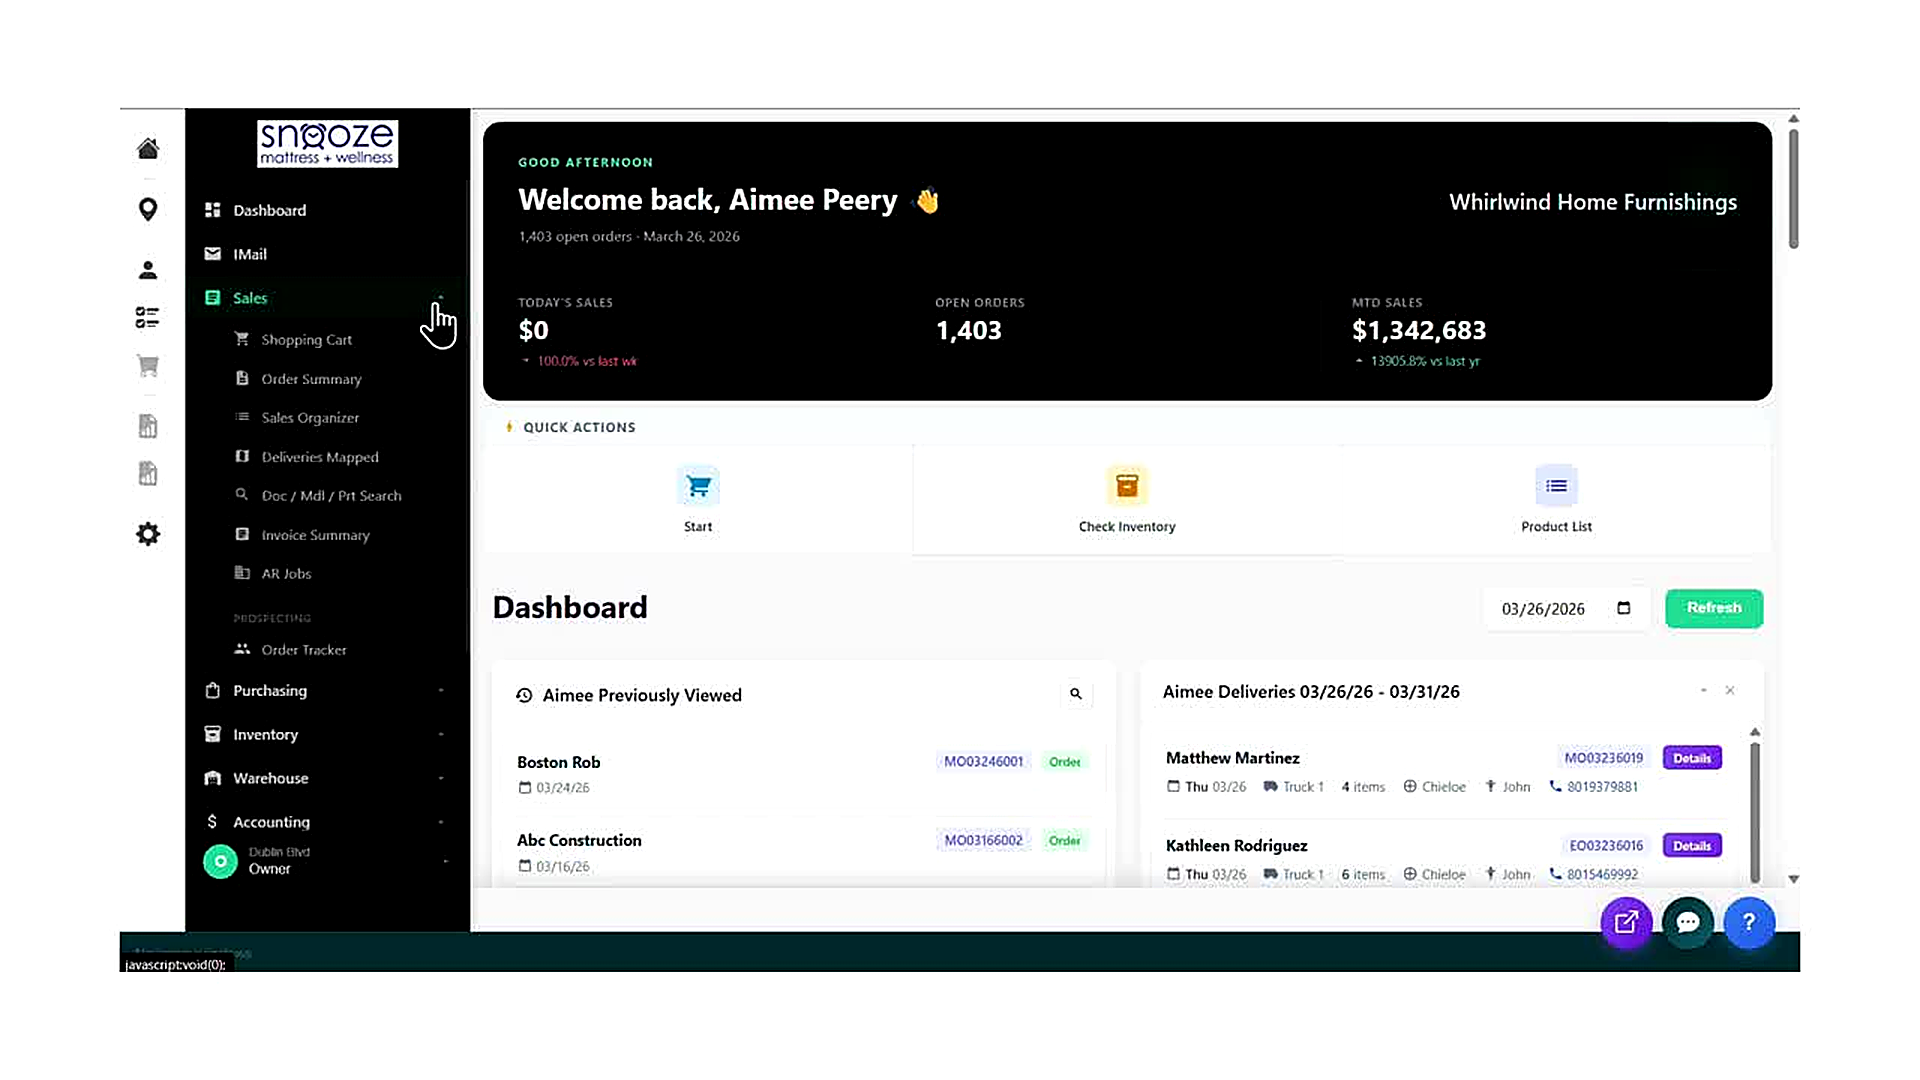
Open the Sales Menu
From any screen in the WhirlWind Portal, locate the left-hand navigation bar. Click on 'Sales' to expand the Sales sub-menu. The menu will display: Shopping Cart, Order Summary, Sales Organizer, Deliveries Mapped, Doc / Mdl / Prt Search, Invoice Summary, and AR Jobs.
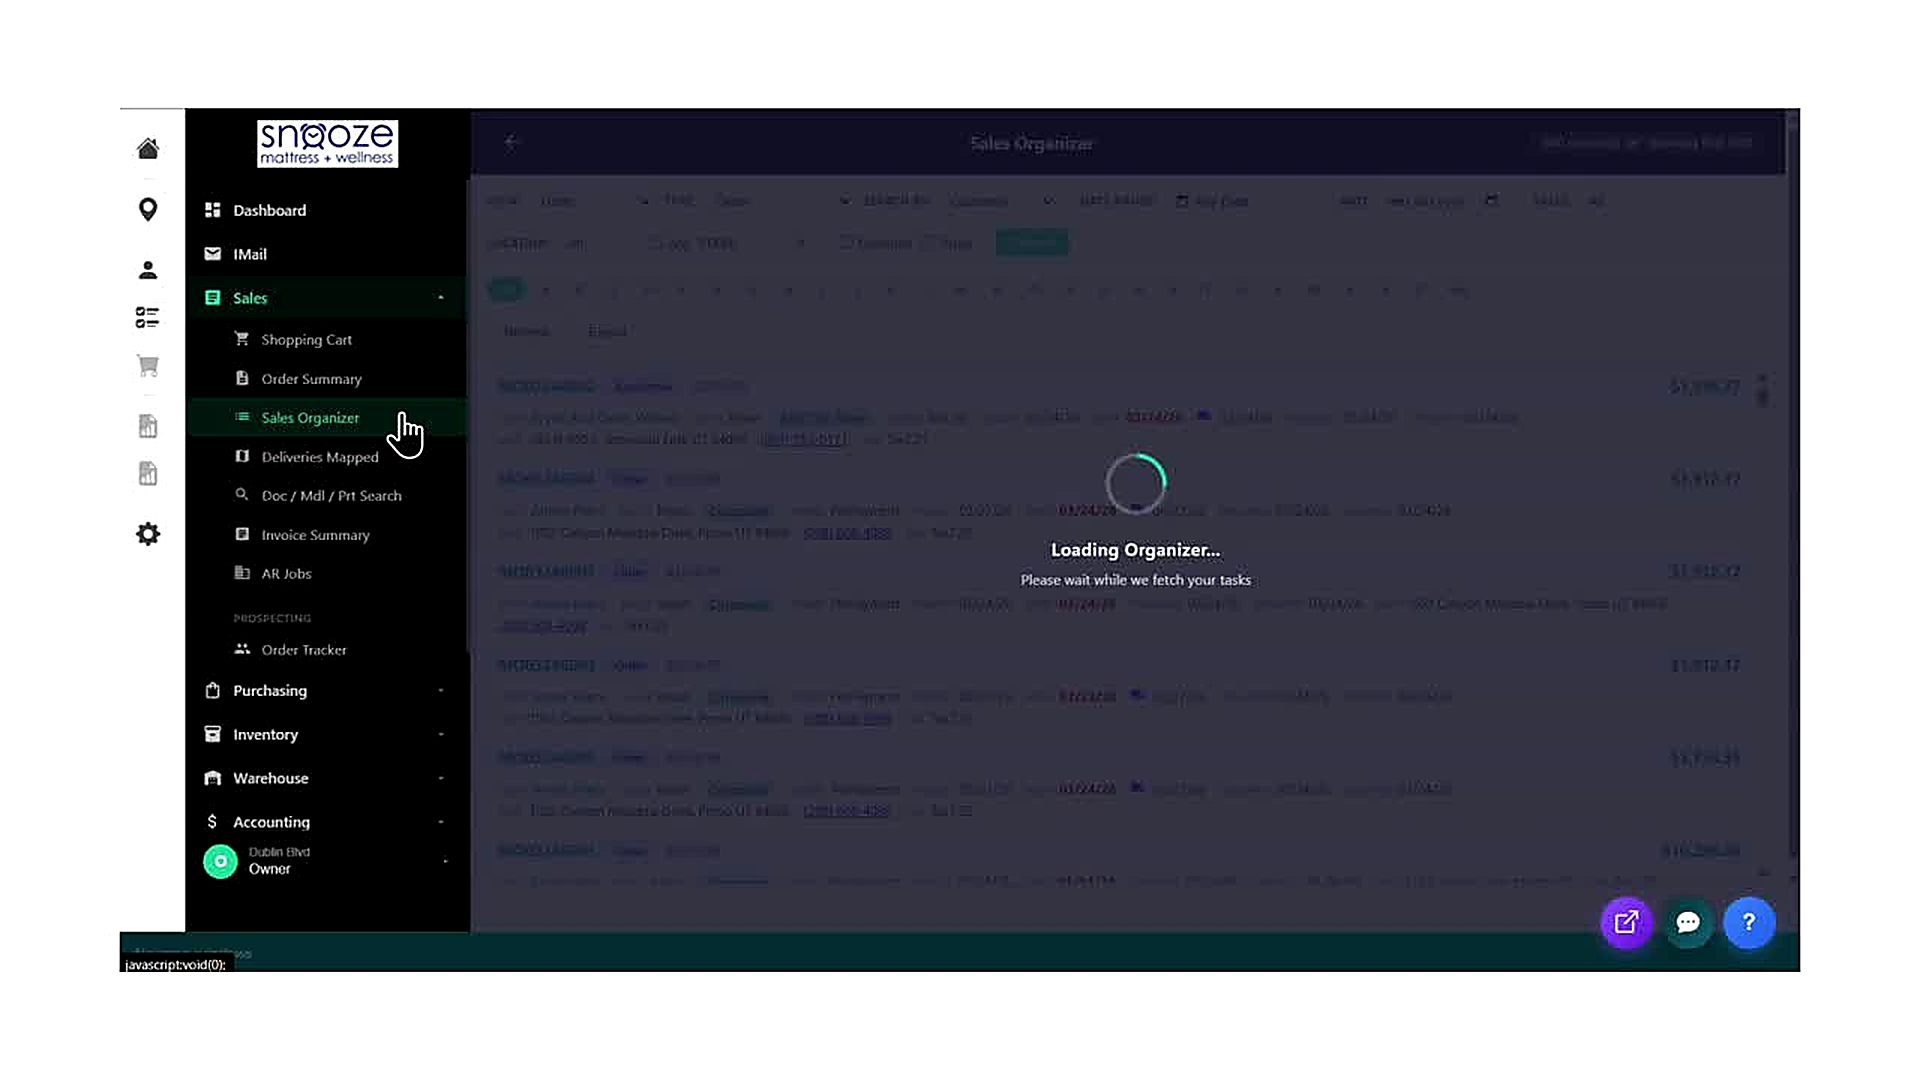
Click 'Sales Organizer'
Click 'Sales Organizer' in the expanded Sales sub-menu. The portal will navigate to the Sales Organizer screen. A 'Loading Organizer... Please wait while we fetch your tasks' message will appear briefly while the system retrieves your order data.
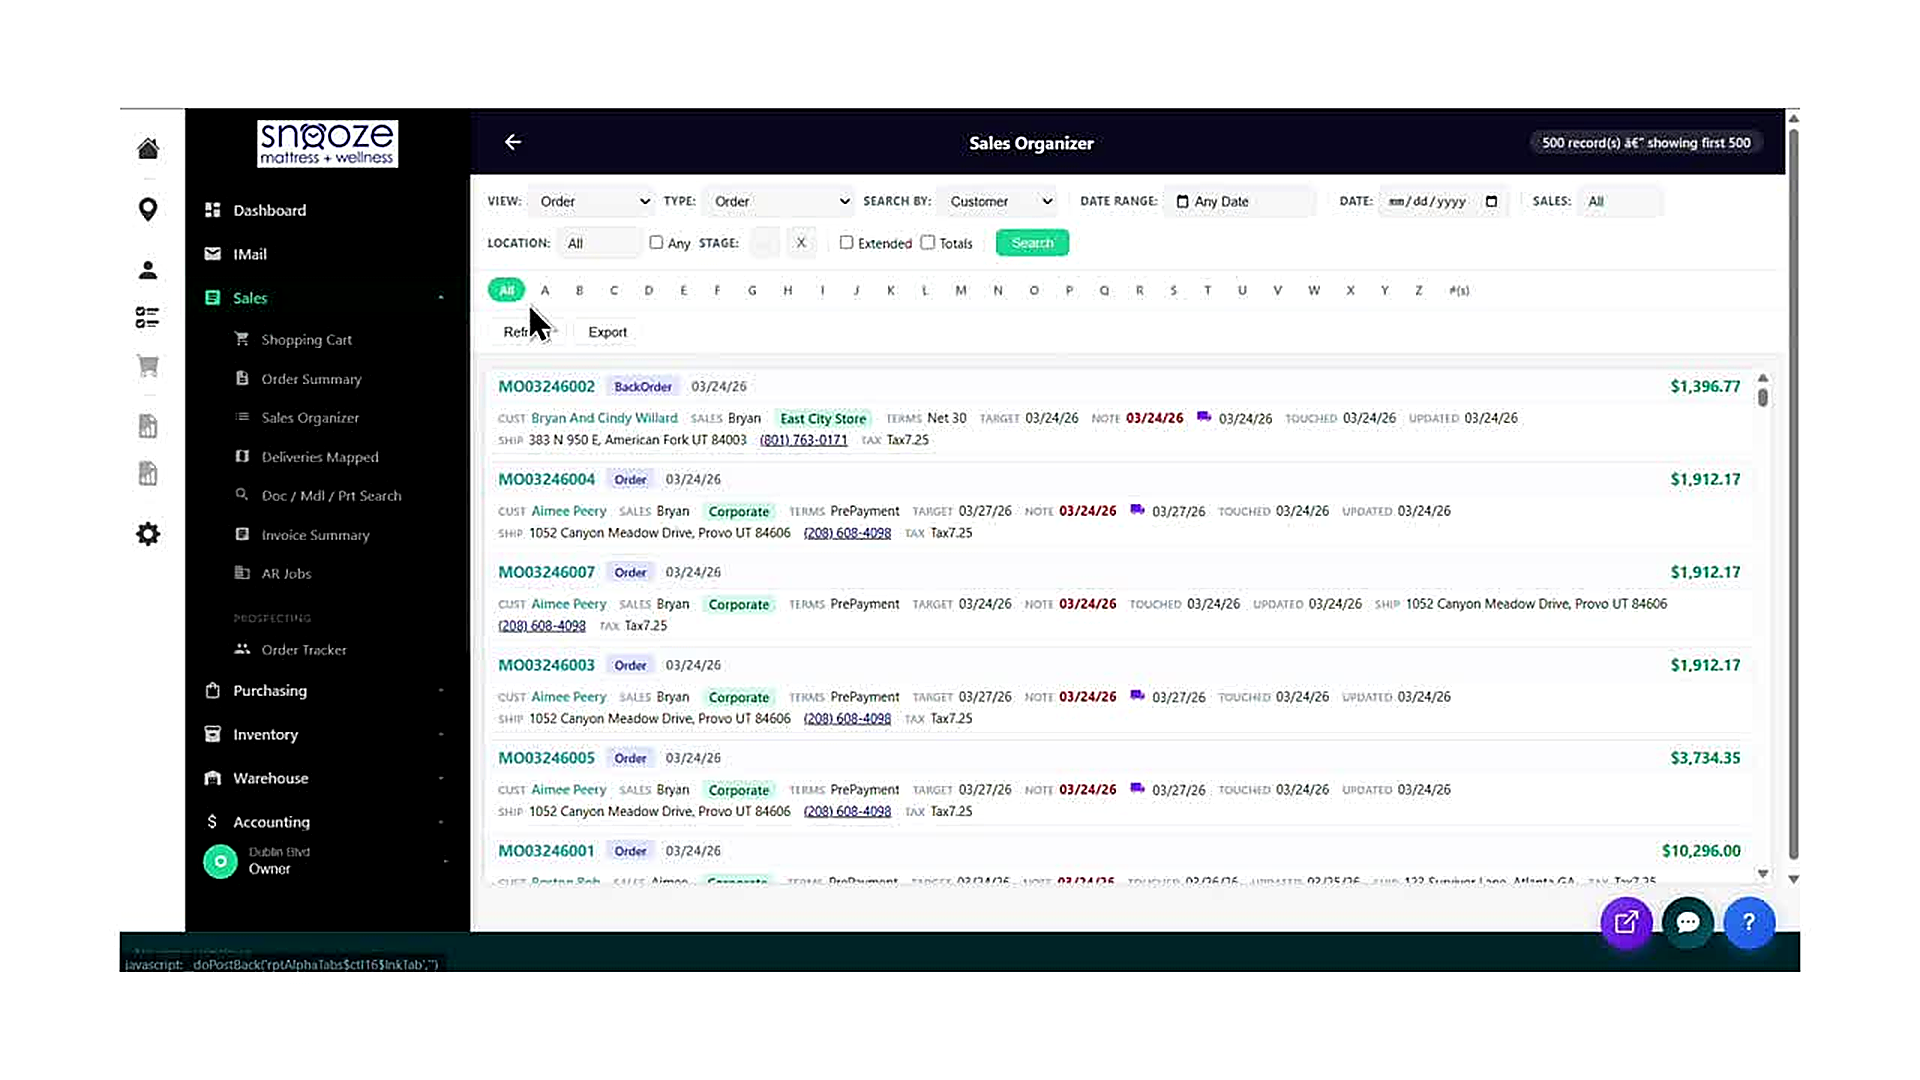
Review the Top Filter Bar
Once loaded, the Sales Organizer displays a filter bar across the top of the screen with the following fields: VIEW (Order or Quote), TYPE (Order, Quote, BackOrder, etc.), SEARCH BY (Customer, Order #, etc.), DATE RANGE (Any Date or a custom range), DATE (specific date entry), SALES (filter by sales rep — defaults to All), and LOCATION (filter by store location).
Use the Stage, Extended, and Totals Options
Below the top filter row, a second row offers: STAGE (filter to a specific order stage), EXTENDED checkbox (expands the detail shown per order row), and TOTALS checkbox (adds a totals summary row to the list). Click the green 'Search' button after changing any filter to refresh the results.
Read the Alphabet Tabs and Record Count
Below the filter bar is a row of alphabet tabs: All, A, B, C, D … Z, and #(s). These filter the order list by the first letter of the customer's last name. The current tab is highlighted in green. The top-right corner of the screen always shows the current record count (e.g., '500 record(s) — showing first 500').
Read an Order Row
Each order in the list displays a full summary on two lines. The first line shows: the Order Number (clickable link), Status Tag (Order, BackOrder, etc.), and the order creation date. The second line shows: CUST (customer name), SALES (sales rep), Location tag (e.g., East City Store, Corporate), TERMS (payment terms), TARGET (target date), NOTE (note date, highlighted in red if overdue), a calendar icon with the follow-up date, TOUCHED (last touched date), UPDATED (last updated date), SHIP (shipping address), TAX (tax group), and the order Total on the far right.

Filter by a Specific Sales Rep
In the filter bar, locate the SALES field on the right side of the top row. Click the SALES field and type or select the sales rep's name (e.g., 'Aimee'). Click the green 'Search' button to apply the filter. The record count in the top-right will update to reflect only that rep's orders (e.g., '70 record(s)').
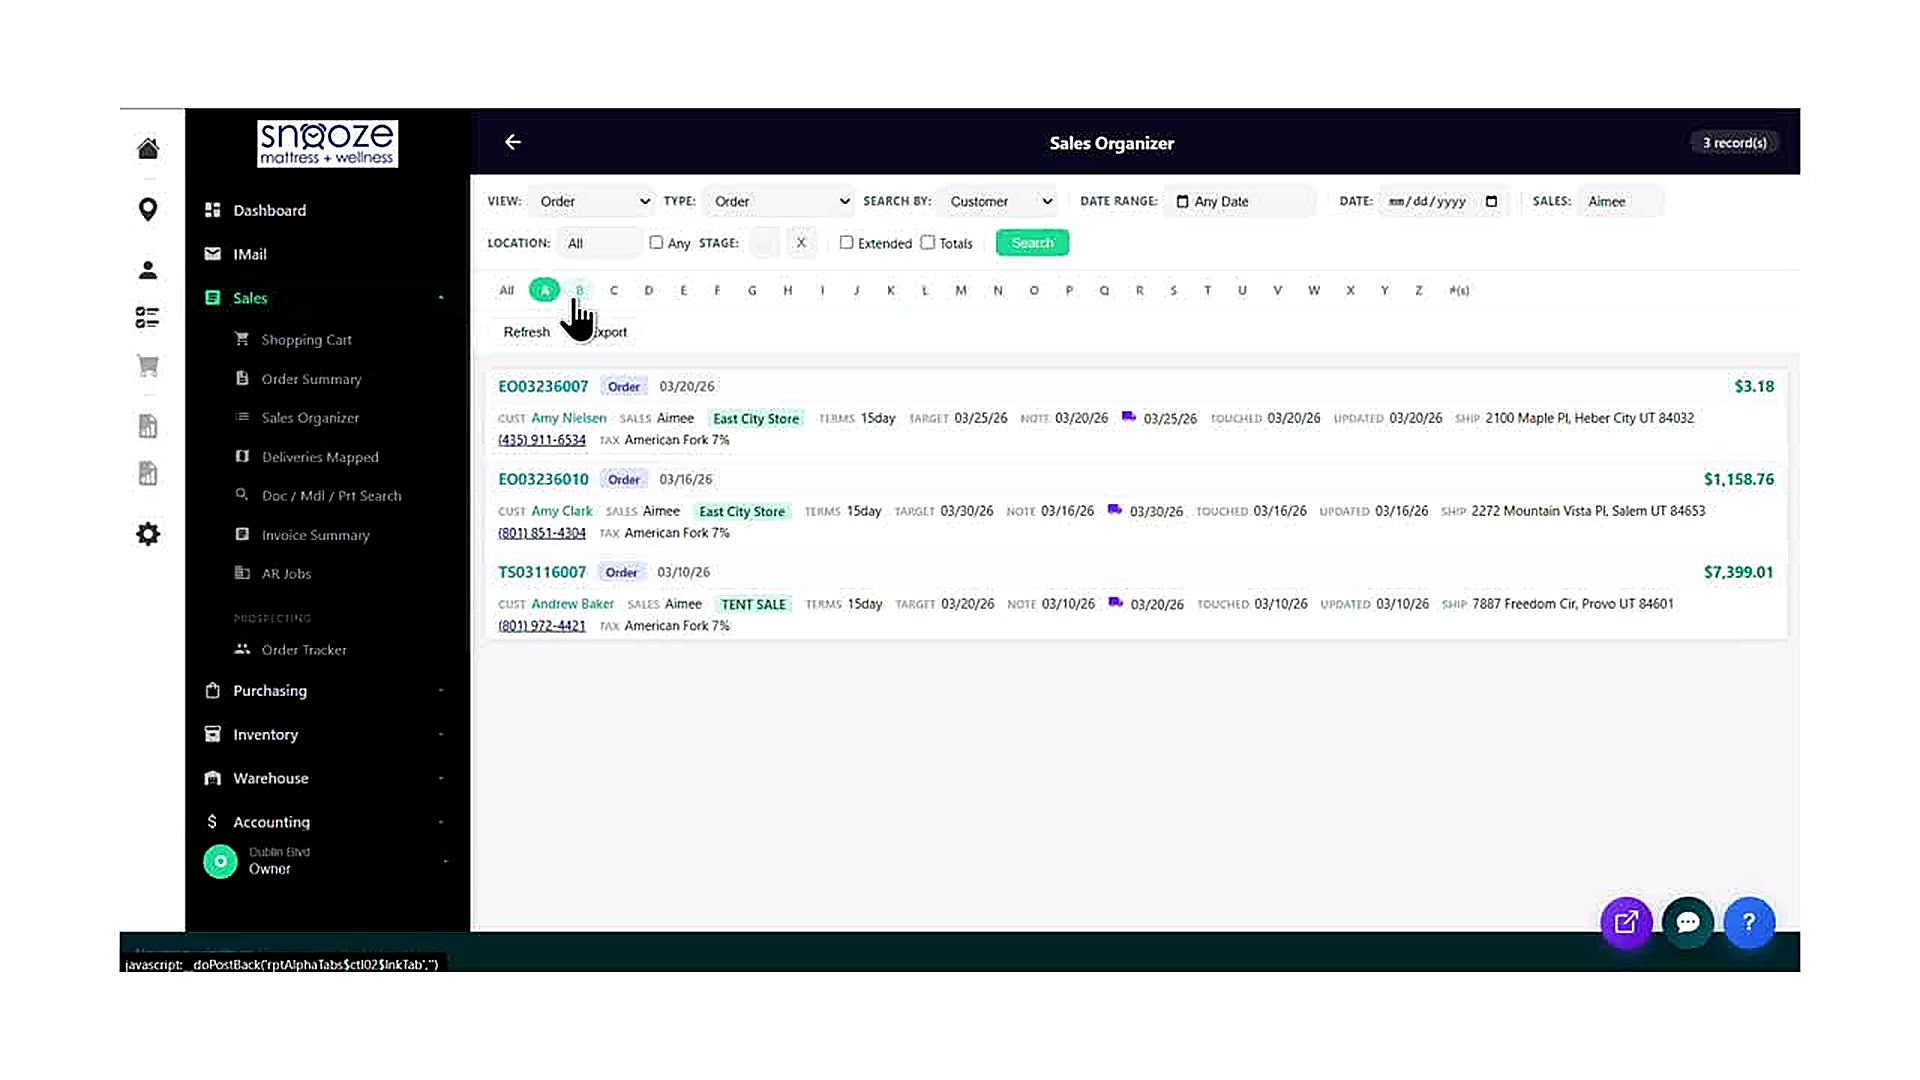
Use the Alphabet Tabs to Narrow Results
With a sales rep filter already applied, click any letter tab to further narrow the list to customers whose last name starts with that letter. For example, clicking 'B' shows only orders from customers with a last name beginning with B. The record count updates immediately (e.g., '3 record(s)').
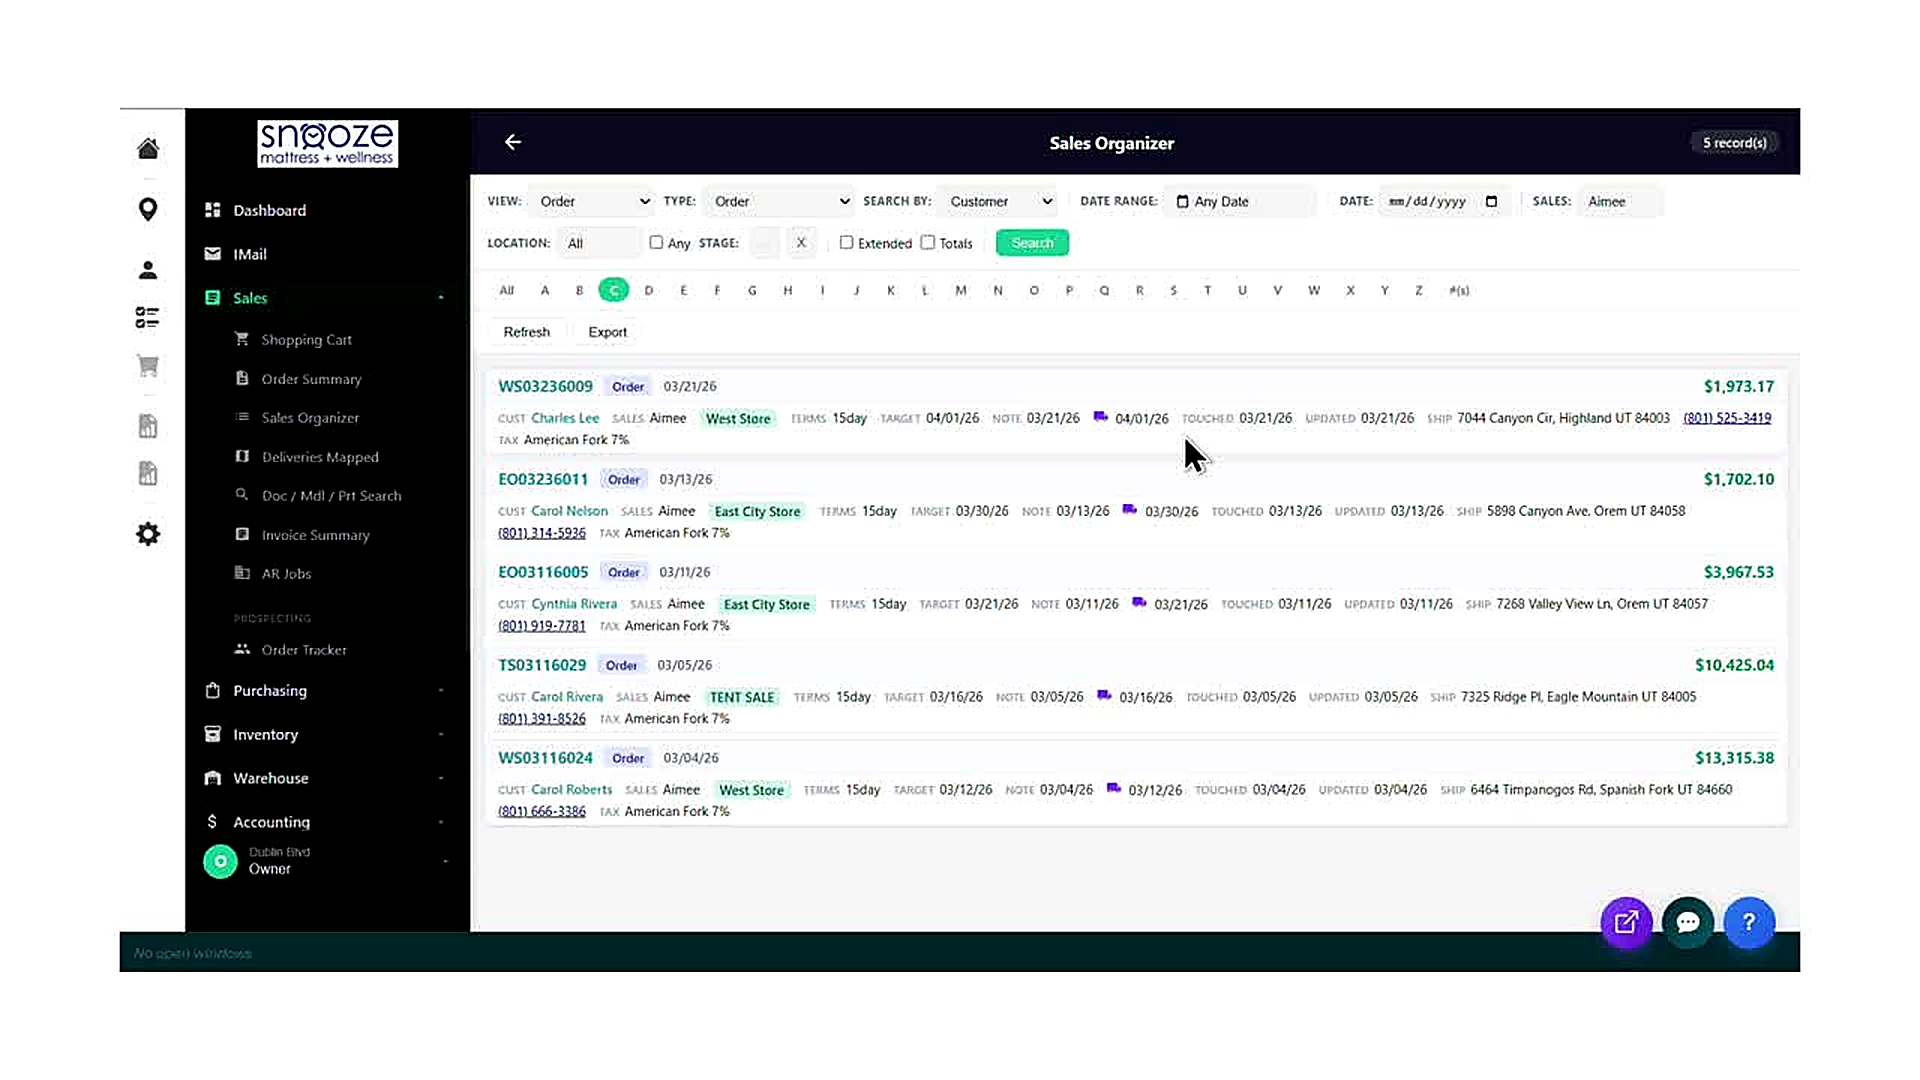
Browse Results Across Letter Tabs
Continue clicking through letter tabs (A, B, C, D, etc.) to review all of a sales rep's orders organized by customer initial. This is especially useful for identifying which customers need follow-up within a specific alphabetical group. Click 'All' to return to the complete list for that rep.
Click an Order Number to Open It
Every order number in the list is a clickable green hyperlink (e.g., MO03246002, EO03236007). Clicking the order number opens that order directly in the portal, taking you to the full order detail view. Use the browser's Back button or the back arrow in the portal to return to the Sales Organizer.
Refresh the Results
Click the 'Refresh' button (located below the alphabet tabs, to the left of 'Export') to reload the current filtered view with the latest data. Use Refresh after making changes to orders so the list reflects the most up-to-date information without clearing your filters.
Export the Results
Click the 'Export' button to download the currently filtered and displayed order list. The export reflects whatever filters and alphabet tab are active at the time of export. Use this to create a spreadsheet of a sales rep's open orders for reporting, handoff, or review purposes.
Doc / Model / Part Search
About This Guide
This step-by-step training guide covers how to use the Doc / Mdl / Part Search tool in the WhirlWind Portal. This tool is designed to help you quickly locate an existing order or quote when a customer calls back after some time has passed — even if you only remember a partial name, address, phone number, or product model number.
- Access the Doc / Mdl / Part Search from the Sales sub-menu
- Understand the three VIEW tabs: Documents, Model / Serial, and Parts
- Use the SHOW filter to toggle between All, Open, and Completed records
- Search by customer Name, Customer ID, Address, or Phone number
- Use the Bill To / Ship To and Billing / Shipping toggle buttons to refine address and phone searches
- Search by Model # , Serial #, or Category to locate orders by product
- Read the search results table: Cust ID, AR Doc, Type, Doc Date, Bill To, Ship To, Ship Address, Ship City, Ship Zip, and Cust PO
- Click an AR Doc link to open the full order or quote directly from the results
- Export search results and clear the form to start a new search
Open the Sales Menu
From any screen in the WhirlWind Portal, click 'Sales' in the left-hand navigation bar to expand the Sales sub-menu. The menu will display: Shopping Cart, Order Summary, Sales Organizer, Deliveries Mapped, Doc / Mdl / Prt Search, Invoice Summary, and AR Jobs.
Click 'Doc / Mdl / Prt Search'
Click 'Doc / Mdl / Prt Search' in the expanded Sales sub-menu. The portal navigates to the Doc / Mdl / Part Search screen. The search form opens empty and ready for input. No results are shown until you run a search.
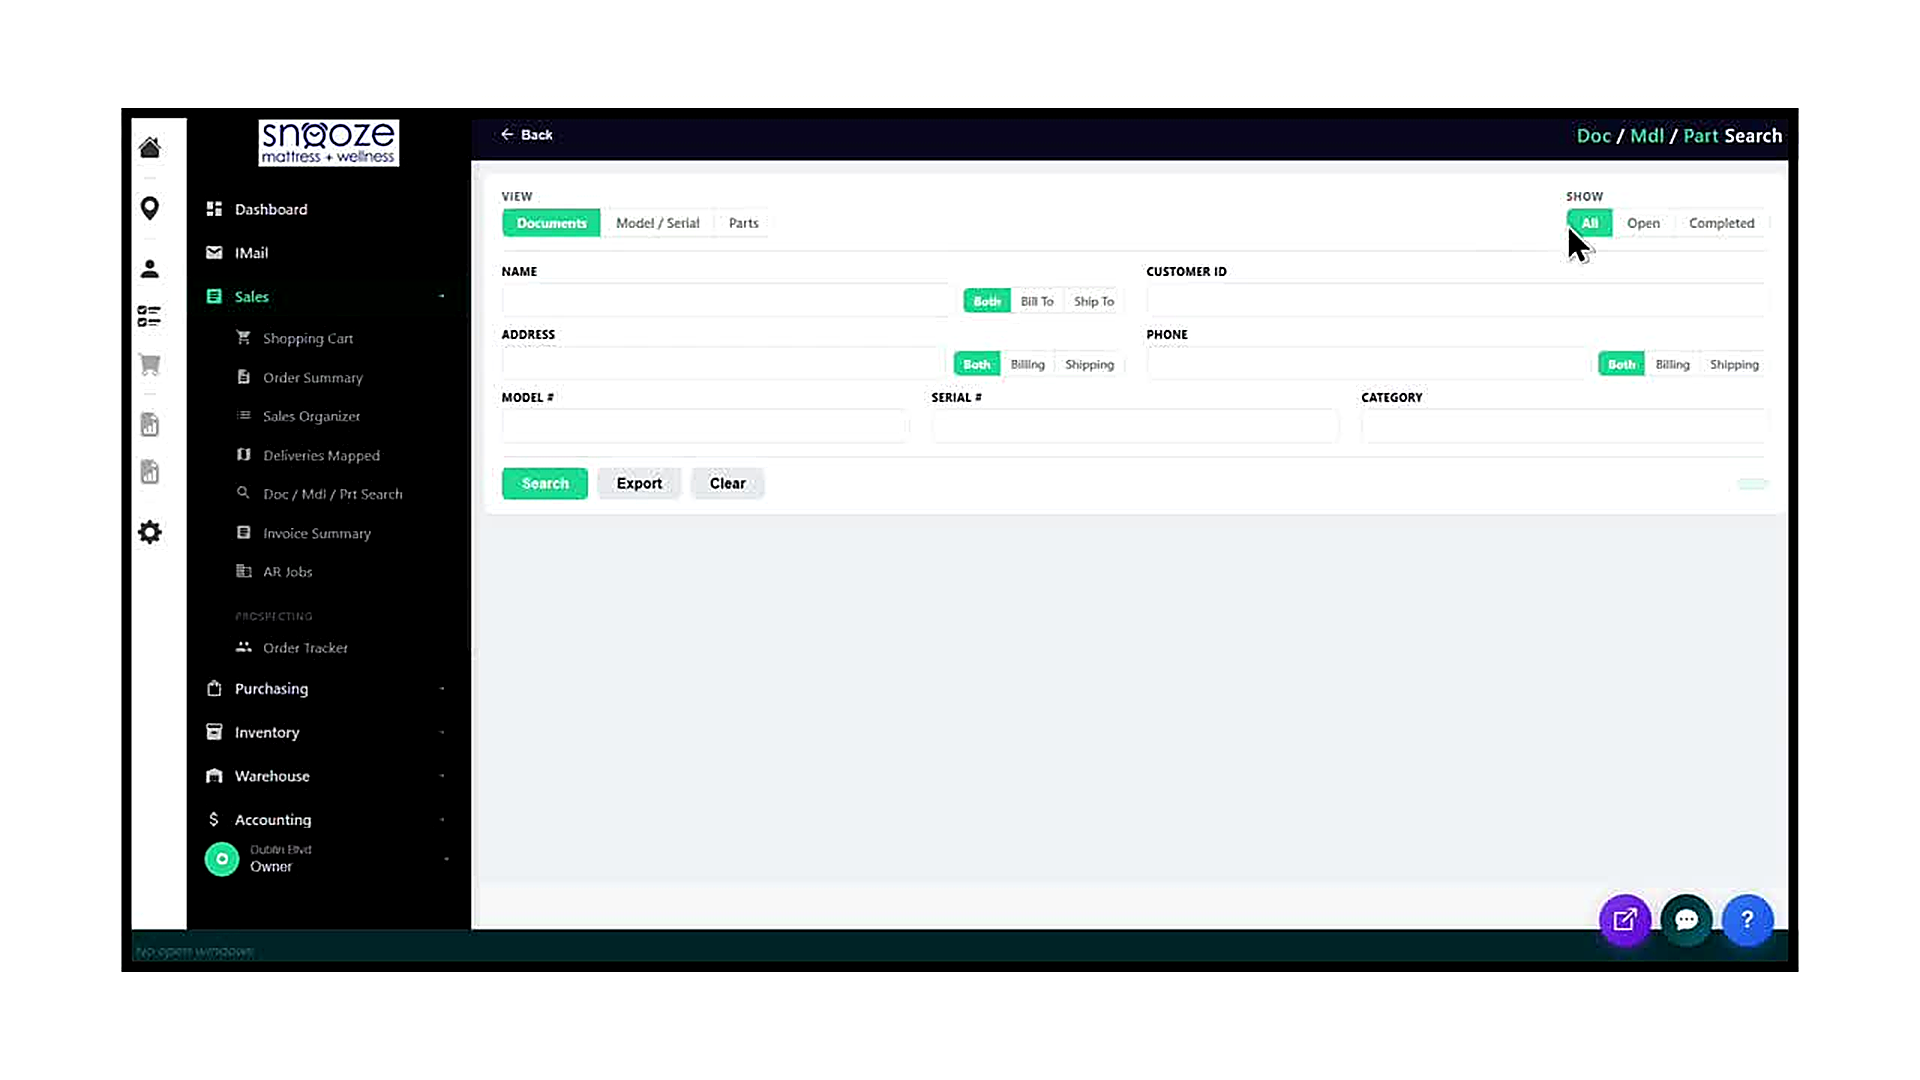
Choose a VIEW Tab
At the top of the screen, three VIEW tabs control what type of records the search looks through. 'Documents' (the default) searches orders and quotes by customer and address details. 'Model / Serial' searches by product model number or serial number. 'Parts' searches for part-related records. Select the tab that matches what you know about the order.
Set the SHOW Filter
In the top-right corner, the SHOW filter controls which order statuses are included in results. 'All' returns every matching record regardless of status. 'Open' returns only orders and quotes that are still active. 'Completed' returns only finalized records. The default is 'All', which is recommended for most lookups.
Review the Search Fields
The Documents view offers the following search fields: NAME (customer name), CUSTOMER ID, ADDRESS, PHONE, MODEL #, SERIAL #, and CATEGORY. You do not need to fill in every field — enter only what you know. The NAME, ADDRESS, and PHONE fields each have toggle buttons to specify whether to search the Bill To record, the Ship To record, or Both.
Use the Bill To / Ship To and Billing / Shipping Toggles
The NAME field has three toggle buttons: 'Both', 'Bill To', and 'Ship To'. These control whether the name search looks at the billing name, the shipping name, or both. Similarly, the ADDRESS field has 'Both', 'Billing', and 'Shipping' toggles, and the PHONE field has 'Both', 'Billing', and 'Shipping' toggles. The default for all three is 'Both', which is the broadest search and is recommended unless you need to narrow by address type.
Enter Your Search Term and Click Search
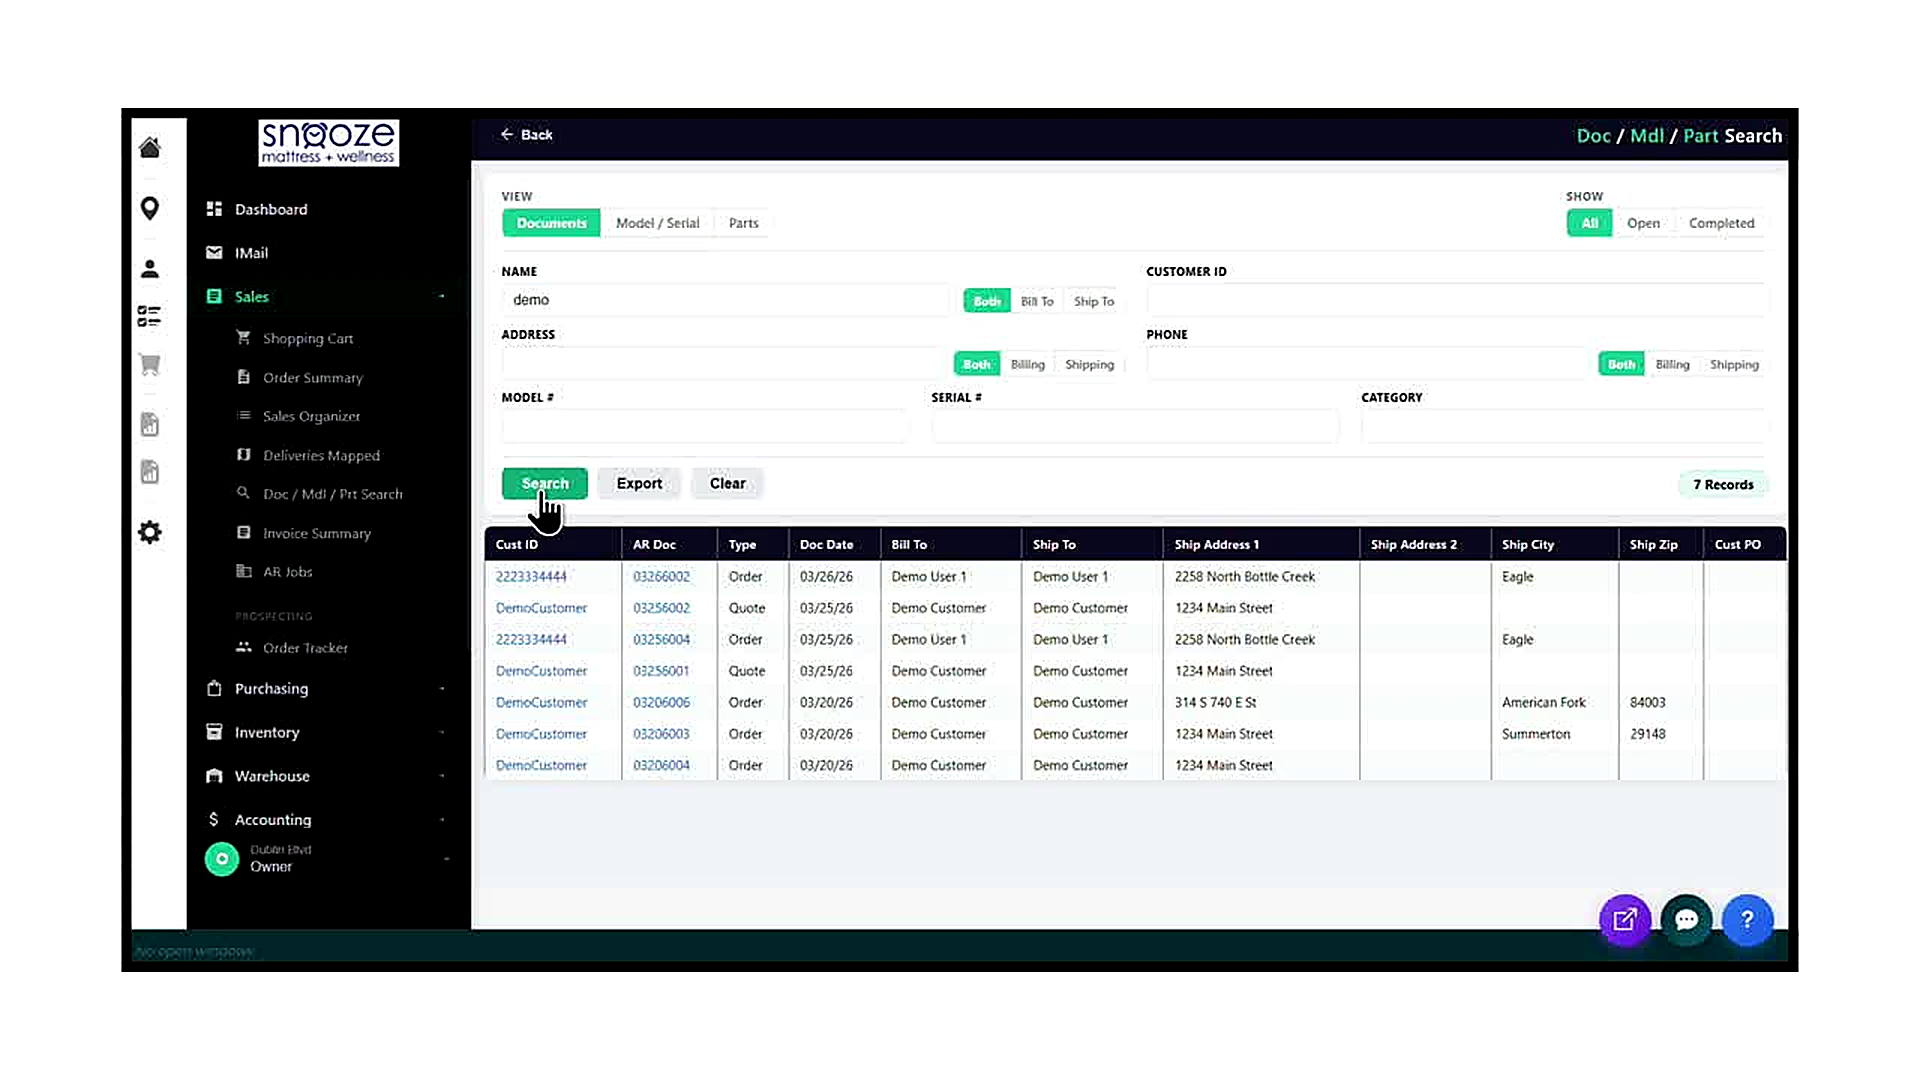
Click into one or more search fields and type your search term. For a name search, you can enter a partial name (e.g., typing 'demo' will return all customers whose name contains 'demo'). Once your terms are entered, click the green 'Search' button. The record count appears to the right of the Export button (e.g., '7 Records'), and the results table populates below.
Read the Results Table
Each row in the results table represents one order or quote and displays the following columns: Cust ID (customer ID number, clickable), AR Doc (the order or quote number, clickable), Type (Order or Quote), Doc Date (the document creation date), Bill To (billing name), Ship To (shipping name), Ship Address 1 (primary shipping street address), Ship Address 2, Ship City, Ship Zip, and Cust PO (customer purchase order number, if any).
Export or Clear the Results
Click 'Export' to download the current results table as a spreadsheet file. This is useful for sharing a list of a customer's orders with a manager or colleague. Click 'Clear' to reset all search fields and results so you can start a new search from scratch. Clicking 'Clear' does not navigate away from the screen.
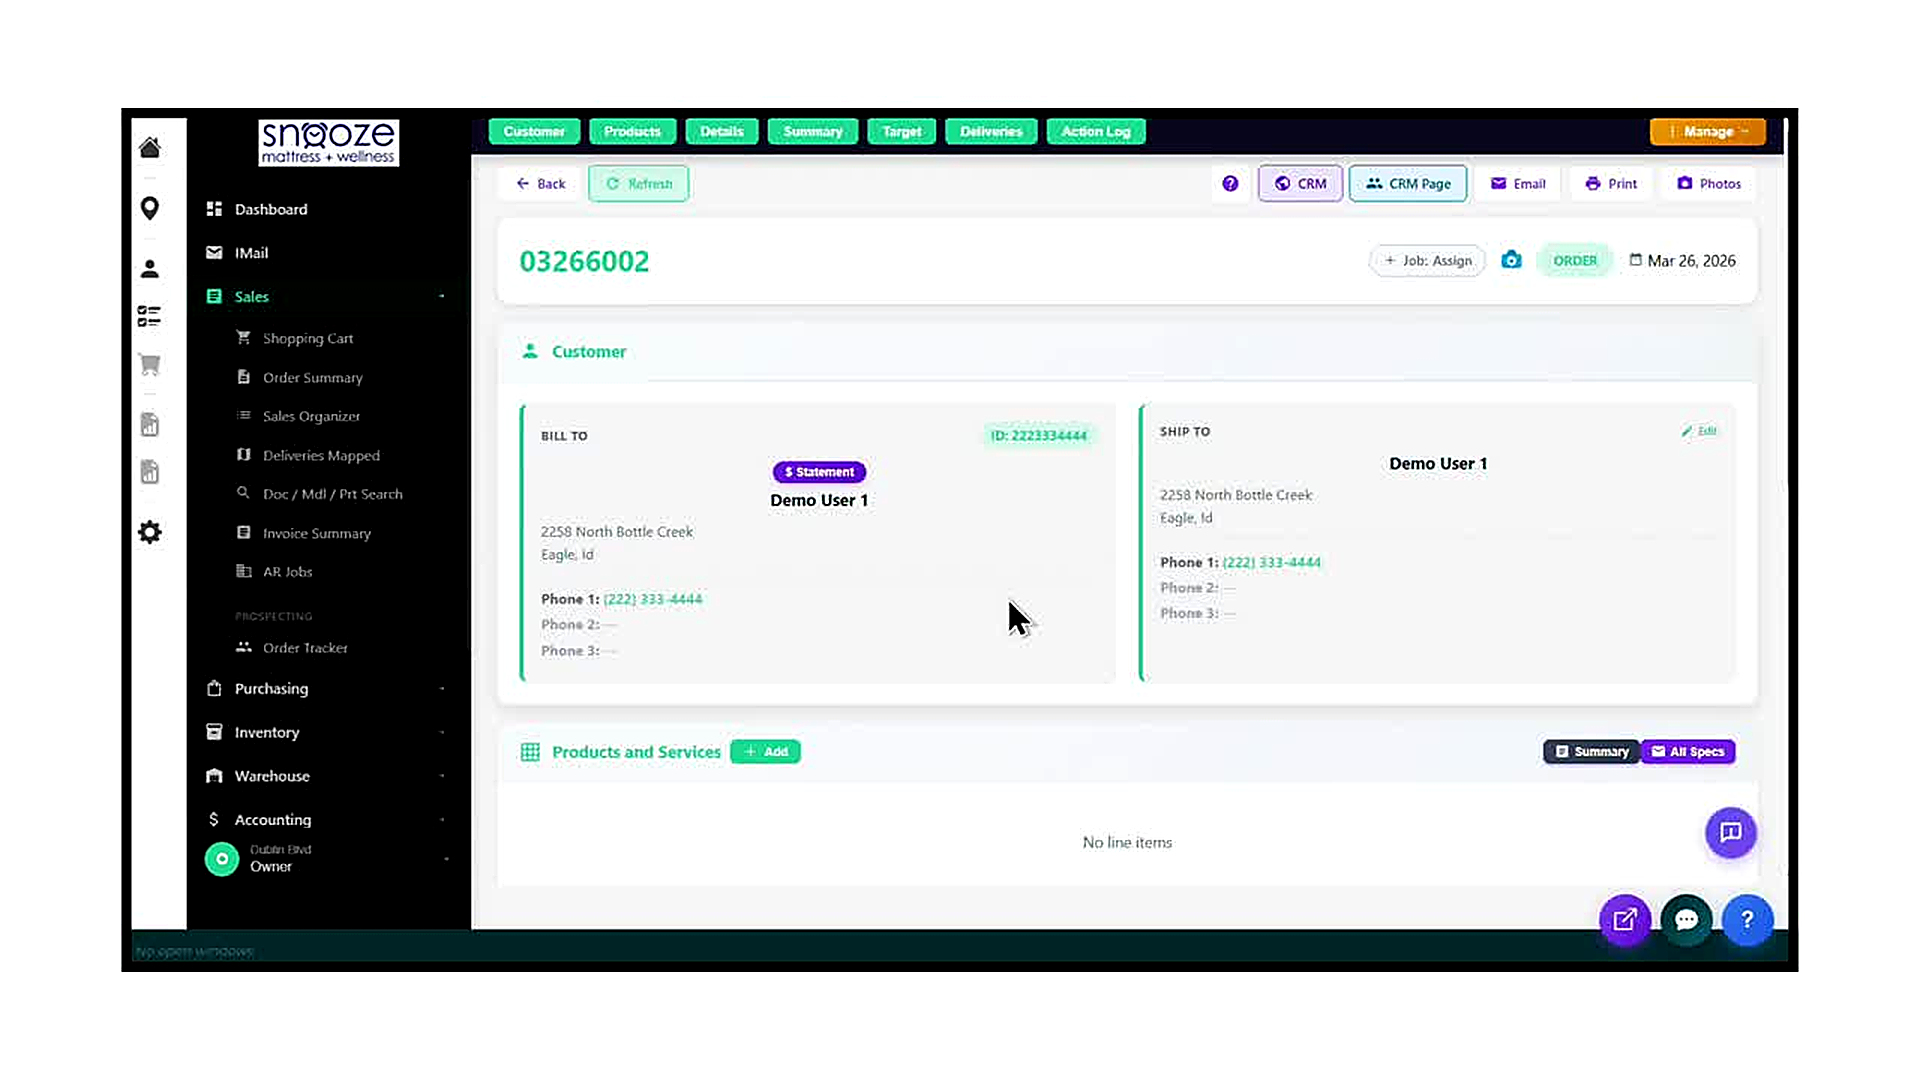
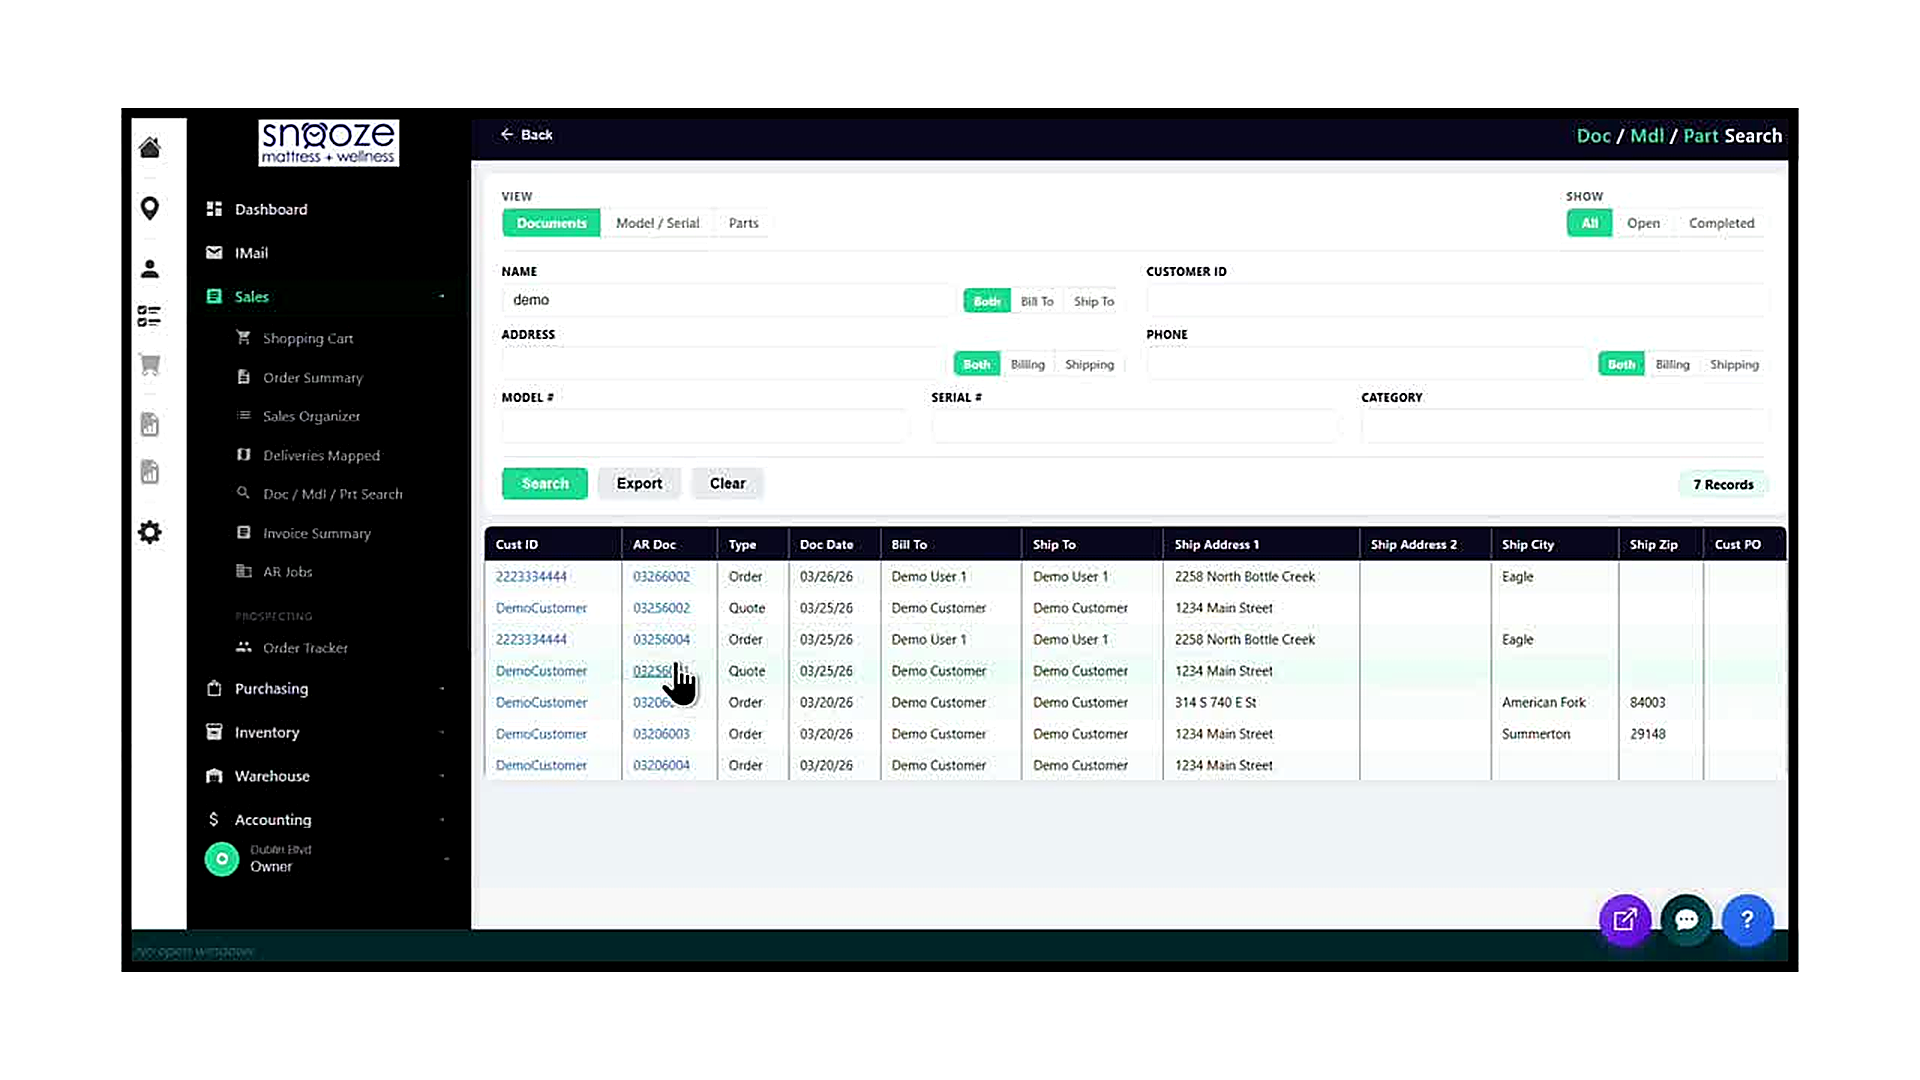
Click the AR Doc Link to Open the Order
In the results table, click the green AR Doc number (e.g., 03266002) in the row that corresponds to the customer's order. The full order screen opens, showing the order number at the top, the customer's Bill To and Ship To details, and all Products and Services on the order. You are now in the standard order view and can take any action available on a normal order.
Click the Cust ID Link to Open the Customer Record
Alternatively, click the green Cust ID value in the results table to open the customer's account record rather than a specific order. This shows the customer's full profile, purchase history, and all associated documents. Use this when you need to browse all of a customer's orders rather than jump directly to one specific document.
Delivery Routing
About This Guide
This step-by-step training guide covers how to use the Routing screen in the WhirlWind Delivery App to set up and manage delivery routes for your trucks. You will learn how to configure a truck, assign a driver, calculate the optimal route, add stops, adjust stop durations, and send SMS delivery notifications to customers.
- Access the Routing screen from the left navigation menu
- Select a delivery date using the date picker
- Set up a truck with a driver, start location, and start time
- Use Route All to automatically calculate Economy, Fastest, or Shortest routes
- Read the route summary: total stops, miles, and estimated drive time
- Add non-delivery stops such as Pickup/Depot, Fuel Stop, Break/Rest, and Lunch/Meal
- Search or click on the map to set a stop address and verify it
- Adjust the duration for any stop on the route
- View the plotted route on the map with breadcrumb lines
- Send SMS delivery notifications to customers with their time window
Open the Routing App
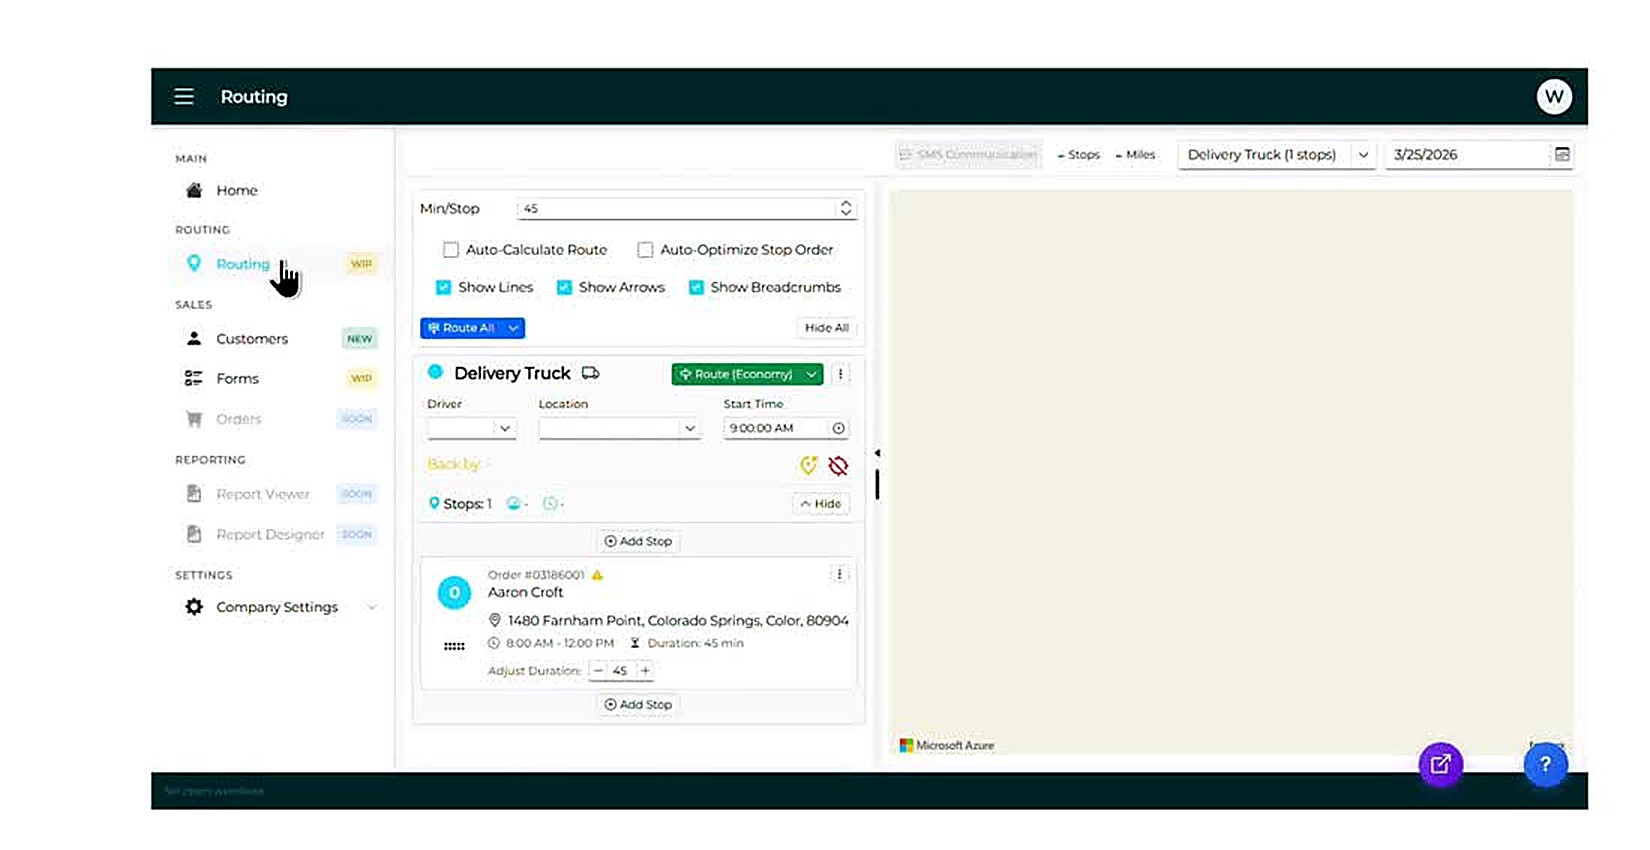
From the left navigation menu, locate the ROUTING section. Click 'Routing' (marked WIP). This opens the Routing screen, which is the central tool for building and managing delivery routes for all your trucks.
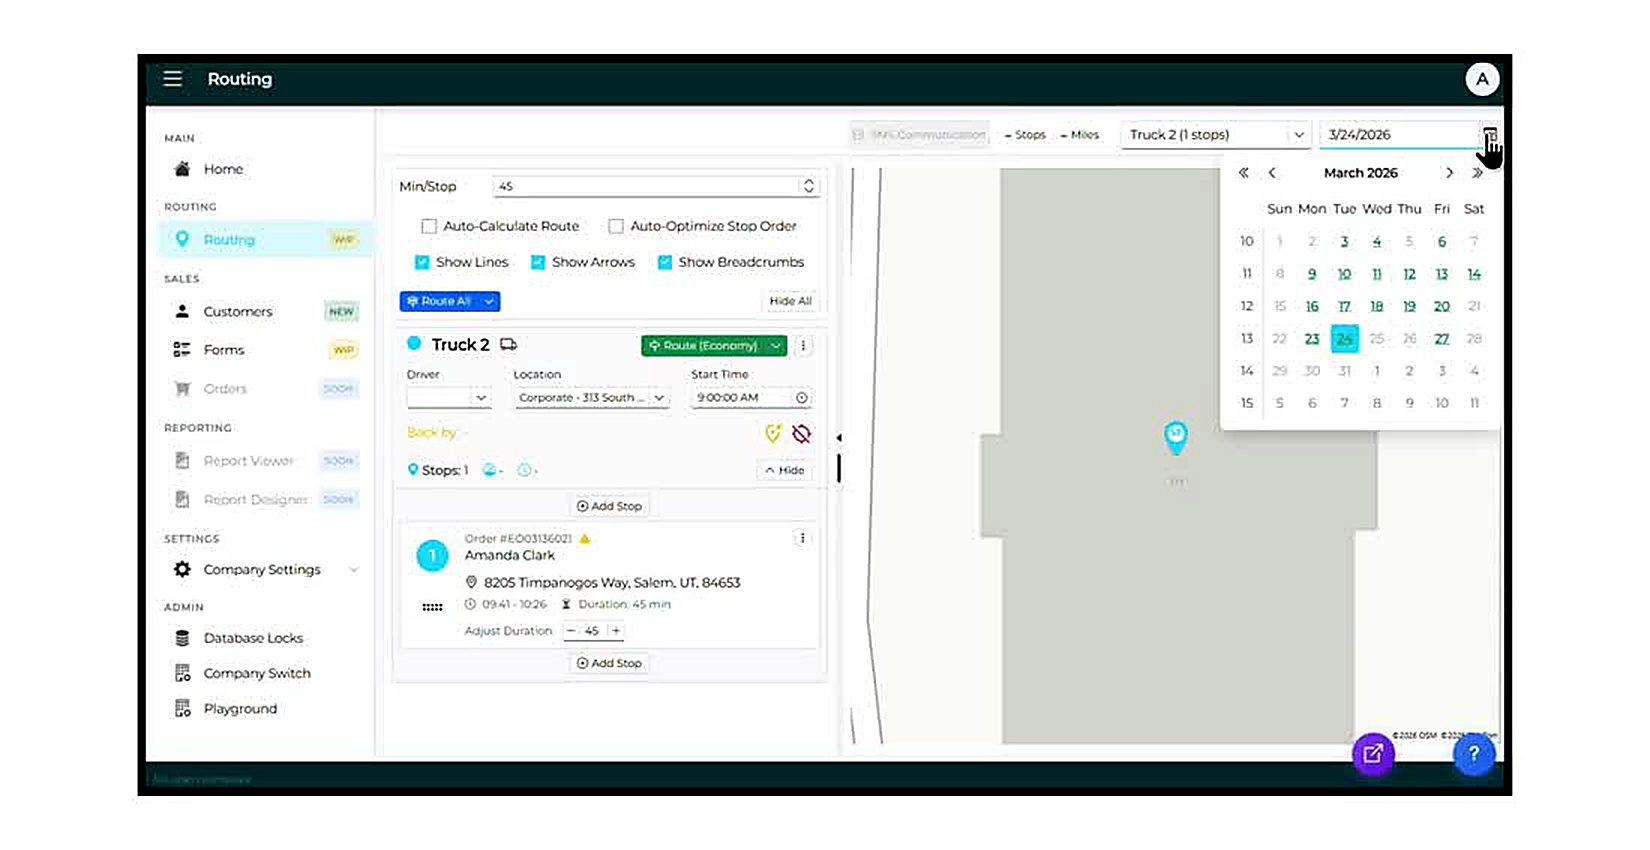
Select a Delivery Date
In the top-right corner of the screen, locate the date field showing today's date (e.g., 3/25/2026). Click the calendar icon next to the date field to open the date picker. Navigate to the desired delivery date using the left and right arrows, then click the date to select it. The truck list will refresh to show routes for that date.
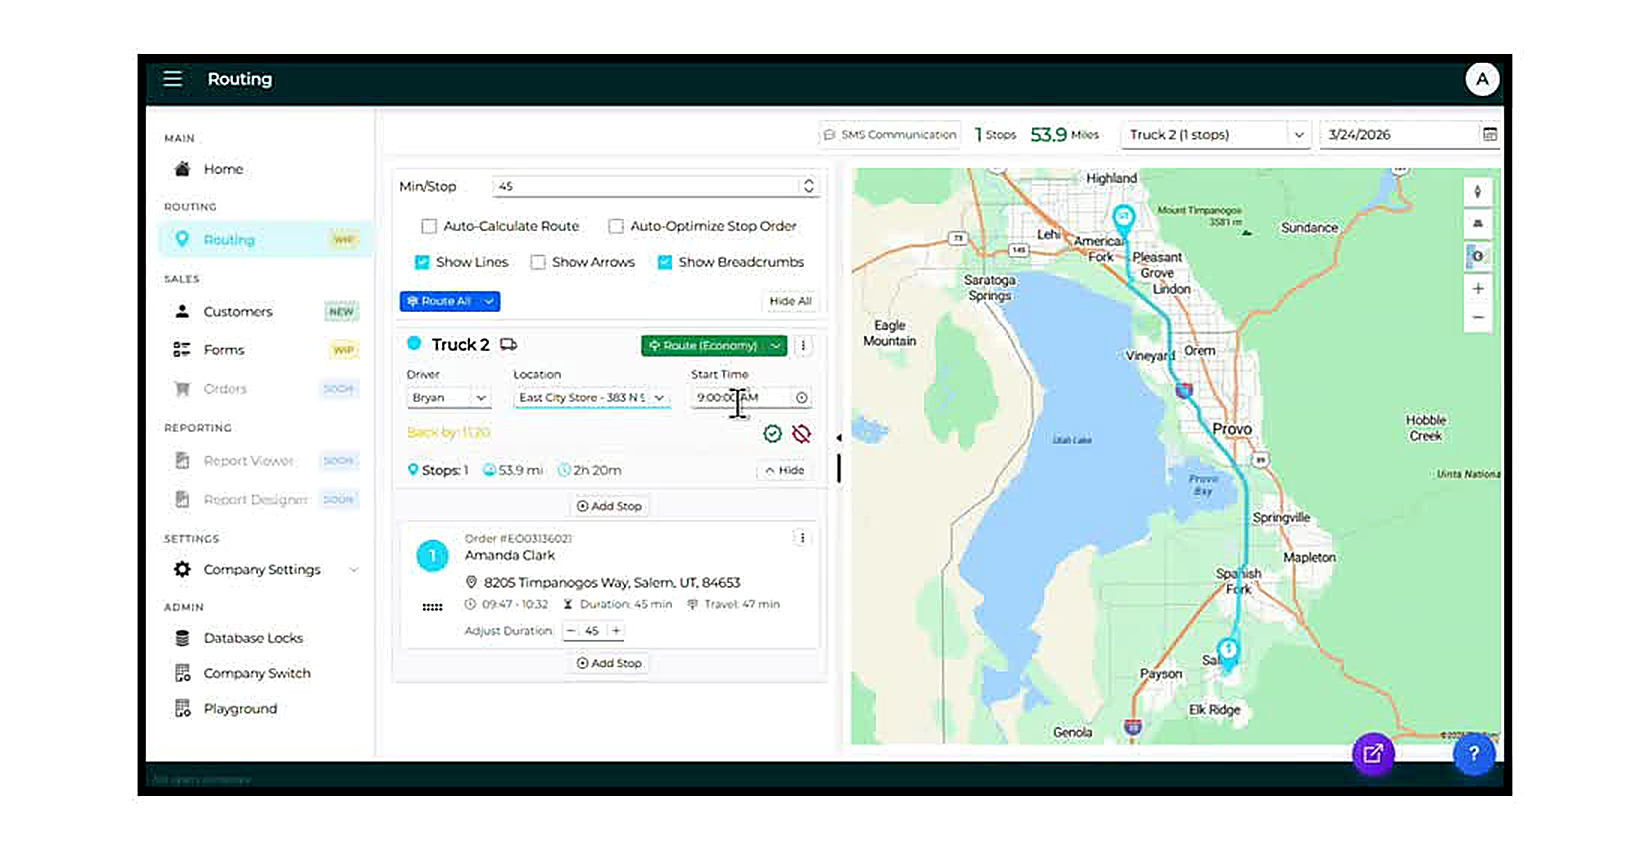
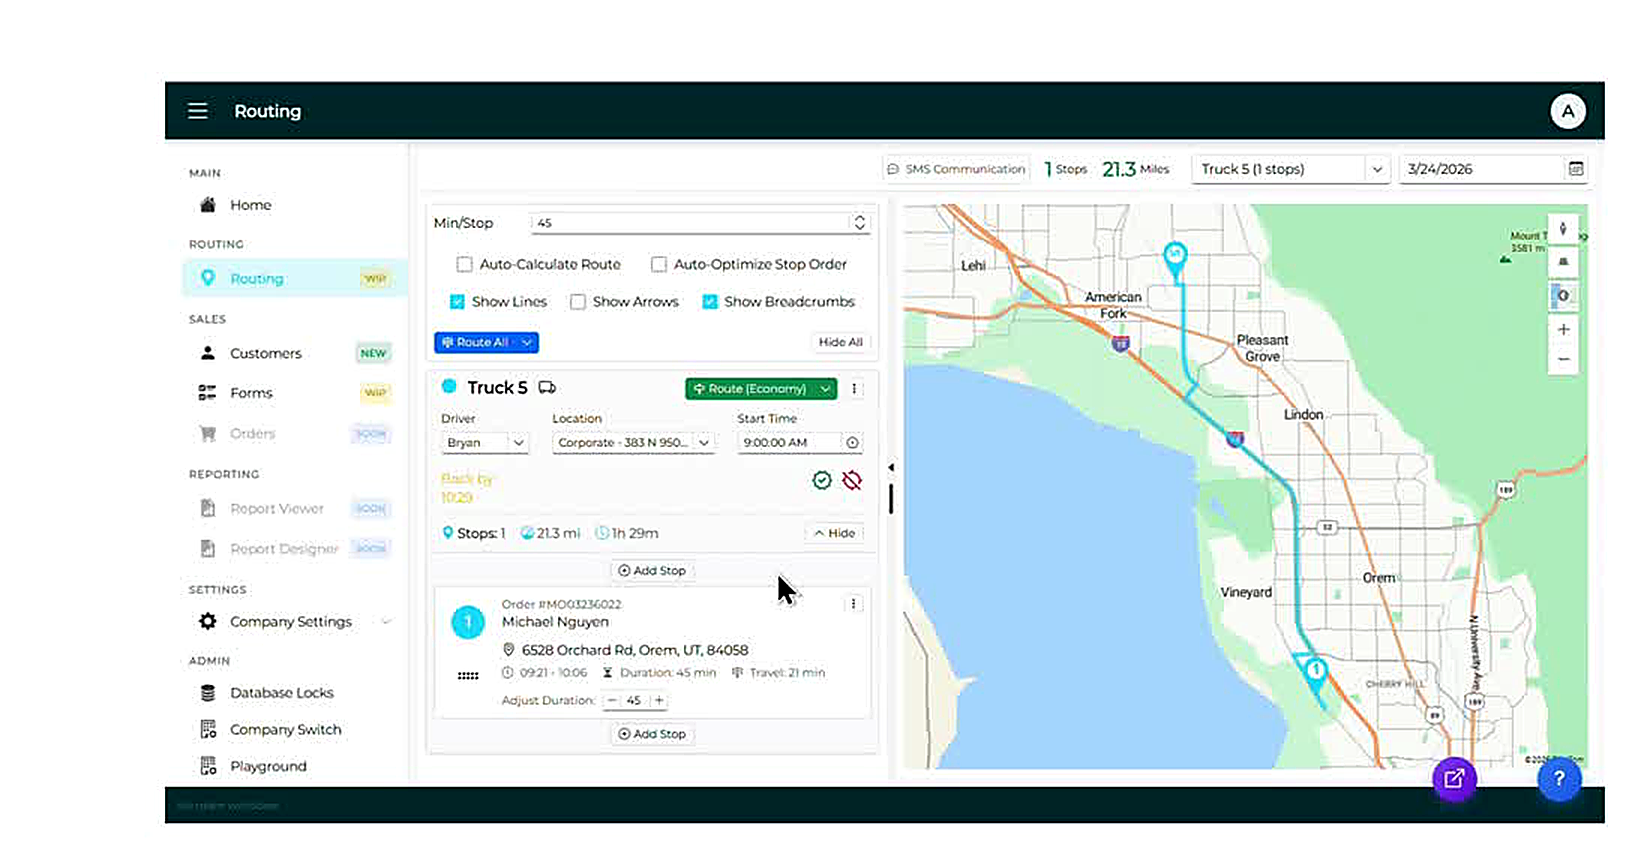
Set the Driver, Location, and Start Time
Each truck card in the left panel has three fields to configure before routing: Driver (select from the dropdown), Location (the starting warehouse or store address), and Start Time (the time the truck departs, defaulting to 9:00 AM). Set all three fields before calculating the route. The 'Back by' time will calculate automatically once the route is run.
Set the Min/Stop Duration
At the top of the center panel, the Min/Stop field controls the default number of minutes allocated at each delivery stop. The default is 45 minutes. Adjust this value up or down to match your team's typical delivery time. This affects the estimated 'Back by' time for the entire route.
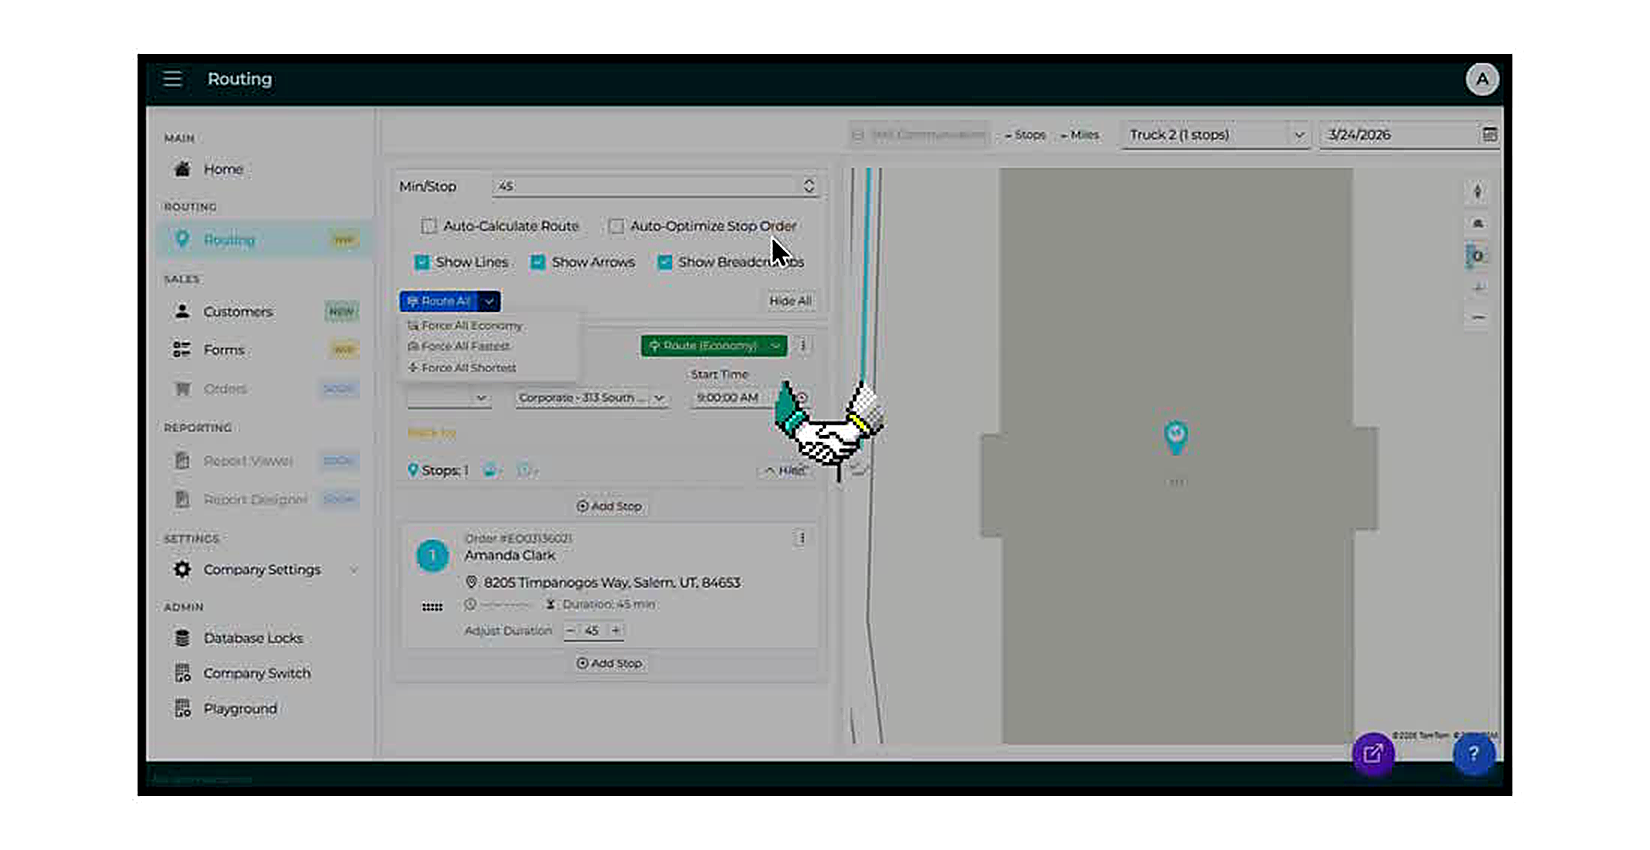
Click 'Route All' to Calculate Routes
Once trucks are configured, click the green 'Route All' button at the top of the center panel. A dropdown appears with three routing options: Force All Economy (minimizes total cost/distance), Force All Fastest (minimizes total travel time), and Force All Shortest (minimizes total miles). Select the option that best fits your delivery priorities for the day.
Review the Route Summary
After routing, each truck card updates to show the route summary: total Stops, total Miles, estimated total drive time (e.g., 2h 20m), and the calculated 'Back by' time. The map panel on the right displays the plotted route with a teal line connecting all stops in sequence. Each stop is shown as a numbered pin.
Enable Auto-Calculate and Auto-Optimize (Optional)
Two optional checkboxes appear at the top of the center panel: Auto-Calculate Route automatically recalculates the route whenever a stop is added or removed. Auto-Optimize Stop Order automatically reorders stops for the most efficient sequence whenever the route is updated. Check these if you want the system to manage route updates automatically as you build the route.
Click '+ Add Stop'
To add a non-delivery stop to a truck route (such as a warehouse pickup, fuel stop, or break), click the '+ Add Stop' button that appears between stops or at the bottom of a truck's stop list. The 'Add Stop to Truck' modal will open.
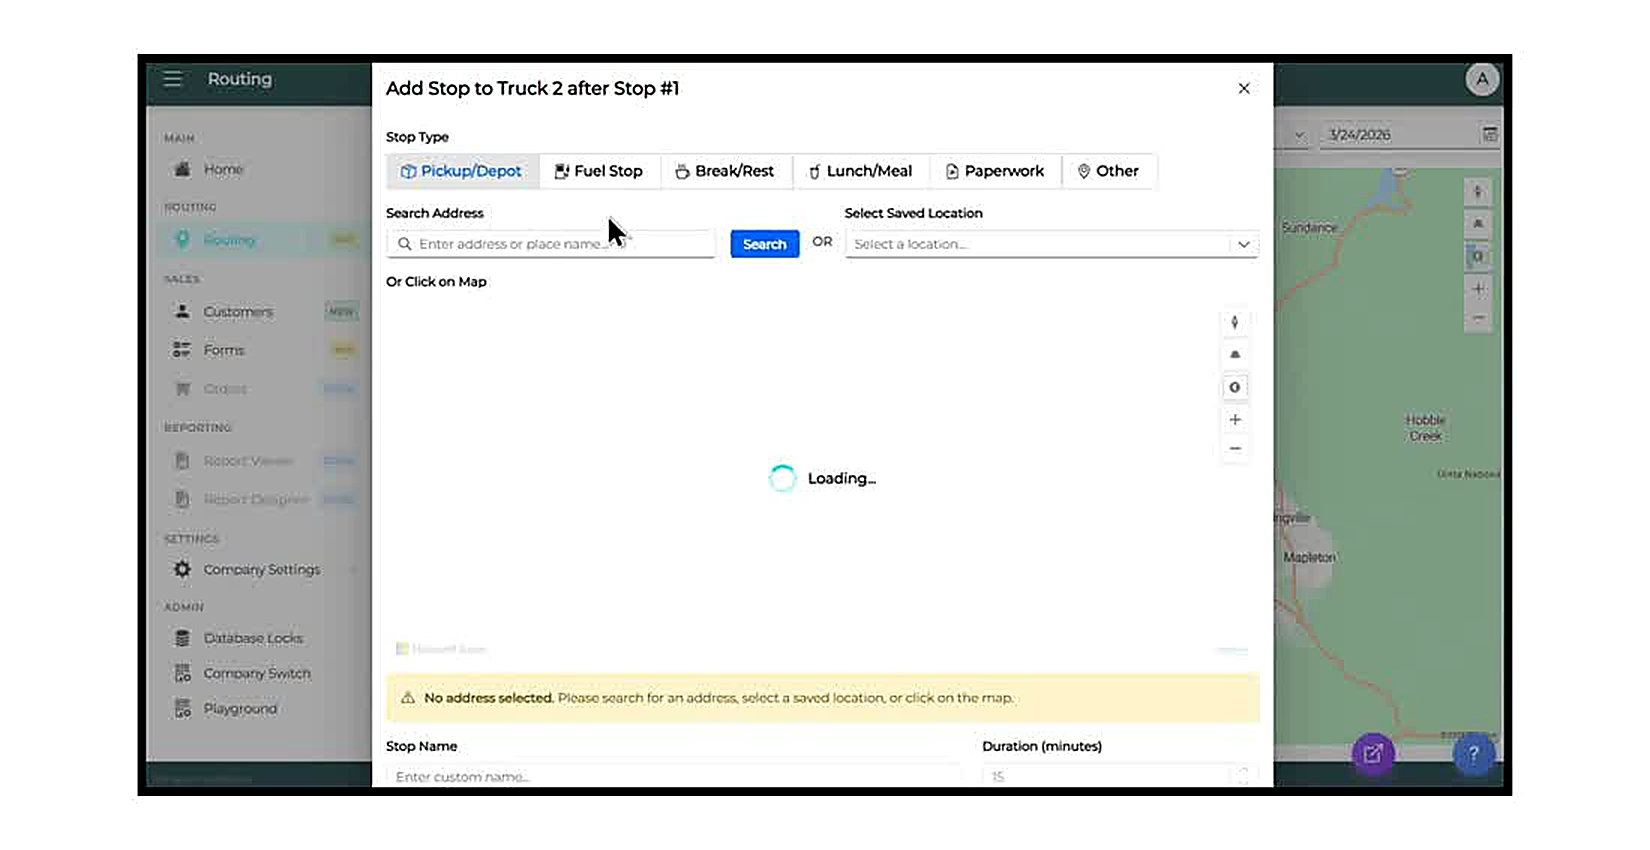
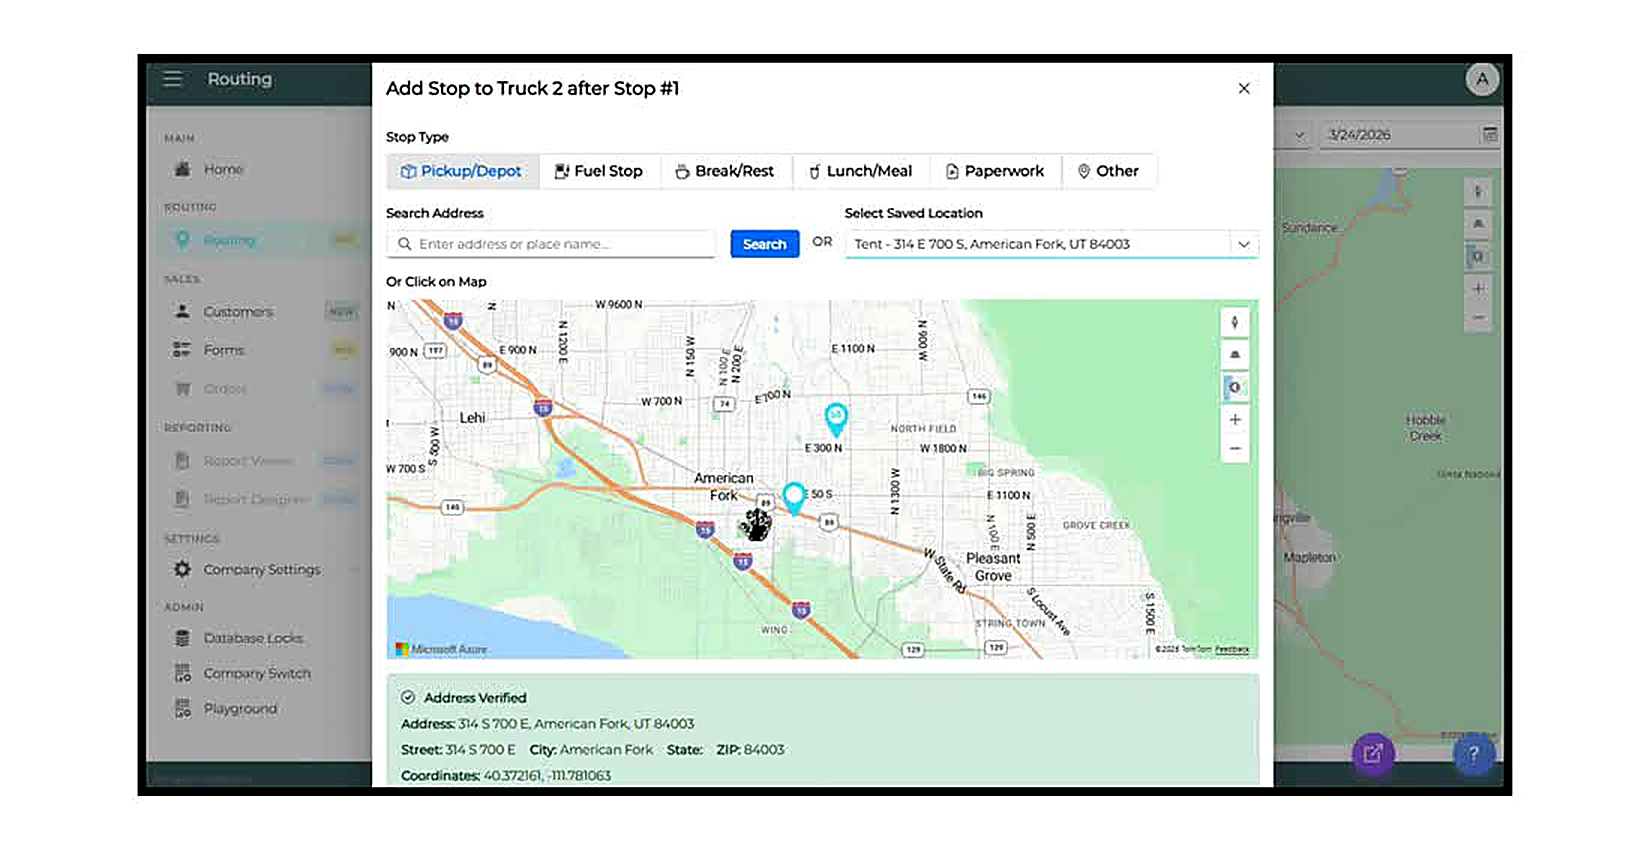
Select a Stop Type and Address
At the top of the Add Stop modal, select the Stop Type tab that matches the purpose of the stop: Pickup/Depot for warehouse or tent pickups, Fuel Stop, Break/Rest, Lunch/Meal, Paperwork, or Other. Then enter an address in the Search Address field and click Search, or select from the 'Select Saved Location' dropdown if the location has been saved in the system. You can also click directly on the map to set the location.
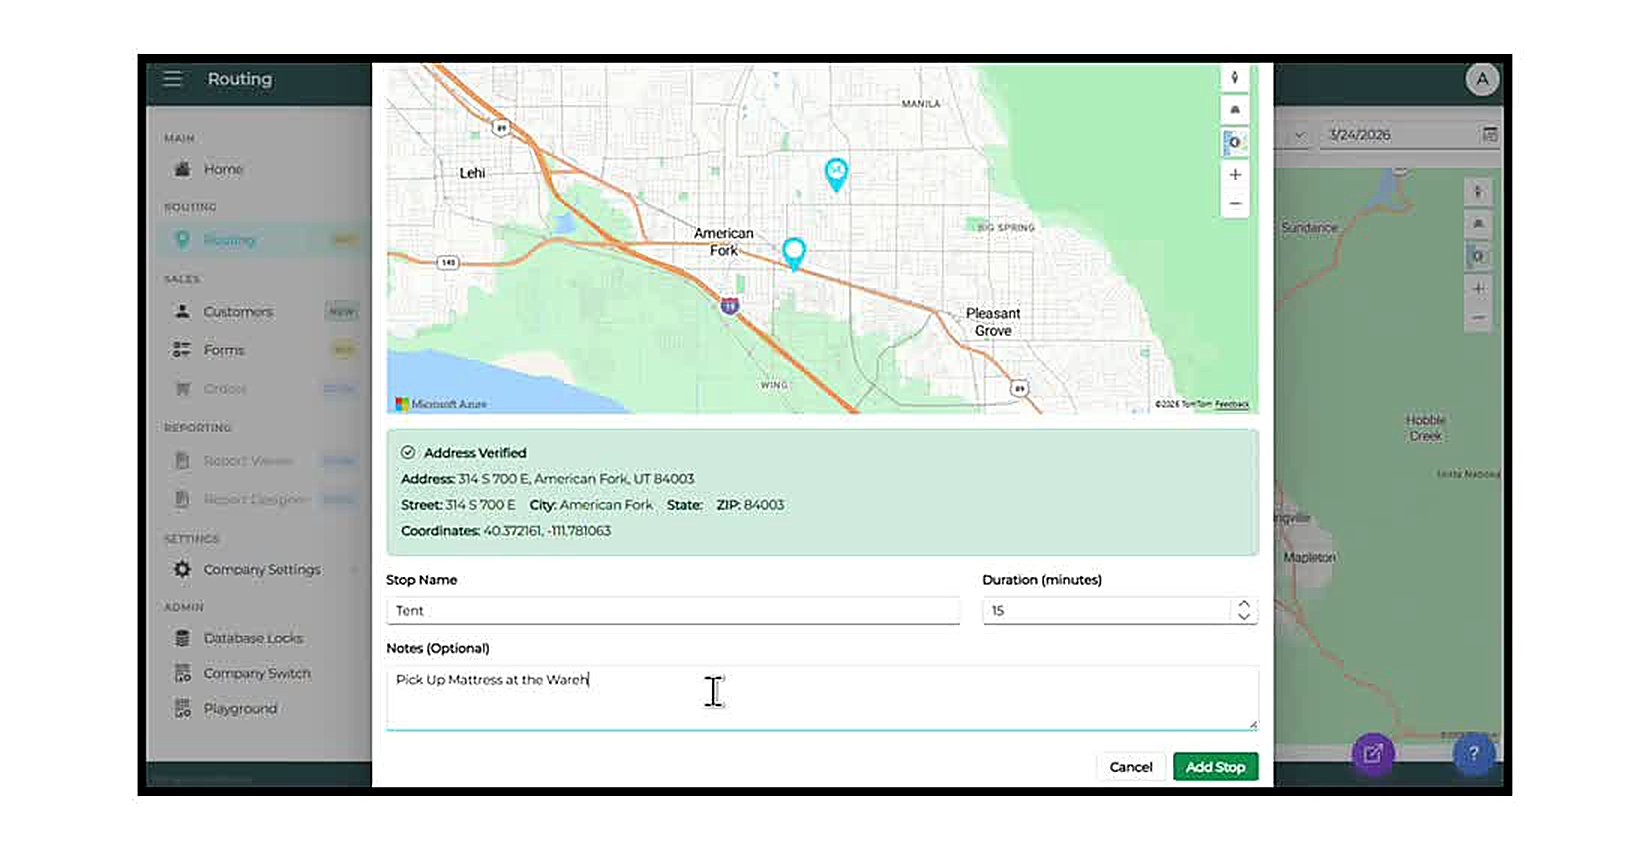
Enter Stop Name, Duration, and Notes
Once the address is verified, scroll down in the modal to complete the remaining fields: Stop Name (a label for the stop, e.g., 'Tent'), Duration in minutes (how long the truck will spend at this stop), and Notes (optional — use for driver instructions such as 'Pick Up Mattress at the Warehouse'). Click the green 'Add Stop' button to save.
Verify the Stop Was Added to the Route
After clicking Add Stop, the modal closes and the new stop appears in the truck's stop list in the correct sequence position. The route summary updates to reflect the new stop count, mileage, and estimated time. The map redraws to include the new stop pin and updated route line.
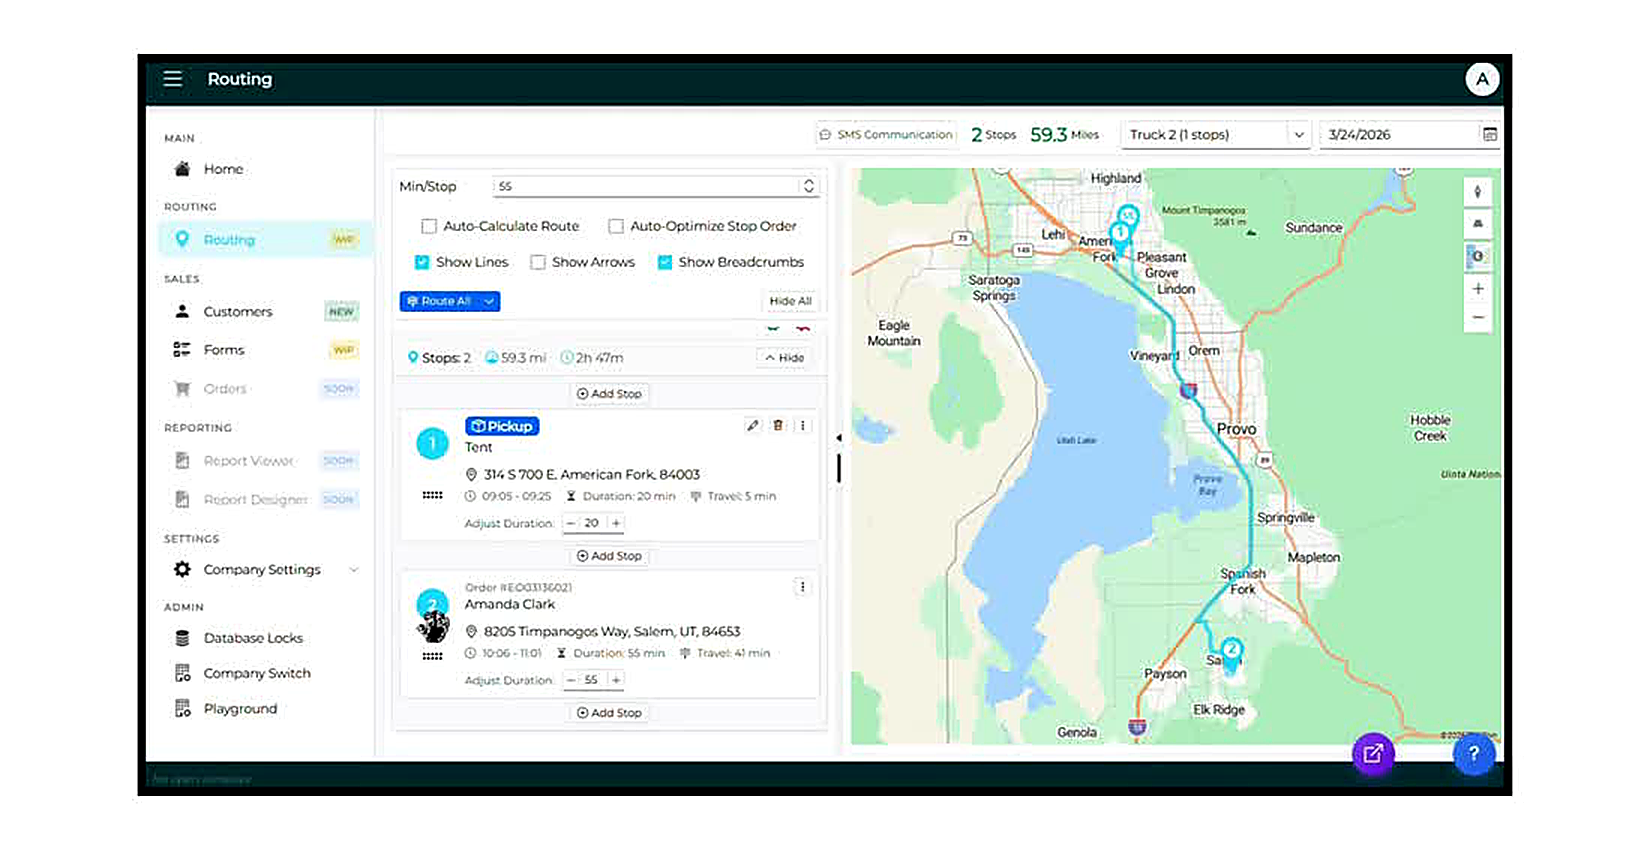
Use the Adjust Duration Controls
Each stop card shows an 'Adjust Duration' row with a minus ( − ) button, the current duration in minutes, and a plus ( + ) button. Click the minus button to decrease the time allocated at that stop; click plus to increase it. The route's total time and 'Back by' estimate update automatically as you adjust.
Open SMS Communication
Once a route is finalized, click the 'SMS Communication' button in the top bar of the screen. The 'Send Delivery Notifications' modal opens. This tool lets you send each customer an automated text message with their scheduled delivery time window.
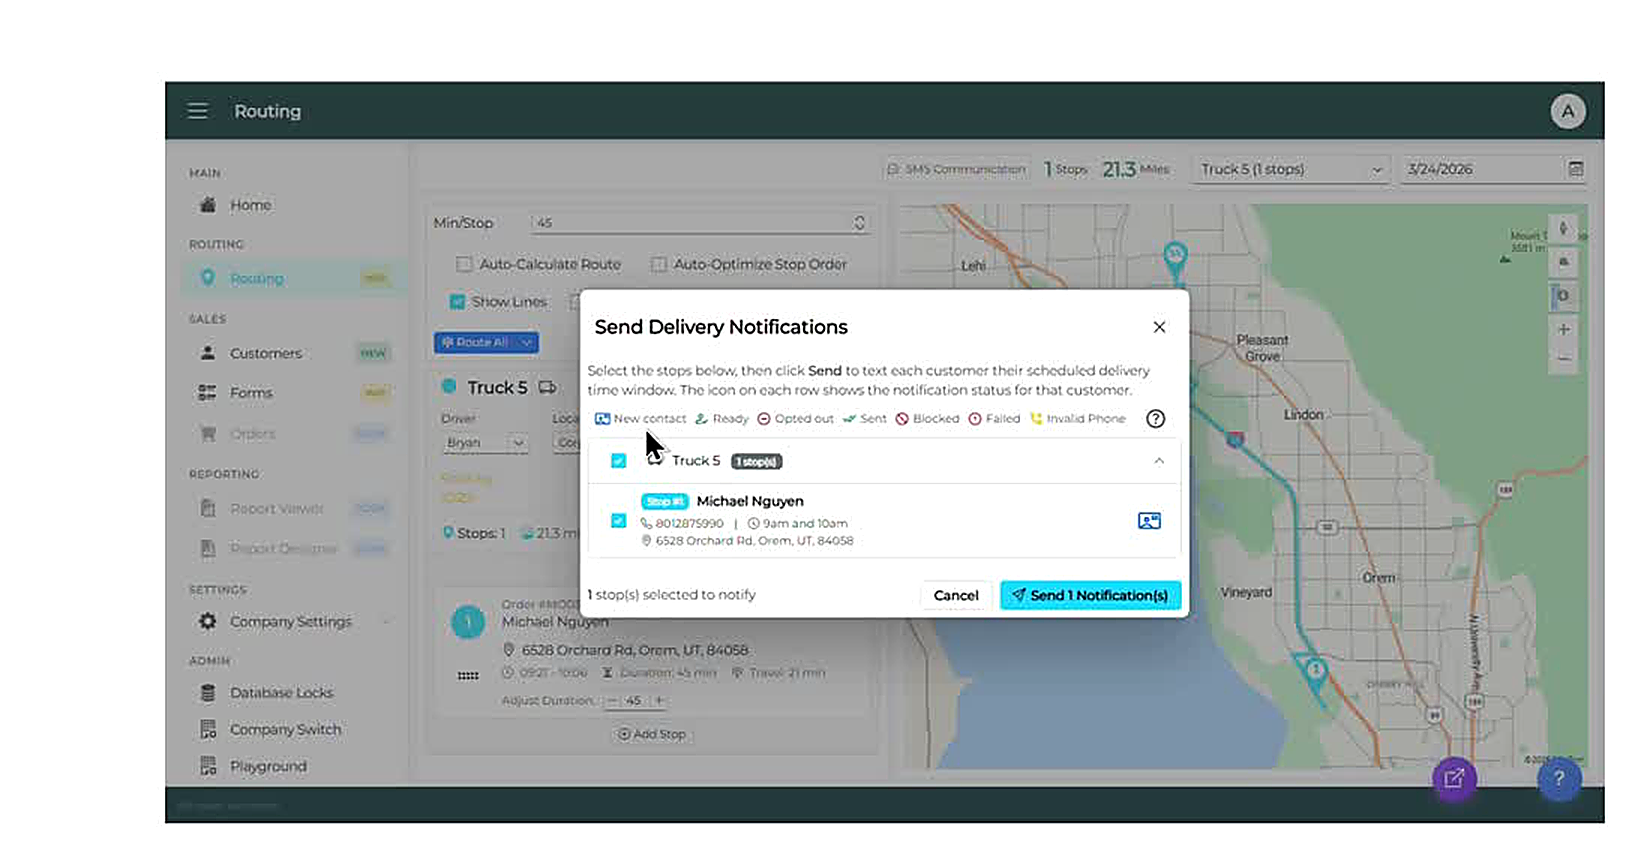
Select Stops and Send Notifications
In the modal, each truck is listed with its stops. Check the checkbox next to each stop you want to notify. The icon on each row shows the customer's notification status: New contact (never texted), Ready, Opted out, Sent, Blocked, Failed, or Invalid Phone. Select all stops that are Ready or New contact, then click 'Send Notification(s)' to text each selected customer their delivery time window.
| Step | Action | Key Notes |
|---|---|---|
| 1 | Open the Routing App | Navigate to ROUTING > Routing in the left menu |
| 2 | Select a Delivery Date | Click the calendar icon top-right and pick a date |
| 3 | Set Driver, Location, Start Time | Fill in all three truck fields before routing |
| 4 | Set Min/Stop Duration | Default is 45 min; adjust to match your team's pace |
| 5 | Click Route All | Choose Economy, Fastest, or Shortest from the dropdown |
| 6 | Review Route Summary | Check stops, miles, drive time, and Back by time |
| 7 | Auto-Calculate / Auto-Optimize | Optional — check these for automatic route updates |
| 8 | Click + Add Stop | Adds Pickup, Fuel, Break, Lunch, Paperwork, or Other stops |
| 9 | Set Stop Type and Address | Search, select saved location, or click the map |
| 10 | Enter Name, Duration, Notes | Add driver instructions in the Notes field before saving |
| 11 | Verify Stop Added | Check stop count, mileage, and map update correctly |
| 12 | Adjust Duration per Stop | Use − / + buttons on each stop card to fine-tune time |
| 13 | Open SMS Communication | Click SMS Communication button in the top bar |
| 14 | Select Stops and Send | Check Ready/New contact stops, then click Send Notification(s) |
Creating a Return (Sold in WhirlWind)
About This Guide
This step-by-step training guide covers how to create a return for a sale that was originally made in WhirlWind. Use this workflow when a customer returns a product that has a posted invoice in the system. The return creates a credit on the customer’s account that can be refunded or applied to a future order.
- Locate the original posted invoice in WhirlWind using Order Summary or Doc / Mdl / Part Search
- Use the 'Return' button in the invoice toolbar to open the Select Items to Return dialog
- Read the Select Items to Return dialog: product list, quantities, and prices
- Select which items to include in the return and click Create Return
- Enter the return cost in the Return Inventory dialog for each serialized product
- Understand the new return order record: order number, RETURN status badge, RET serial number, and ASSIGNED status
- Open the Manage dropdown on the return order and select 'Post Return'
- Choose the posting date: Today, Order Date, or Custom Date
- Understand what posting does: creates an AR Sales Invoice, marks inventory, posts to GL, and updates customer balance
- Verify the system navigates back to the original order after posting
Locate the Original Posted Invoice
Find the customer’s original order in WhirlWind using Order Summary, the Sales Organizer, or Doc / Mdl / Part Search. Open the order and confirm it has been posted — look for an 'INVOICE' badge and a 'POSTED' badge in the order header bar, alongside the invoice date and due date. Only posted invoices can generate a return using this workflow.
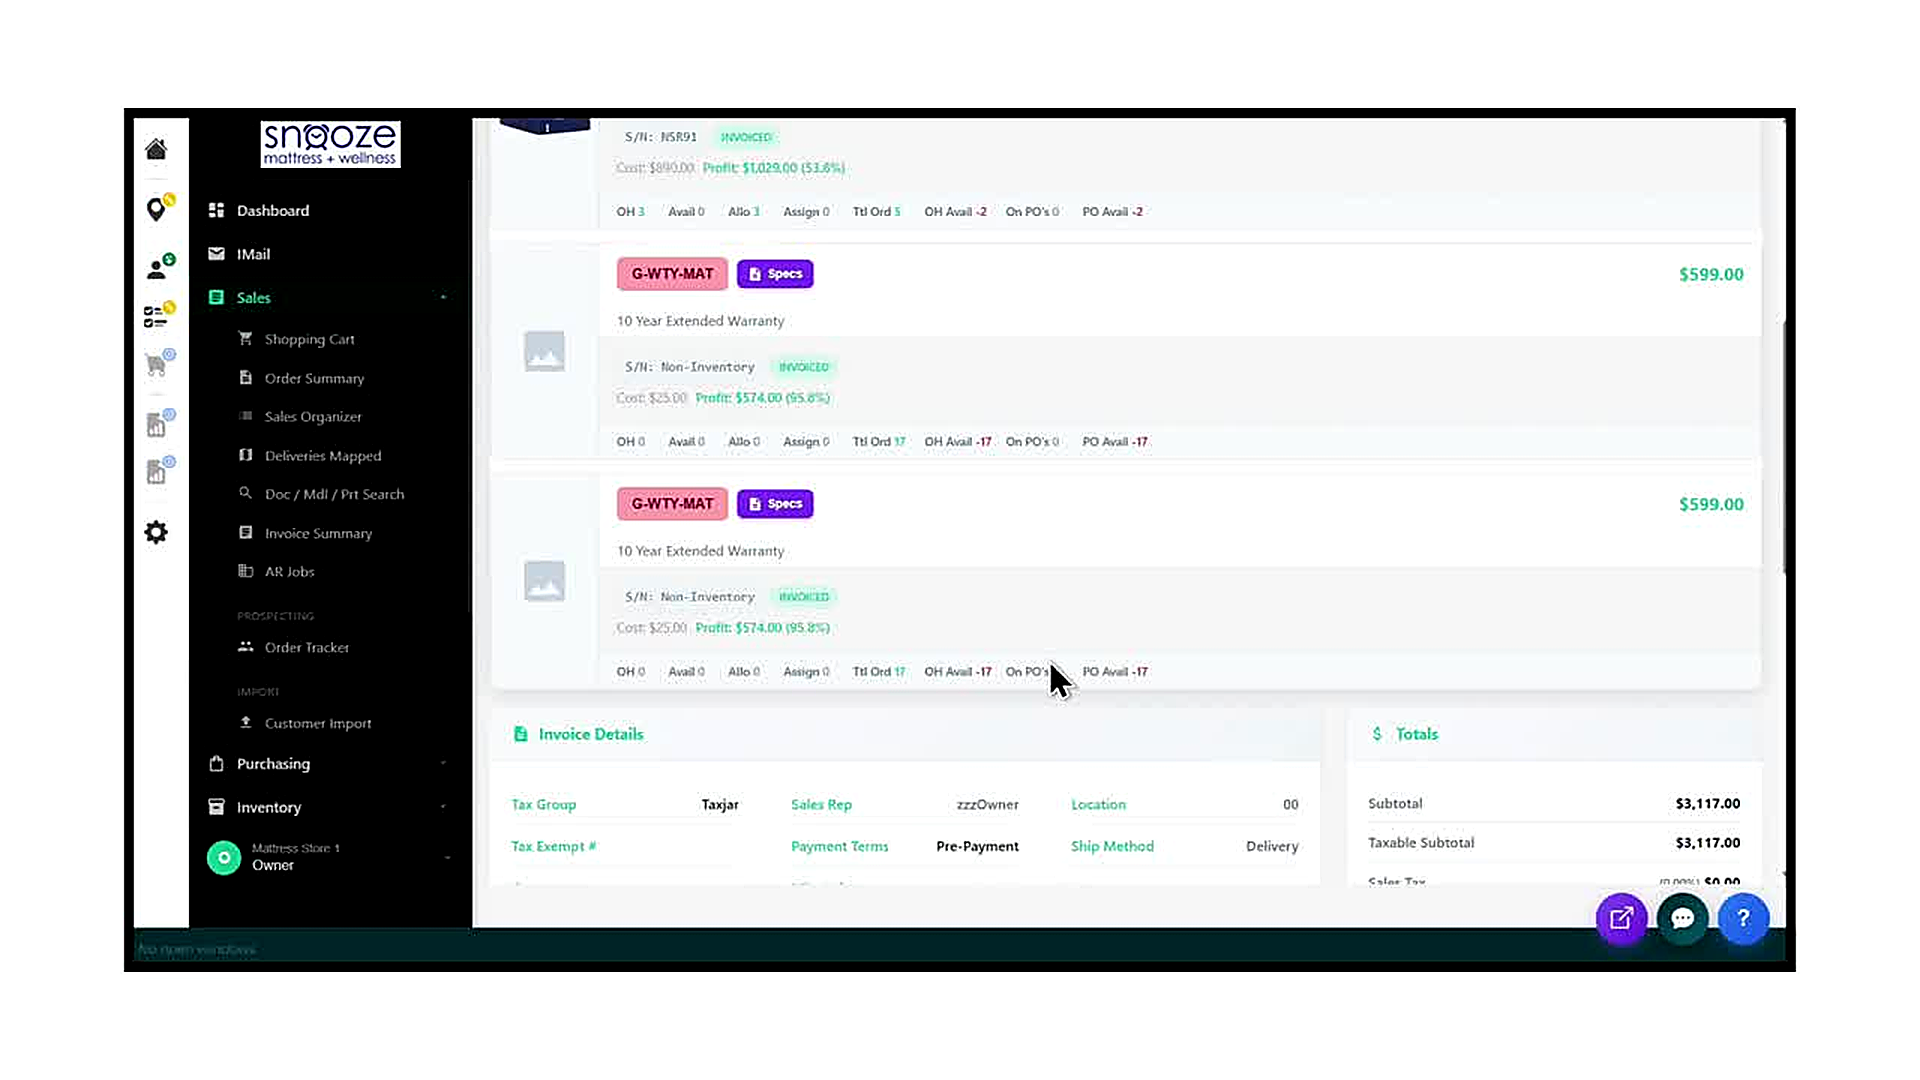
Review the Products on the Invoice
Scroll through the Products and Services section of the invoice to familiarize yourself with what was sold: model numbers, quantities, serial numbers, and prices. Confirm which item or items the customer is returning before proceeding. The return workflow will present you with a list of everything on the invoice, and you will need to select only the items being returned.
Click the 'Return' Button in the Toolbar
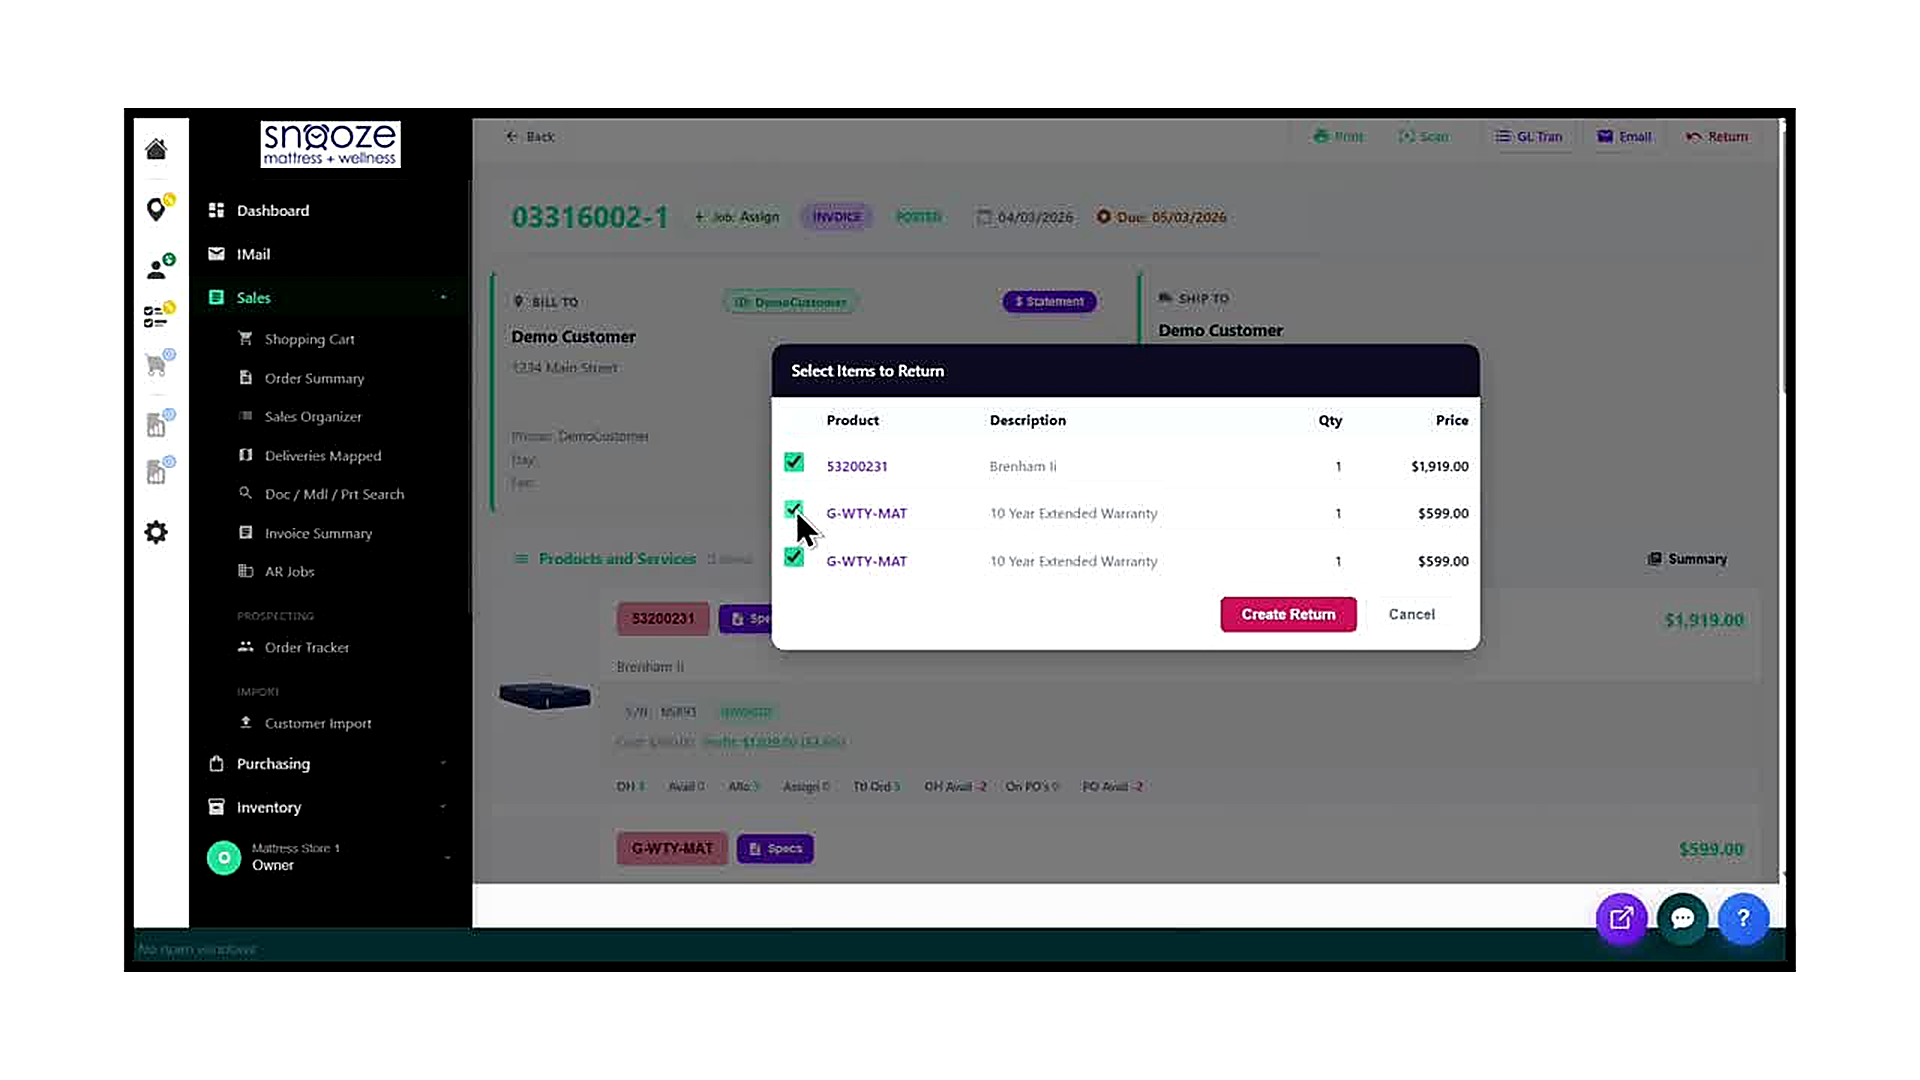
With the original posted invoice open, locate the toolbar at the top of the order screen. Click the 'Return' button (shown with a return arrow icon and the label 'Return'). The 'Select Items to Return' dialog opens immediately over the order.
Select the Items Being Returned
The Select Items to Return dialog lists every product line on the invoice, with a checkbox, model number, description, quantity, and price for each. By default, all items are checked. Uncheck any items that are NOT being returned — leave only the items the customer is physically bringing back checked. Once your selection is correct, click the red 'Create Return' button to proceed.
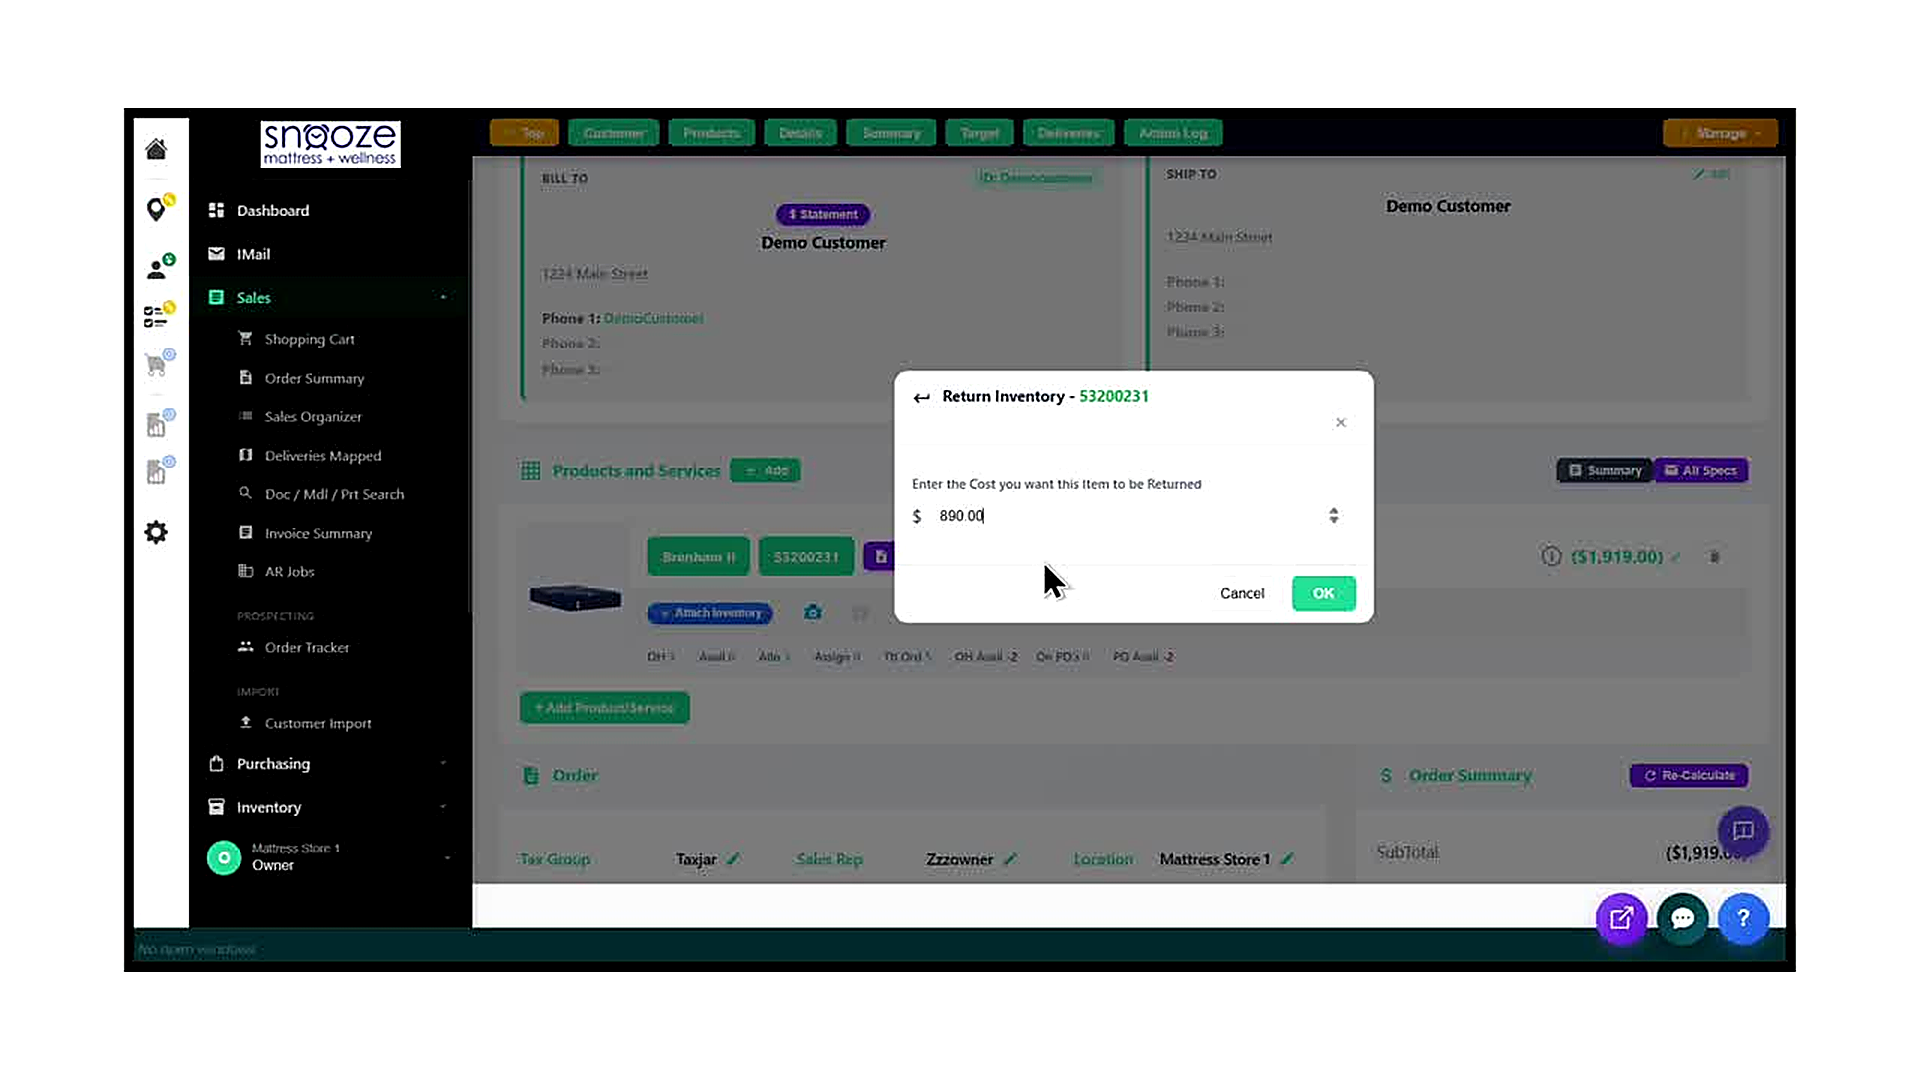
Enter the Return Cost for Serialized Items
After clicking Create Return, a 'Return Inventory' dialog appears for each serialized item on the return. The dialog shows the model number and asks: 'Enter the Cost you want this Item to be Returned.' The cost field is pre-filled with the original cost from the invoice. Verify or adjust the cost to reflect what the store is crediting back to inventory for this returned unit, then click OK.
Repeat for Each Serialized Item
If the return includes multiple serialized products, the Return Inventory dialog will appear once for each one in sequence. Complete the cost entry and click OK for each item before the return order is fully created. Non-inventory items (such as warranties marked as Non-Inventory) do not trigger this dialog and are added to the return automatically.
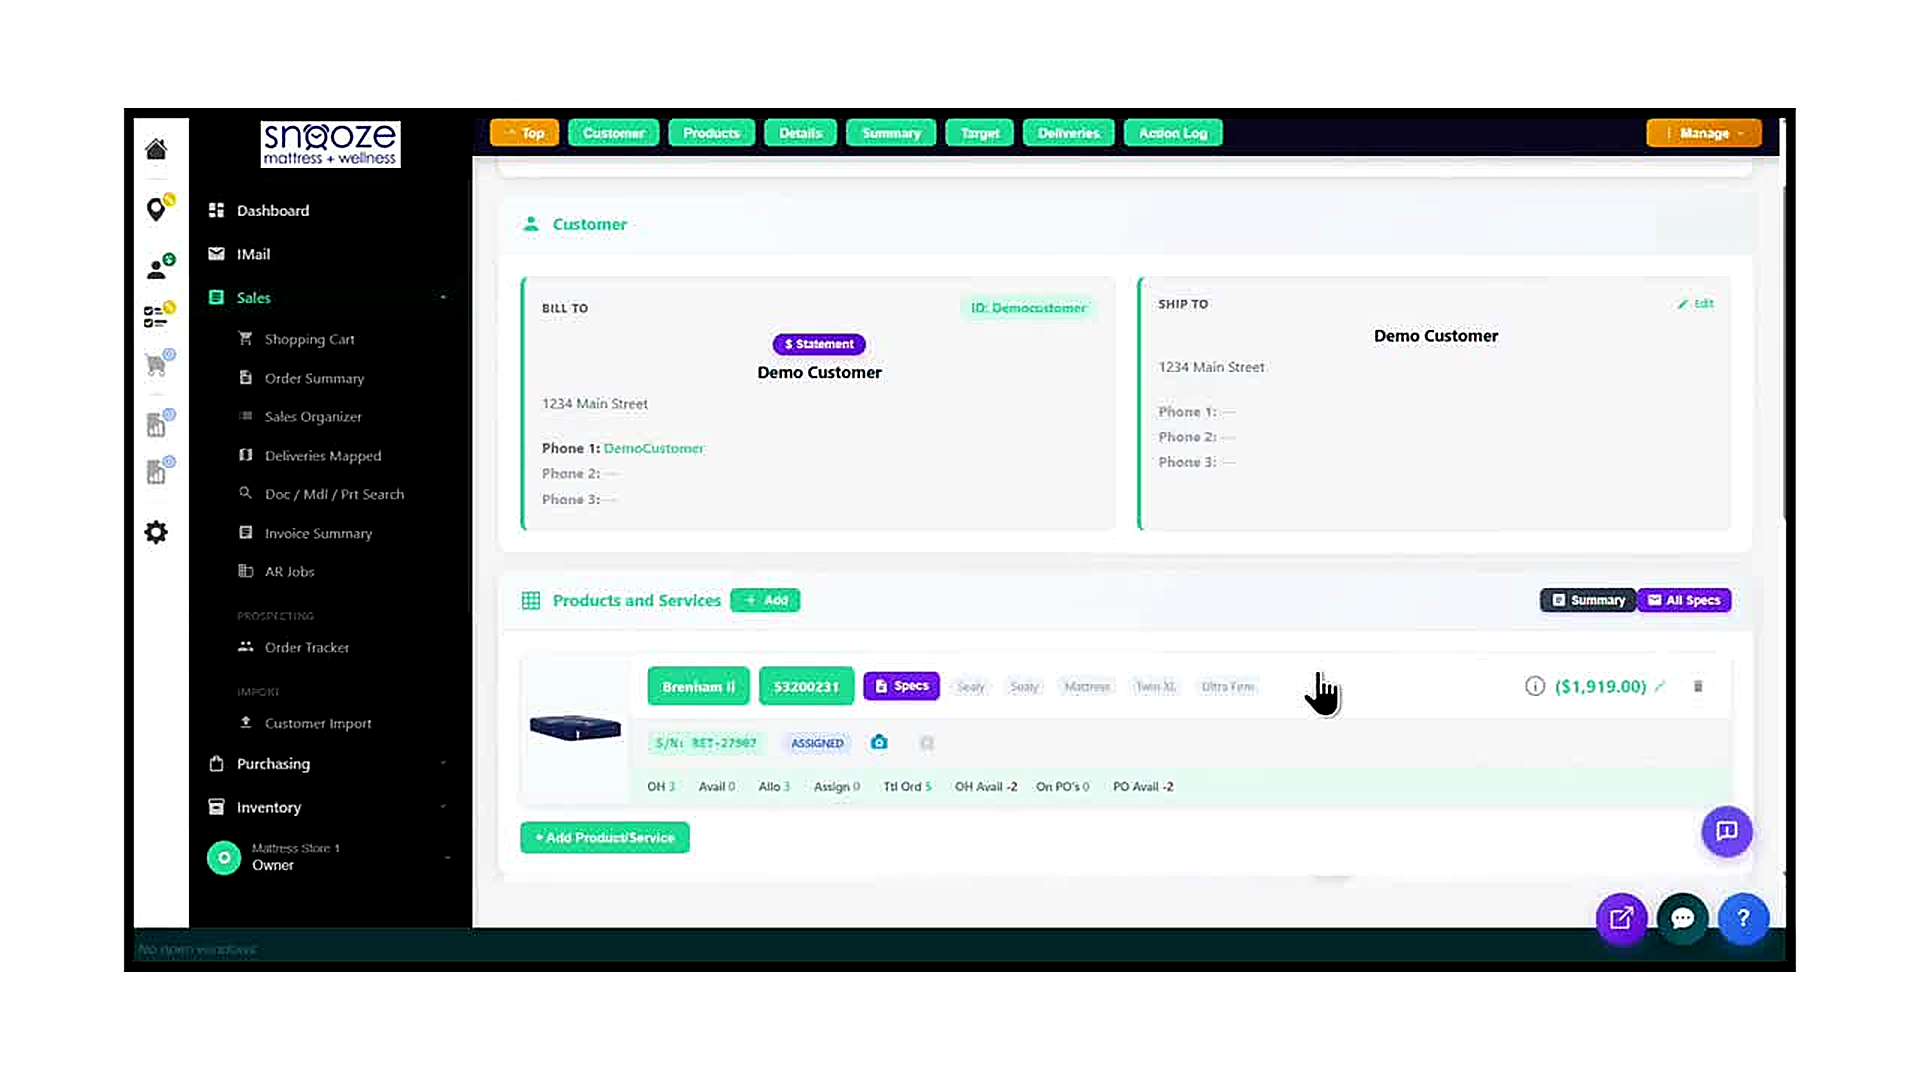
Review the New Return Order
After the cost entry is completed, WhirlWind creates a new return order with a unique order number (e.g., 32726070). The order header shows a 'RETURN' status badge. In the Products and Services section, all returned items appear as negative dollar amounts (e.g., ($1,919.00)), representing the credit being issued. Confirm the items, quantities, and negative amounts match what the customer is returning.
Confirm the Return Serial Number
For each serialized item returned, the serial number row on the return order displays a new RET serial number (e.g., RET-27987) alongside an ASSIGNED badge. This RET serial number is how WhirlWind tracks the returned unit in inventory. It confirms the unit has been re-added to your stock and is ready to be assigned to a new order or processed for disposal.
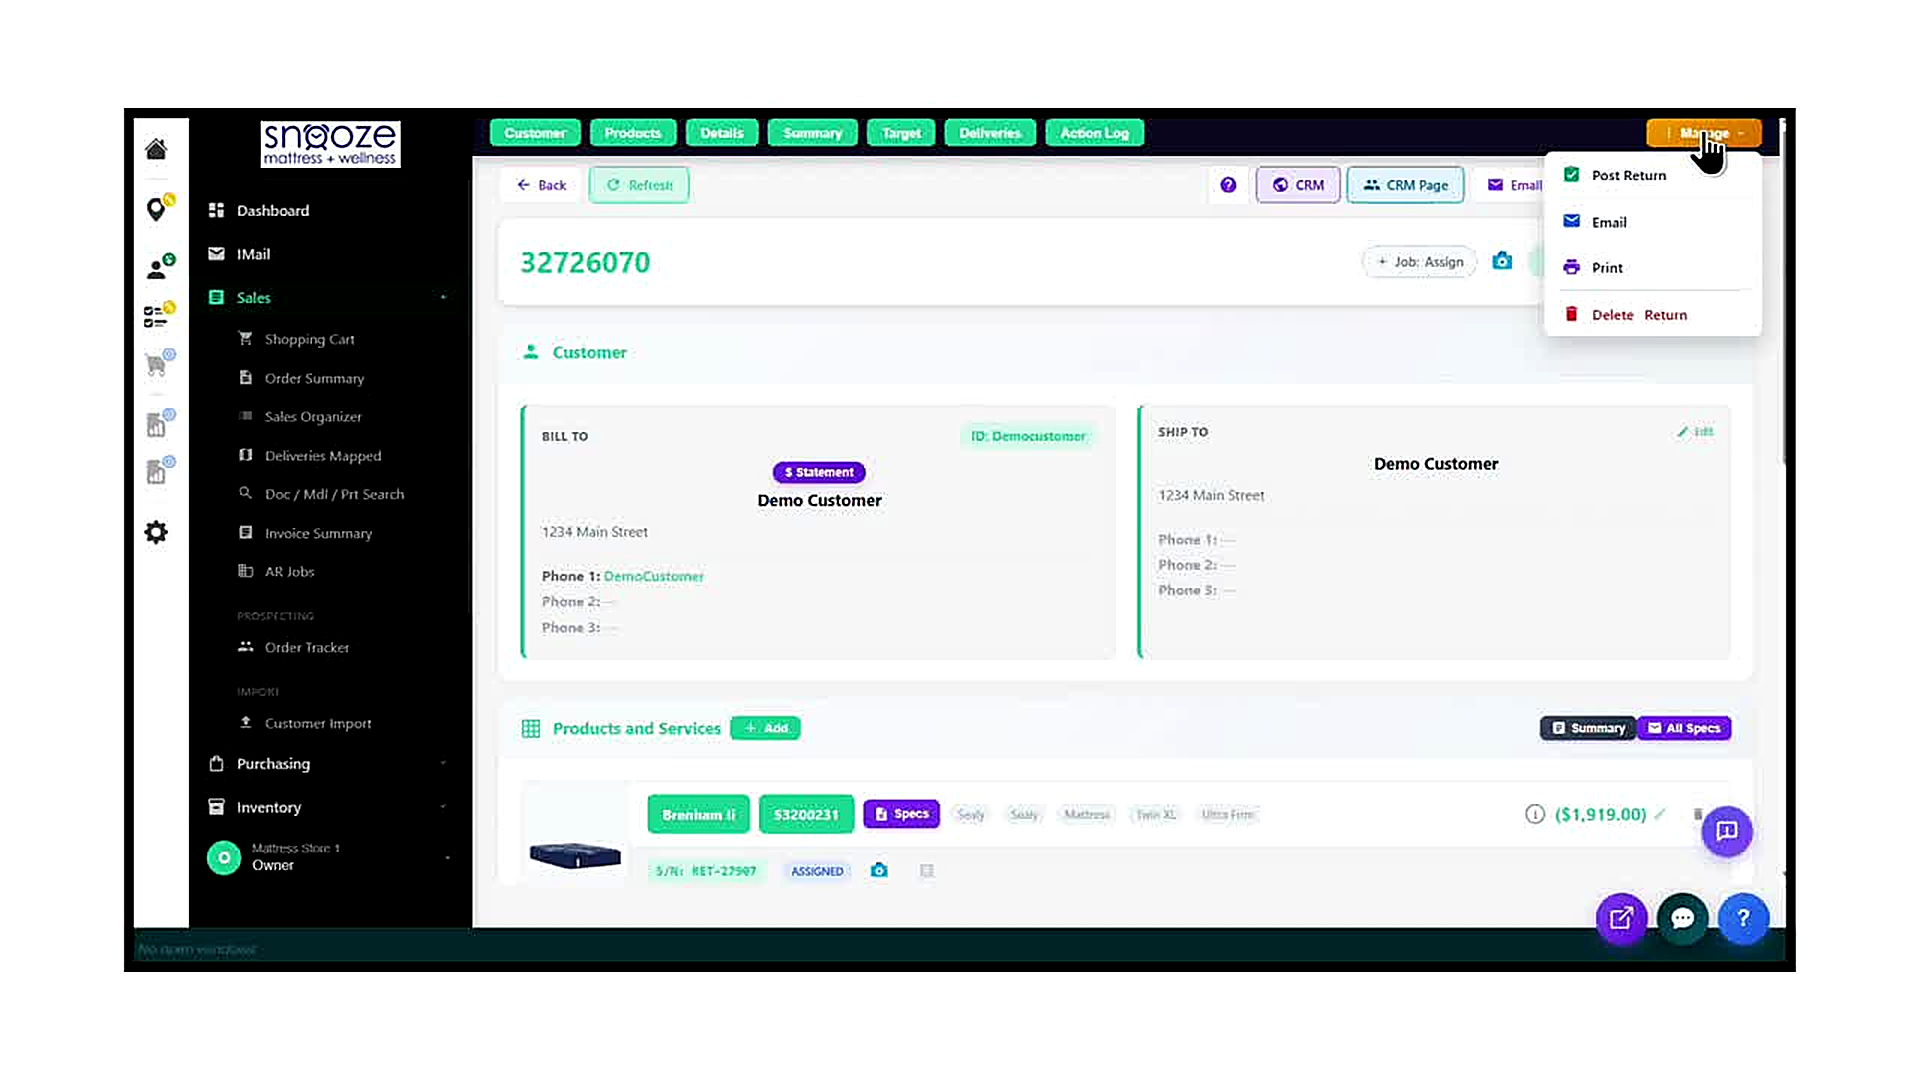
Open the Manage Menu and Click 'Post Return'
Once you have reviewed the return order and confirmed all details are correct, click the orange 'Manage' button in the top-right corner. A dropdown menu appears with the options: Post Return, Email, Print, and Delete Return. Click 'Post Return' to begin the posting process.
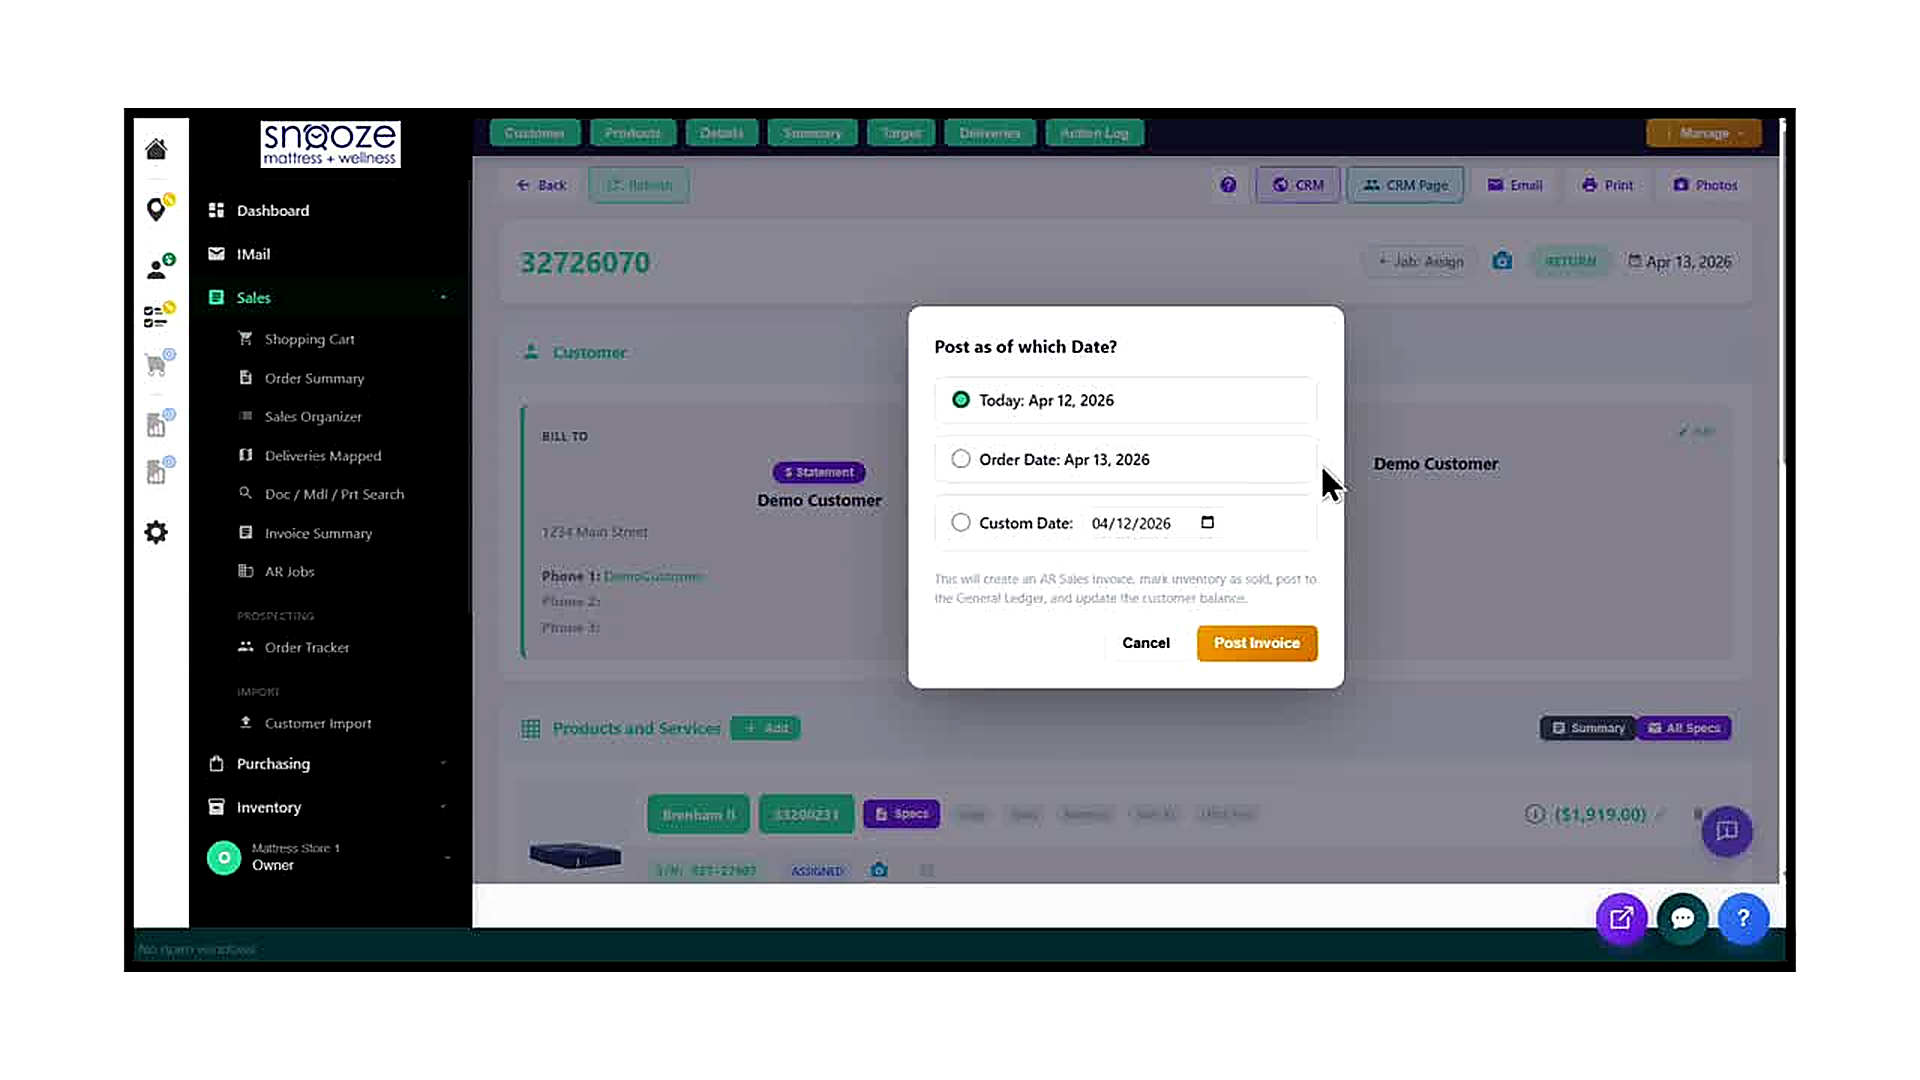
Select the Posting Date
The 'Post as of which Date?' dialog offers three choices: Today (the current system date), Order Date (the date the return order was created), or Custom Date (a date you enter manually). Select the date that best reflects when the return is being processed for accounting purposes. Read the note at the bottom carefully — posting will create an AR Sales Invoice, mark inventory as sold, post to the General Ledger, and update the customer’s account balance.
Click 'Post Invoice' to Complete the Return
Once the posting date is selected, click the orange 'Post Invoice' button. The system processes the return, creates the AR credit, updates inventory, and posts the transaction to the General Ledger. A 'Navigating back — Please wait' spinner appears briefly while the system redirects you back to the original invoice. The return is now complete and the customer’s account has been credited.
Intro to Purchasing Terminology
Purchasing Menu Walkthrough
About This Guide
This step-by-step training guide covers the Purchasing section of the WhirlWind Portal, including the purchasing shortcuts on the Dashboard and both items in the Purchasing sub-menu: Request and Purchase Orders. You will learn how to monitor incoming inventory, identify items that need to be ordered, and navigate purchase order records.
- Access the Purchasing menu and its two sub-items: Request and Purchase Orders
- Use the 'Recently Received' Dashboard widget to see inventory received in the last four days
- Use the 'Recently Viewed PO's' Dashboard widget to quickly navigate back to recent purchase orders
- Navigate the Product Requested (Request) screen and understand its filter bar
- Use the vendor tabs (Molecule, Sealy, SERTA, Tempur-Pedic, ALL) to filter requested items by vendor
- Read a requested item row: product name, model number, order number, and inventory statistics (OH, Avail, Allo, Assign, Tit Ord, OH Avail, On PO's, PO Avail)
- Interpret the Current Inventory and Open PO's panels on the Request screen
- Use the 'Create Purchase Order' button to initiate a new PO from the Request screen
- Navigate the Purchase Orders screen: search for an existing PO by number or vendor, and understand the PO form fields
Locate the Purchasing Menu
In the left navigation bar, find the 'Purchasing' item between 'Sales' and 'Inventory'. Click on 'Purchasing' to expand it. Two sub-items appear: 'Request' and 'Purchase Orders'. These are the two primary tools for managing inventory ordering in the WhirlWind Portal.
Understand the Two Sub-Items
'Request' opens the Product Requested screen, which shows all items on open orders that have not yet been fulfilled from inventory. It is used to identify what needs to be ordered. 'Purchase Orders' opens the PO management screen, where you can search existing purchase orders, create new ones, and track vendor shipments.
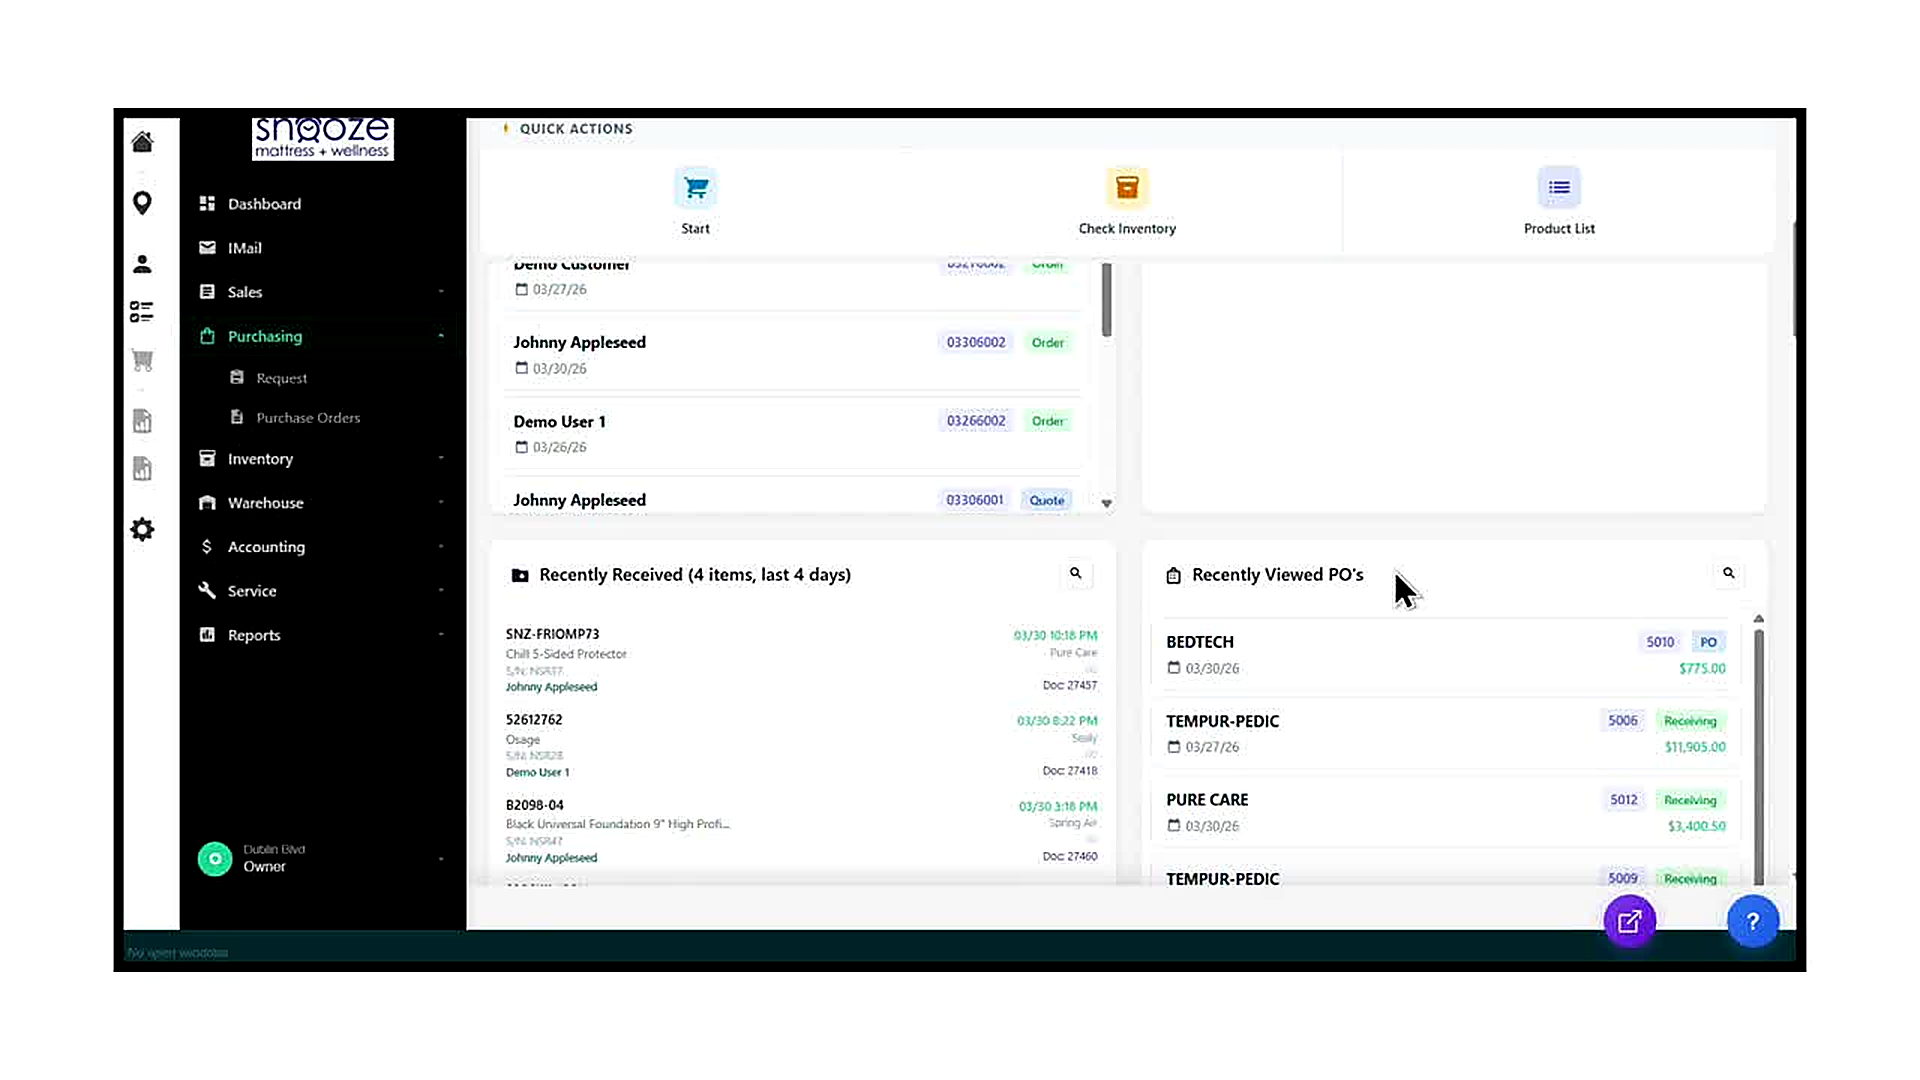
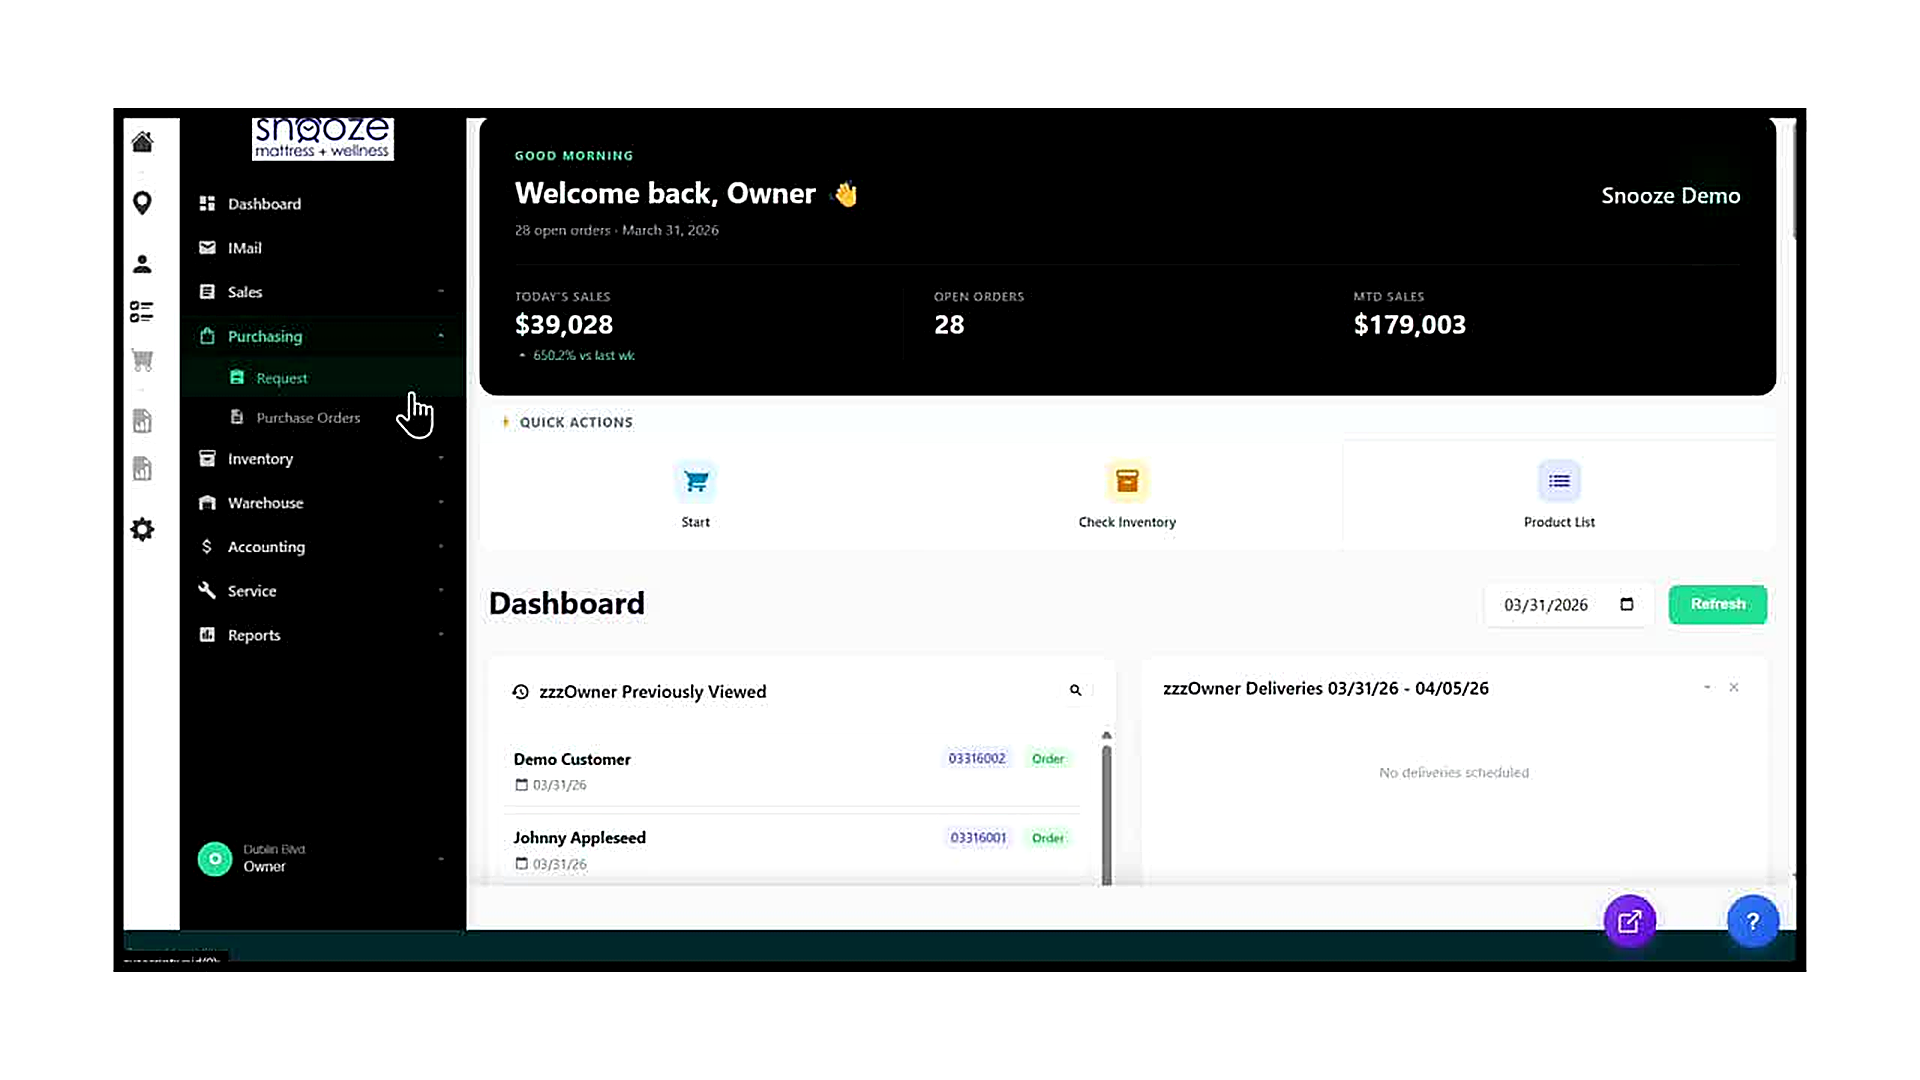
Use the 'Recently Received' Widget
The 'Recently Received' widget on the Dashboard shows all inventory items that have been received in the last four days. Each row displays the model number, product name, vendor, the customer order it is associated with (Doc number), and the date and time it was received. This widget is a quick way to confirm that expected shipments have been checked in without navigating to the Warehouse section.
Use the 'Recently Viewed PO’s' Widget
The 'Recently Viewed PO’s' widget on the right side of the Dashboard shows the purchase orders you have accessed most recently. Each entry displays the vendor name, PO number, current status badge (PO or Receiving), date, and dollar amount. Click any entry to jump directly to that purchase order without navigating through the Purchasing menu.
Open the Request Screen
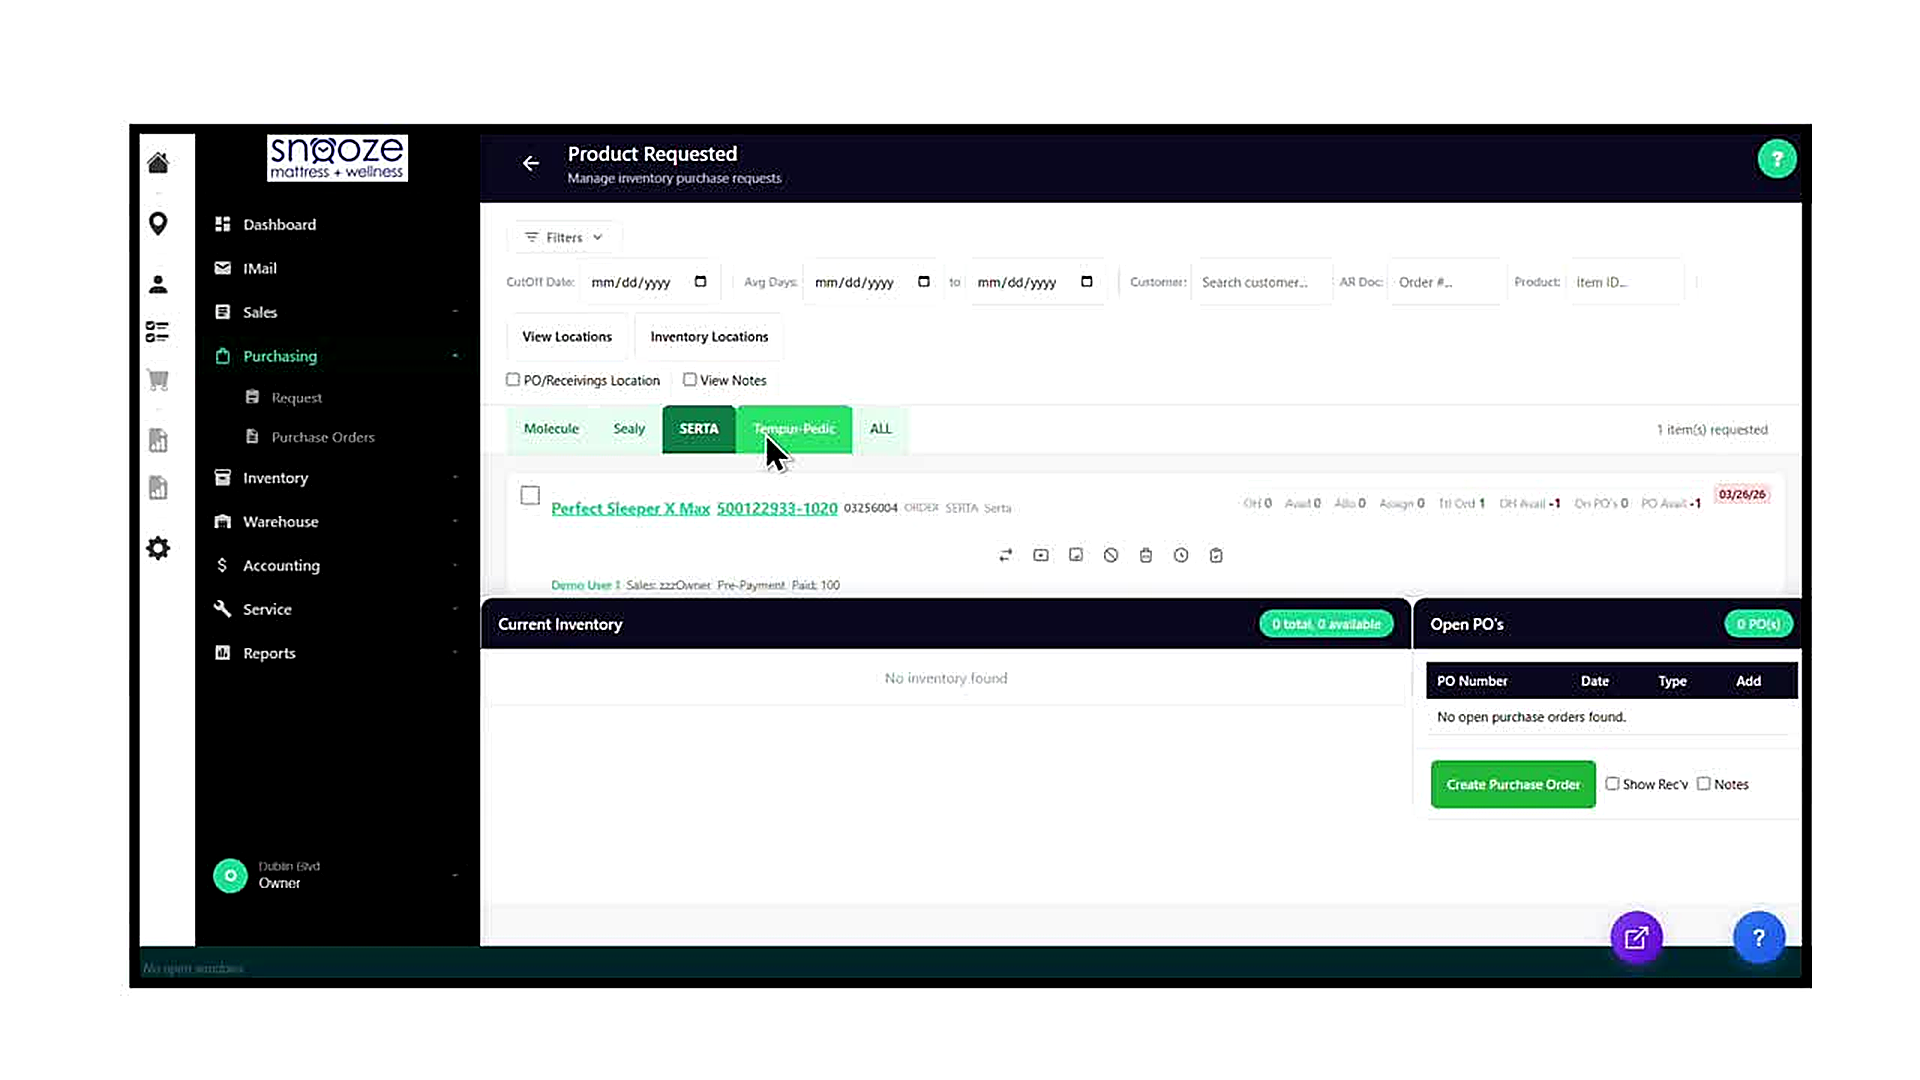
Click 'Request' in the Purchasing sub-menu. The 'Product Requested' screen opens with the subtitle 'Manage inventory purchase requests'. This screen lists every product line on an open order that has not yet been assigned inventory. It is sorted and grouped by vendor using the tabs across the middle of the screen.
Use the Filter Bar
The filter bar at the top of the screen offers the following filters: CutOff Date (limit results to orders placed before a date), Avg Days (filter by average days in system, with a from-to date range), Customer (search by customer name), AR Doc (filter by order number), Order # (filter by order number), Product (filter by product name), and Item ID (filter by item identifier). Use these filters to narrow the list when you are looking for a specific order or product.
Select a Vendor Tab
Below the filter bar is a row of vendor tabs: Molecule, Sealy, SERTA, Tempur-Pedic, and ALL. Click a vendor tab to display only the items requested from that vendor. The item count for the selected tab is shown on the right (e.g., '1 item(s) requested' or '4 item(s) requested'). Click 'ALL' to see every unfulfilled item across all vendors at once.
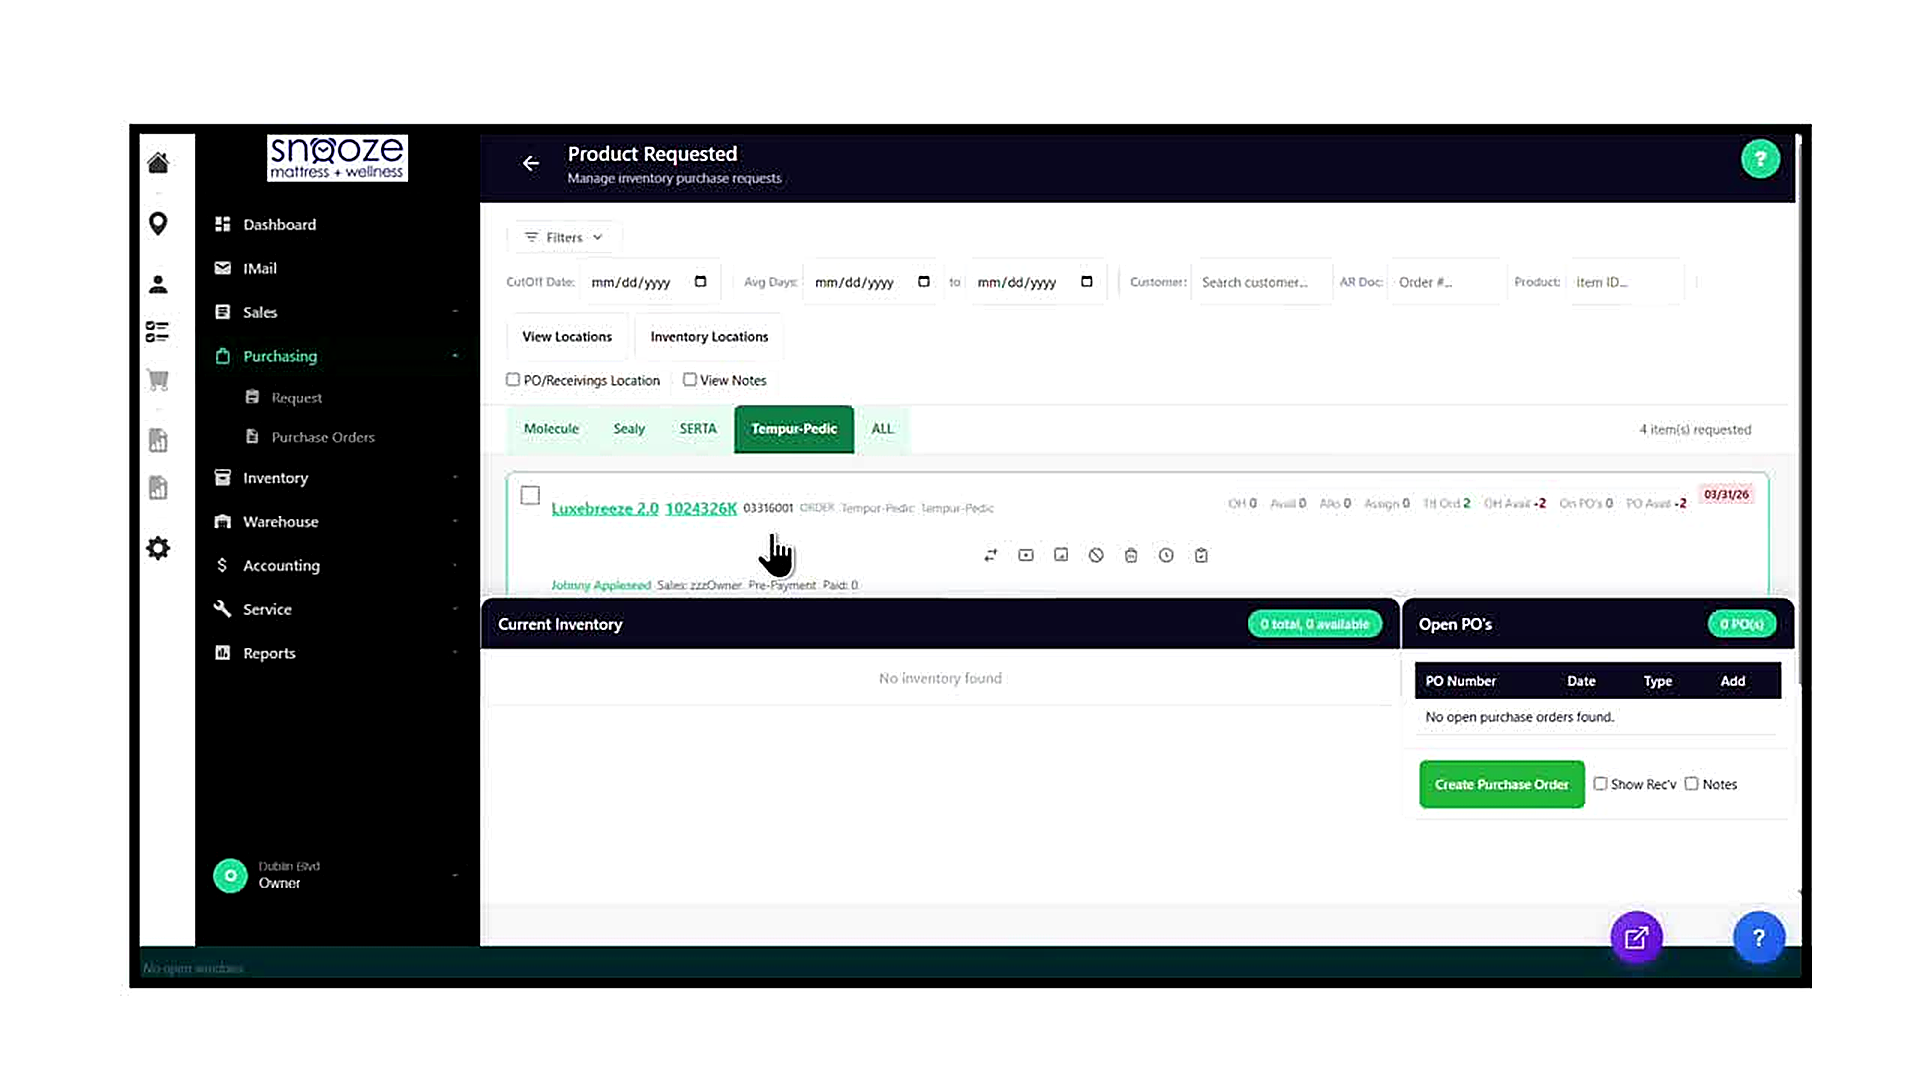
Read an Item Row
Each requested item displays: the product name (clickable link), the model number (clickable link), the linked order number, the document type (ORDER), the vendor, and a row of inventory statistics on the right side. The statistics show: OH (on hand), Avail (available), Allo (allocated), Assign (assigned), Tit Ord (title ordered), OH Avail (on-hand availability), On PO's (quantity on existing purchase orders), and PO Avail (PO availability). A date in red on the far right indicates the order's target date.
Use the Action Buttons on an Item Row
Each item row has a set of small icon buttons below the statistics line. These buttons allow you to perform quick actions on that specific item: transfer it, view inventory details, view the order, mark it, delete the request, set a reminder, and more. Hover over each icon to see its label before clicking.
Review the Current Inventory and Open PO’s Panels
When an item is selected or highlighted, the bottom half of the screen shows two panels side by side. The 'Current Inventory' panel (left) shows whether there are any units of that model currently in stock at any location, with the total count and availability. The 'Open PO’s' panel (right) lists any existing purchase orders that include this item, with columns for PO Number, Date, Type, and an Add button to add the item to an existing PO.
Create a Purchase Order from the Request Screen
If the Open PO's panel shows 'No open purchase orders found' for the selected vendor and the item is needed, click the green 'Create Purchase Order' button at the bottom of the Open PO's panel. This opens a new, blank Purchase Order form pre-associated with the selected vendor, ready for you to fill in quantities and submit.
Open the Purchase Orders Screen
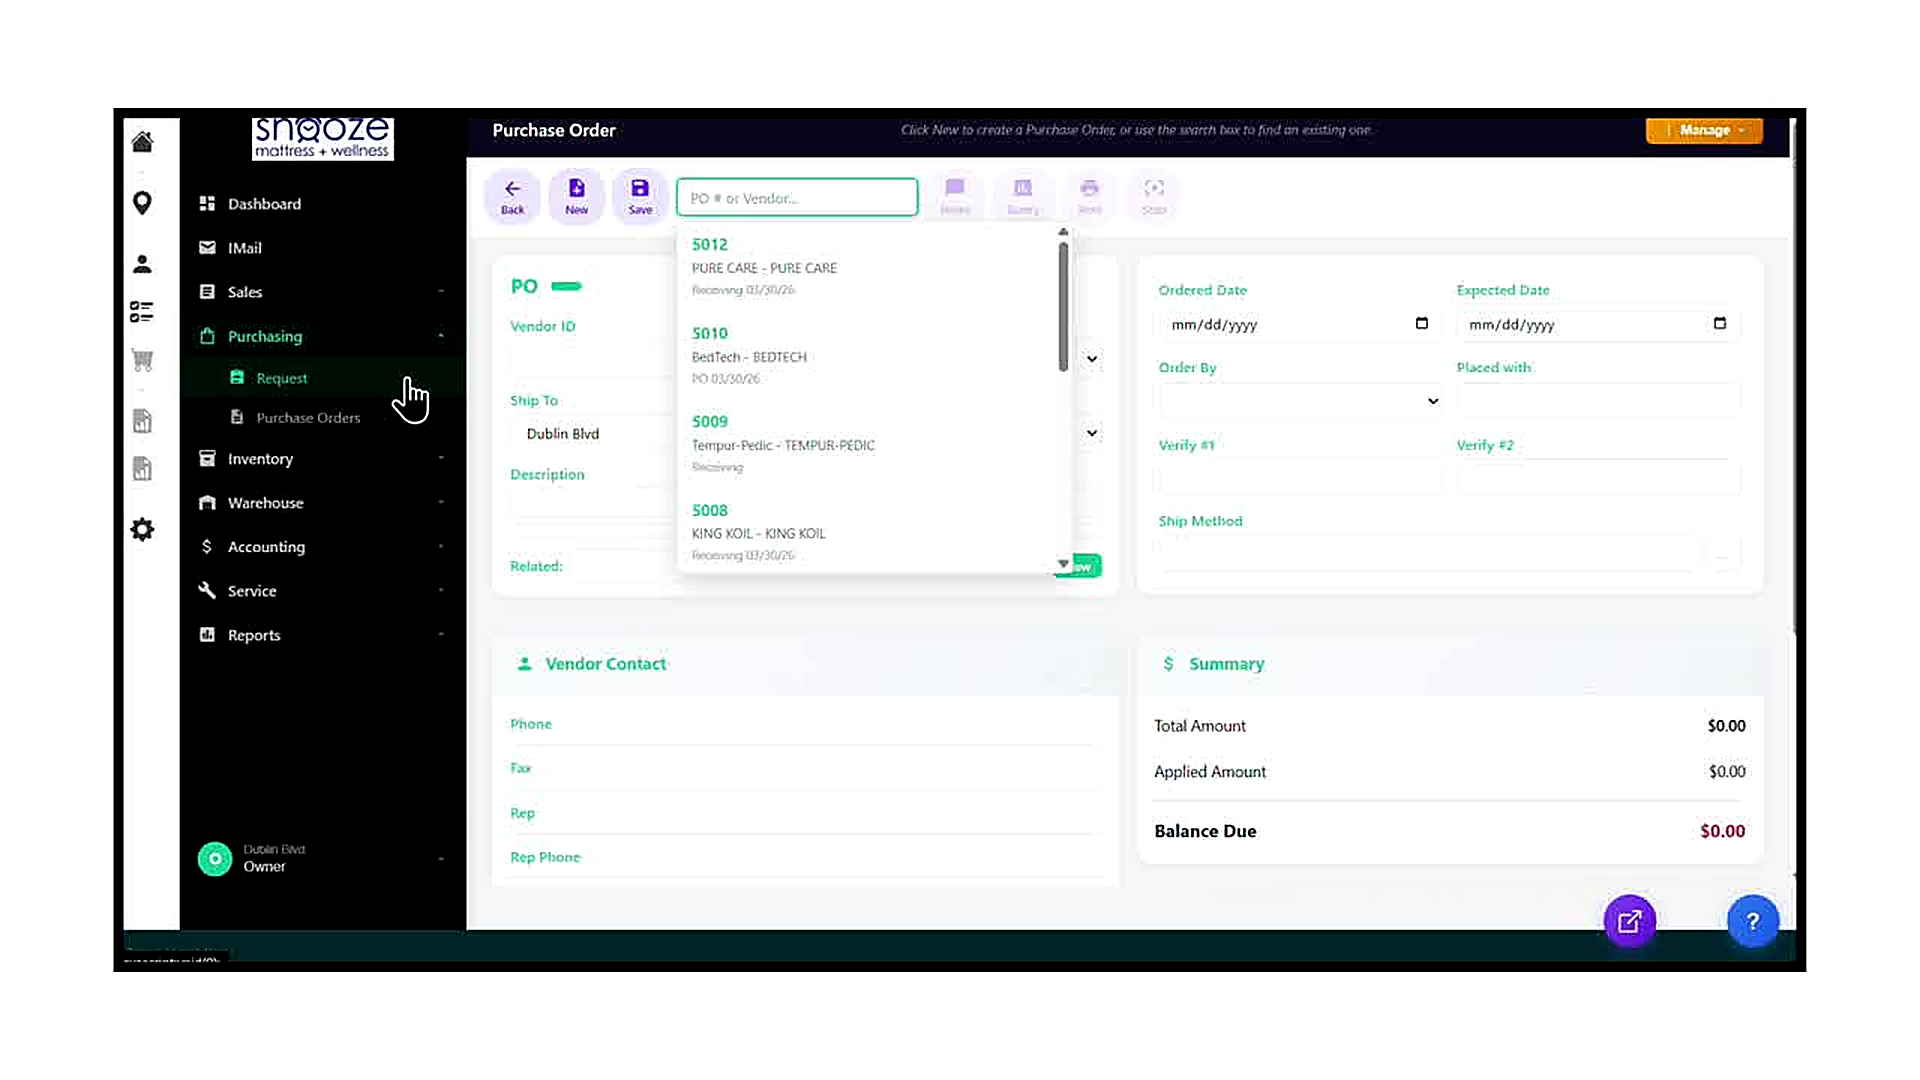
Click 'Purchase Orders' in the Purchasing sub-menu. The Purchase Orders screen opens. The toolbar at the top contains: a Back arrow, New (create a new PO), Save, a search box labeled 'PO # or Vendor...', Print, Query, Items, and Stop buttons. The main form area below is blank until you either create a new PO or search for an existing one.
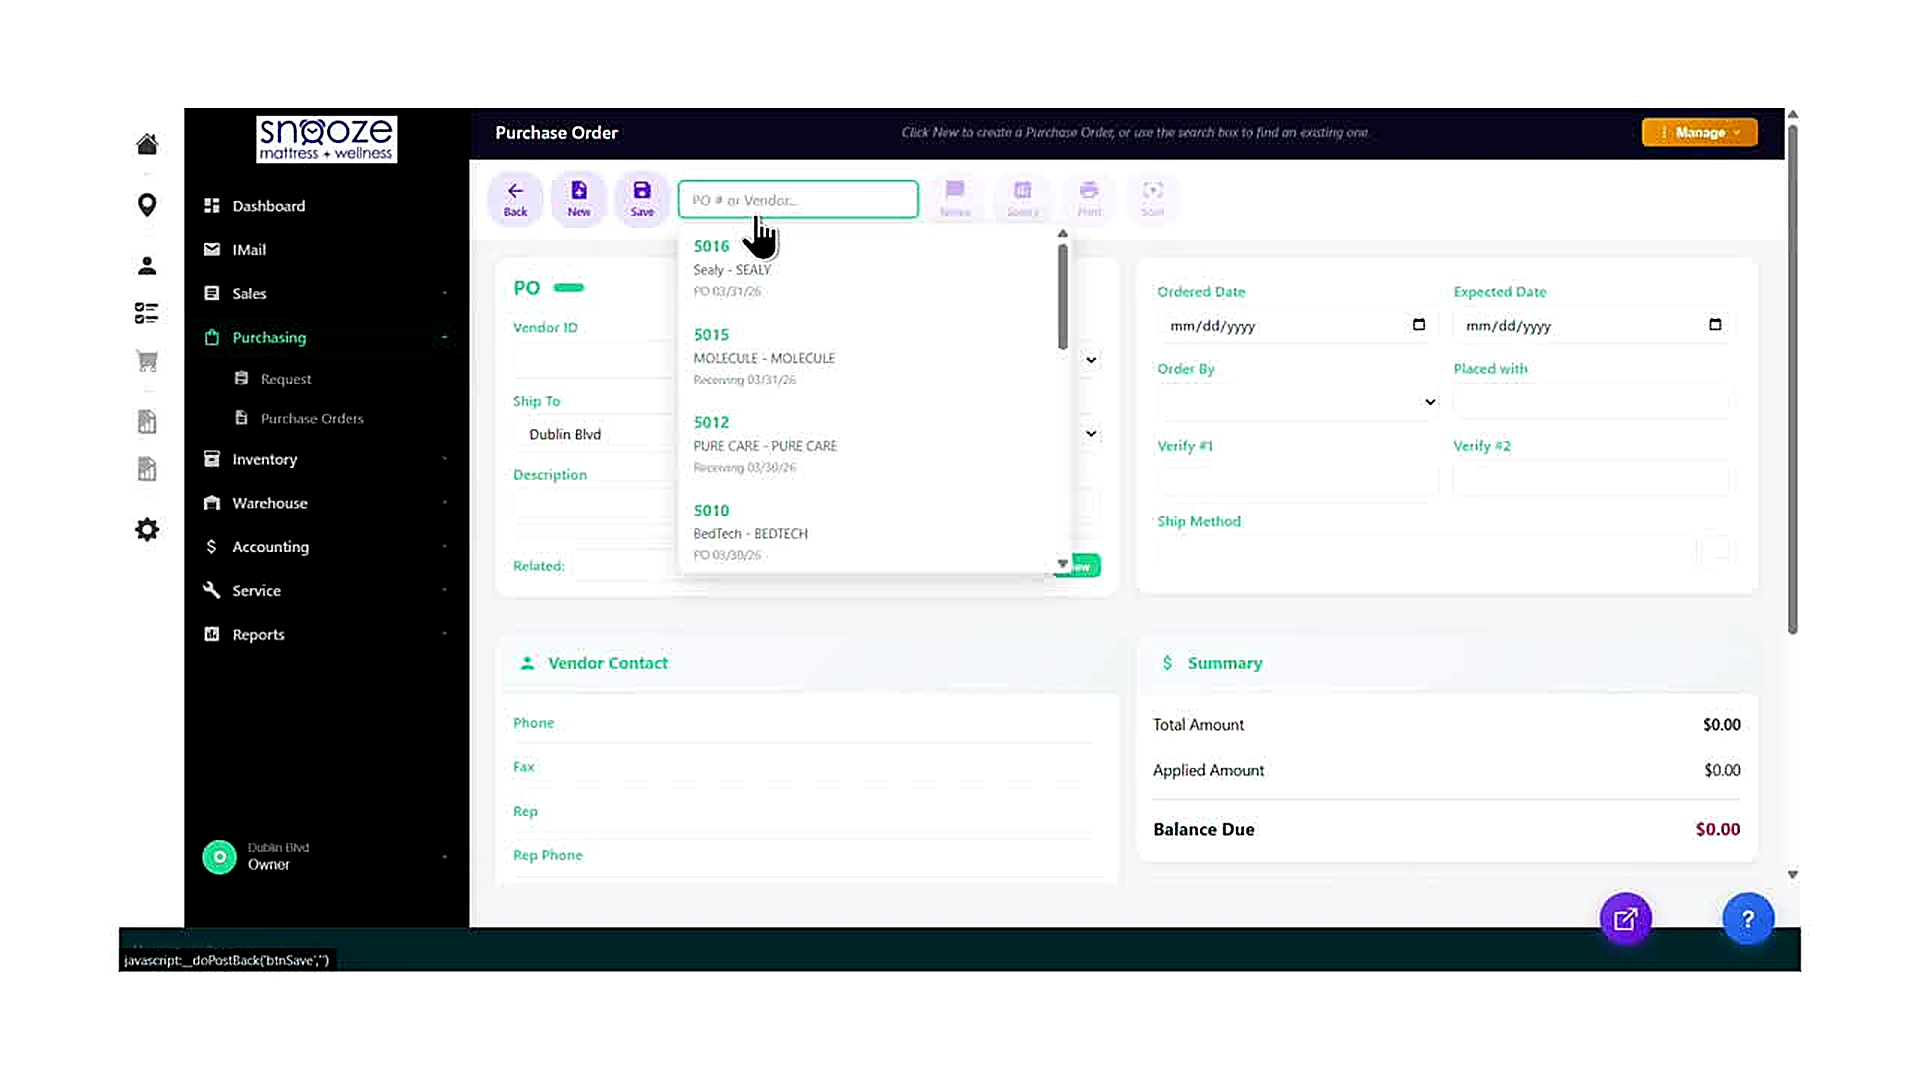
Search for an Existing Purchase Order
Click into the 'PO # or Vendor...' search box in the toolbar. A dropdown appears listing recently viewed purchase orders, each showing the PO number, vendor name, and current status (PO or Receiving). Click any entry in the dropdown to load that purchase order into the form. Alternatively, type a PO number or vendor name to filter the dropdown results.
Understand the Purchase Order Form Fields
The PO form contains the following sections and fields: at the top, PO number (auto-assigned), Vendor ID, Ship To (your store location), and Description. In the right column: Ordered Date, Expected Date, Order By, Placed With, Verify #1, Verify #2, and Ship Method. The Vendor Contact section below shows the vendor's Phone, Fax, Rep name, and Rep Phone. The Summary panel on the right shows Total Amount, Applied Amount, and Balance Due.
Create a New Purchase Order
To create a brand-new purchase order, click the 'New' button in the toolbar. A blank PO form opens. Fill in the Vendor ID field by typing the vendor name, select the Ship To location, enter the Ordered Date and Expected Date, and complete the remaining fields as needed. Once the header is saved, use the 'Items' button in the toolbar to add product line items to the PO.
Creating a PO & Adding Products
About This Guide
This step-by-step training guide covers how to create a new Purchase Order and add requested products to it, all from within the Product Requested screen in the WhirlWind Portal. This workflow is used when a customer’s order contains a product that is not in stock and needs to be ordered from a vendor.
- Navigate to the Product Requested screen and select the correct vendor tab
- Identify items with negative inventory availability that need to be ordered
- Confirm that no existing Purchase Order is already open for the vendor
- Click 'Create Purchase Order' to open the Create PO dialog
- Review and confirm the auto-assigned PO Number, Location, and Ship To fields
- Click 'Create' to generate the new Purchase Order record
- Locate the newly created PO in the Open PO’s panel
- Click 'Add' to add the requested item to the new Purchase Order
- Verify the green success confirmation banner ('1 item(s) added to PO XXXX')
- Confirm that the item’s On PO’s count has updated and the request list has decreased
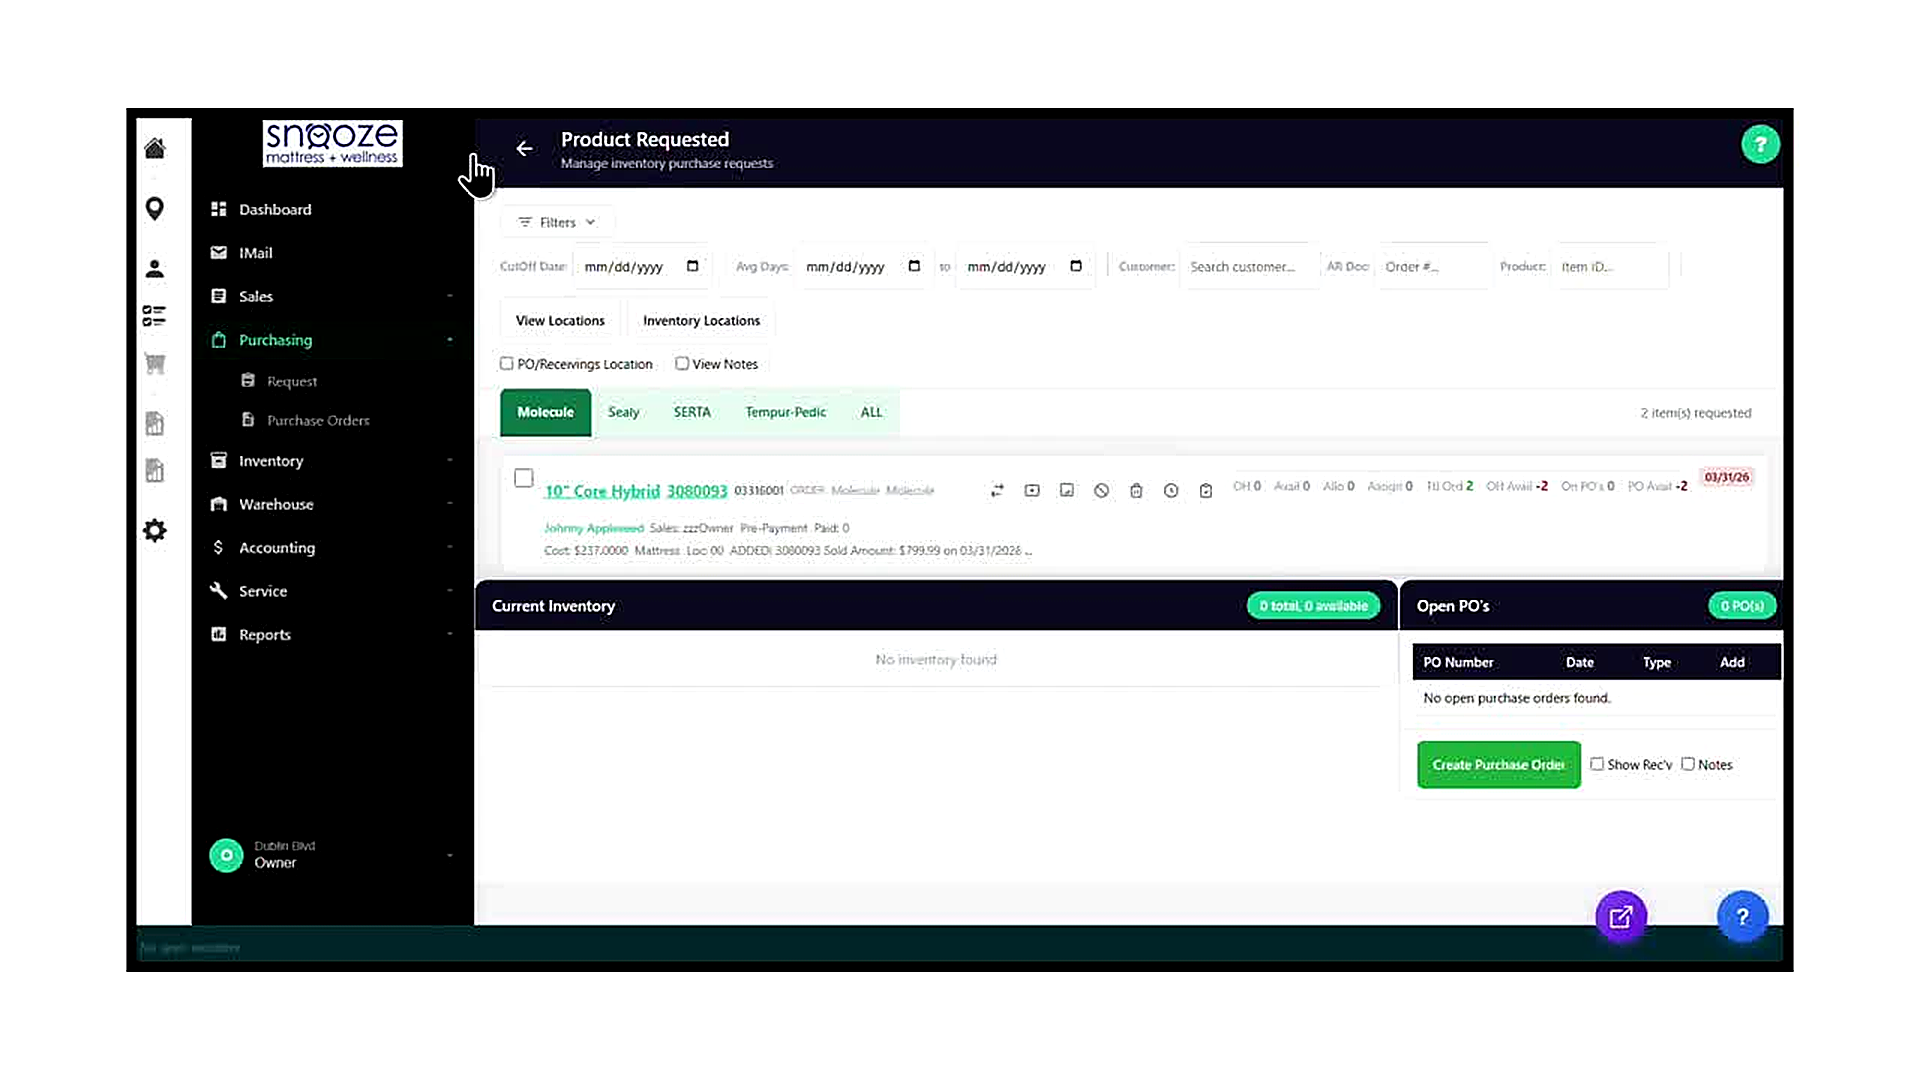
Navigate to the Product Requested Screen
From the left navigation bar, click 'Purchasing' to expand the Purchasing sub-menu, then click 'Request'. The Product Requested screen opens, listing all items on open orders that have not yet been fulfilled from existing inventory. The screen subtitle reads 'Manage inventory purchase requests'.
Select the Correct Vendor Tab
Across the middle of the screen, click the vendor tab that corresponds to the product you need to order. In this example, the 'Molecule' tab is selected, which filters the list to show only Molecule-brand items. The item count for that tab appears on the right (e.g., '2 item(s) requested'). Other available tabs include Sealy, SERTA, Tempur-Pedic, and ALL.
Identify Items with Negative Availability
Review the item rows in the list. Look at the inventory statistics on the right side of each row. The key columns to check are OH Avail (on-hand availability) and PO Avail (purchase order availability). A negative number in red — such as -2 — means that demand from customer orders exceeds supply. These are the items that need to be ordered.
Check the Open PO’s Panel
Before creating a new purchase order, check the Open PO’s panel in the bottom-right of the screen. If it shows 'No open purchase orders found' and the badge reads '0 PO(s)', no PO currently exists for this vendor. If a PO already exists, it will appear in the list and you can add the item directly to that PO using its 'Add' link instead of creating a new one.
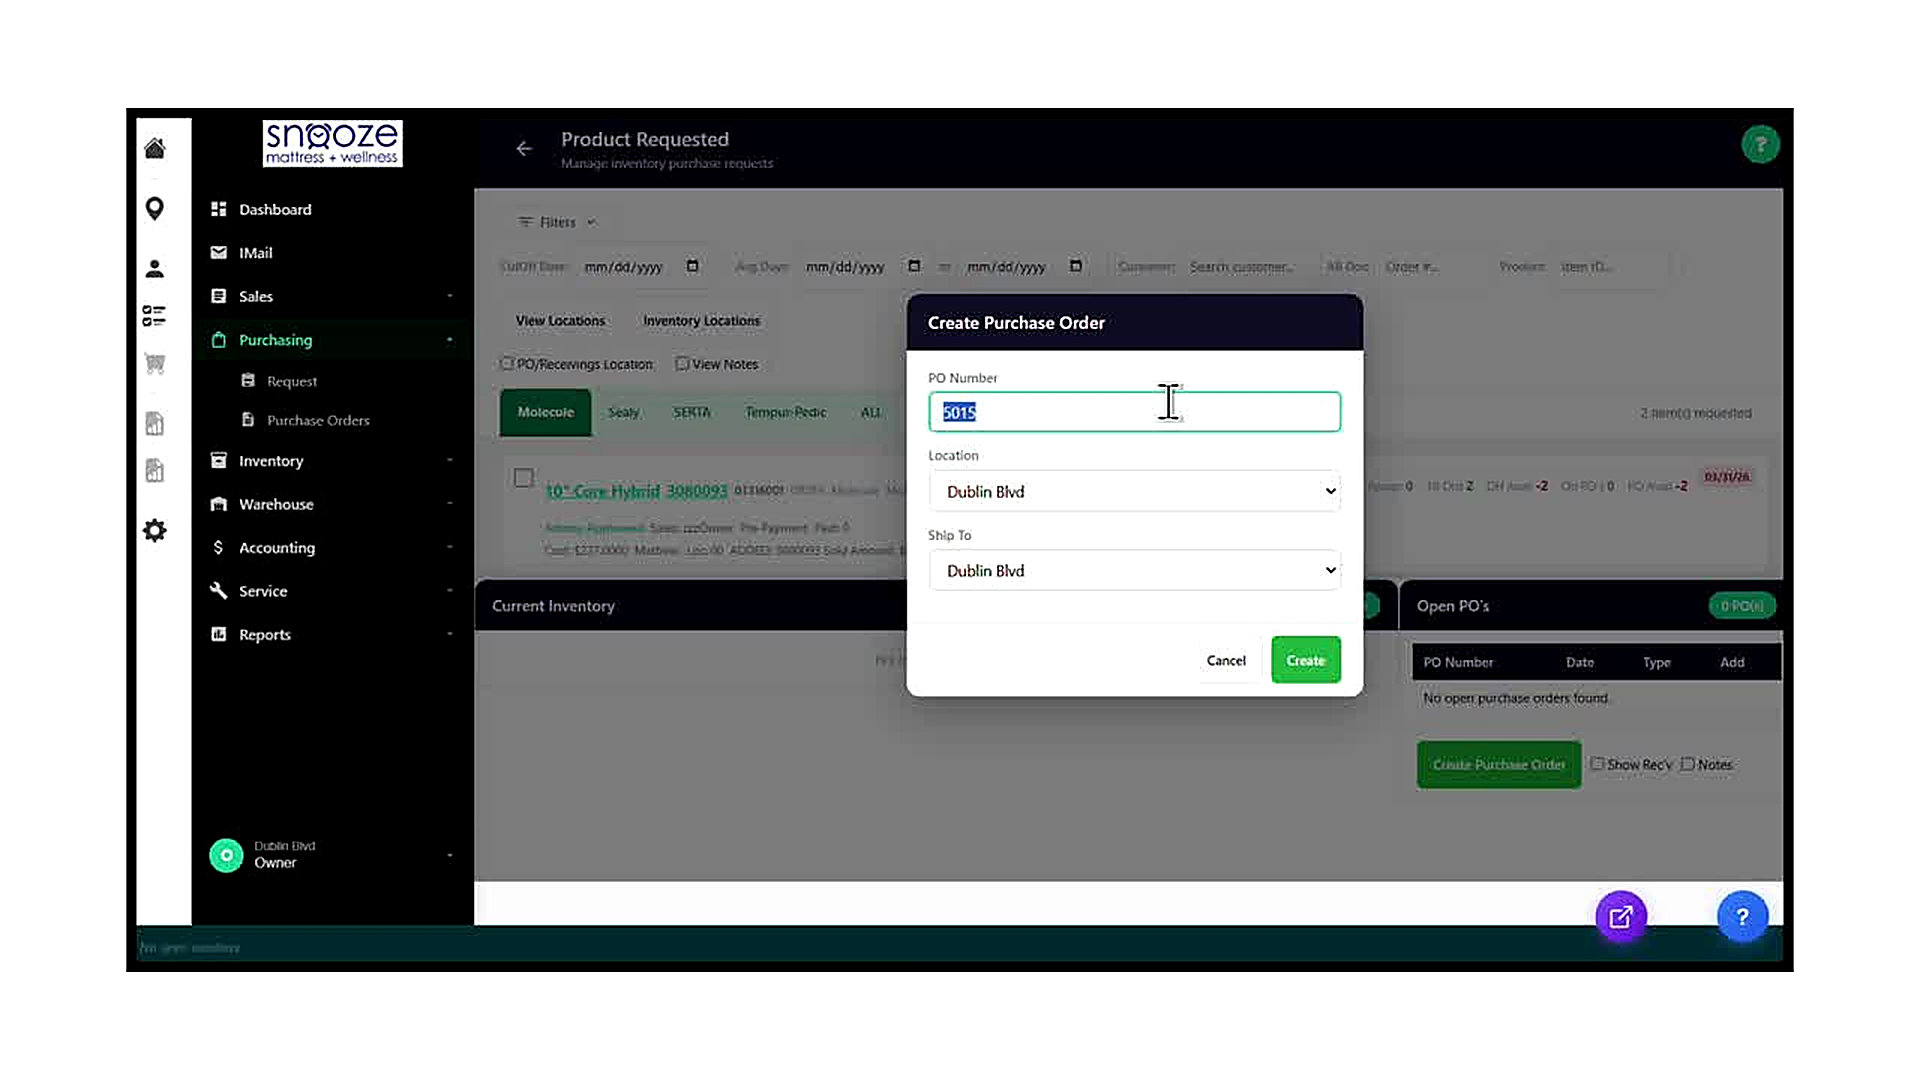
Click 'Create Purchase Order'
In the Open PO’s panel at the bottom right of the screen, click the green 'Create Purchase Order' button. A modal dialog titled 'Create Purchase Order' appears over the screen. The background is dimmed while the dialog is open.
Review the PO Number
The PO Number field is automatically populated with the next sequential purchase order number in the system (e.g., 5015). This number is assigned by WhirlWind and does not need to be changed under normal circumstances. If your store uses a custom PO numbering format, update this field to match your convention before proceeding.
Confirm the Location and Ship To
Review the Location dropdown and the Ship To dropdown. Both default to your store’s location (e.g., Dublin Blvd). The Location field indicates which store location is issuing the PO. The Ship To field indicates where the vendor should deliver the goods. For most standard orders, both fields should match your current store location. Adjust either dropdown if the goods need to be shipped to a different location.
Click 'Create' to Generate the Purchase Order
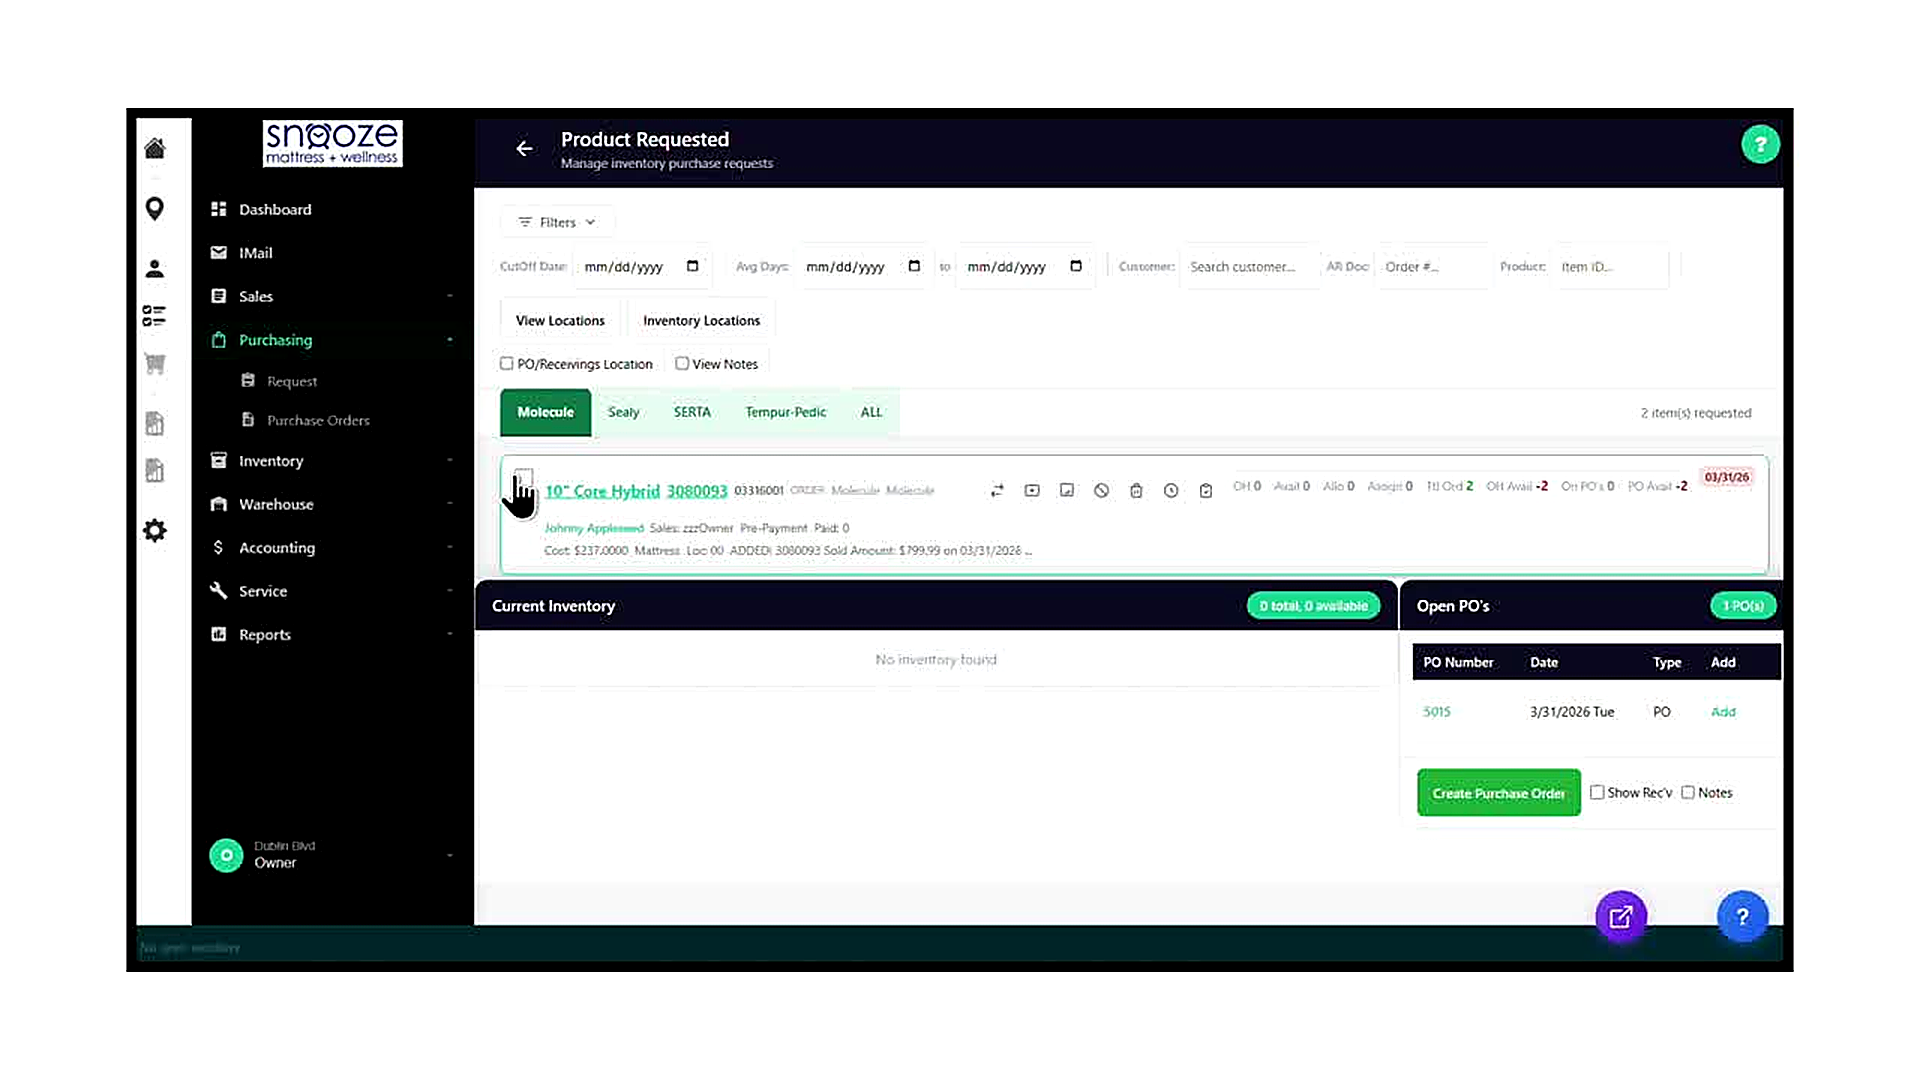
Once the PO Number, Location, and Ship To are correct, click the green 'Create' button at the bottom right of the dialog. The dialog closes and the system creates the new purchase order record. The Open PO’s panel on the right side of the Product Requested screen immediately updates to show the newly created PO, including its PO number, date, type (PO), and an 'Add' link.

Locate the New PO in the Open PO’s Panel
After clicking Create, the Open PO’s panel header badge updates from '0 PO(s)' to '1 PO(s)'. The panel now displays a row for the newly created PO, showing: the PO Number (a clickable green link, e.g., 5015), the Date it was created, the Type (PO), and an 'Add' link in the rightmost column.
Click 'Add' to Add the Item to the PO
In the Open PO’s panel, click the 'Add' link in the row for the newly created PO (e.g., PO 5015). The system processes the request and adds the selected requested item to that purchase order. The item’s checkbox in the item list becomes active during this action.
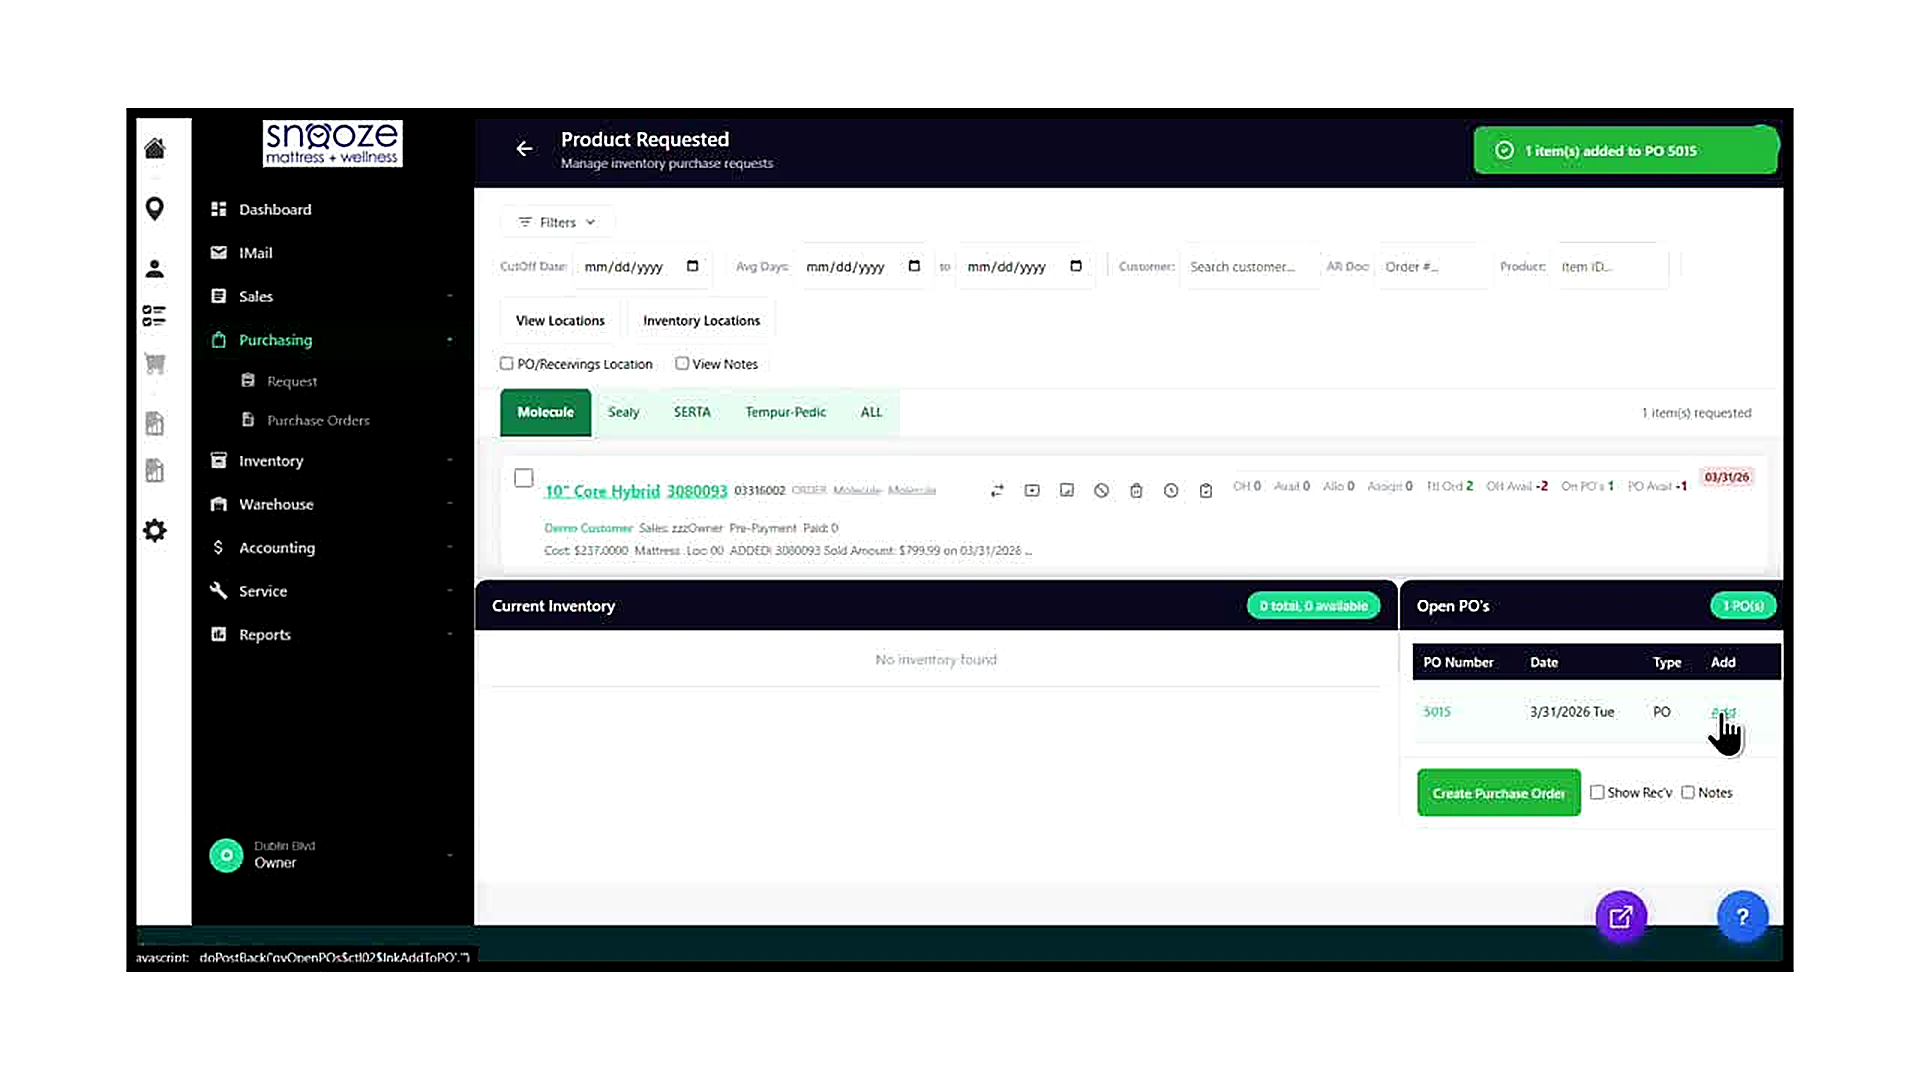
Verify the Green Success Banner
After clicking 'Add', a green banner appears at the top of the Product Requested screen confirming the action. The message reads '1 item(s) added to PO 5015' (or whichever PO number was used). This confirms the item has been successfully linked to the purchase order. The banner disappears automatically after a few seconds.
Confirm the Item Count Has Decreased
After a successful addition, the item count shown on the vendor tab decreases by one. In this example, the Molecule tab updates from '2 item(s) requested' to '1 item(s) requested'. This means one item has been accounted for on a PO and the remaining item still needs to be handled separately.
Check the Updated Inventory Statistics
The remaining item row now shows updated inventory statistics. The 'On PO’s' column increments to reflect the item that was just added to a PO (e.g., from 0 to 1). The 'PO Avail' figure may also change to reflect the improved position (e.g., from -2 to -1). These updates confirm that the system has registered the new PO line item against the customer demand.
Open the PO to Complete the Details
Now that the item has been added, click the PO number link in the Open PO’s panel (e.g., 5015) to open the full Purchase Order record. From there, enter the Ordered Date, Expected Date, Vendor Contact information, and any other required fields. Save the PO when all details are complete. The PO is now active and will appear in the Recently Viewed PO’s widget on the Dashboard.
Converting a PO to a Receiving
About This Guide
This step-by-step training guide covers how to review a Purchase Order record and convert it into a Receiving in the WhirlWind Portal. Converting a PO to a Receiving is the required step before you can mark items as received. It is done when a vendor shipment has arrived at your store and the PO details have been verified and completed.
- Open a Purchase Order and understand the PO header fields
- Read the Related field and understand the PO vs. Receiving relationship
- Review and understand product line item rows: model number, Ord, Ready, Recv, Alloc counters, and customer allocation details
- Set the Back-Order (BO) Date on a product unit using the date picker
- Edit a product model’s quantity and cost using the Edit Model dialog
- Enter the Ordered Date and Expected Date in the PO header
- Open the Manage dropdown and click ‘Convert to Receiving’
- Confirm the conversion in the ‘Confirm Convert’ dialog
- Read the success banner and verify the record has changed from PO to Receiving
- Understand the difference between Finalize and Delete in the Manage menu
Open the Purchase Order
From the left navigation bar, click 'Purchasing' then 'Purchase Orders'. Use the 'PO # or Vendor...' search box in the toolbar to find the PO associated with the arriving shipment. Click the PO entry in the dropdown to open it. The screen title at the top reads 'PO ~ [number]' (e.g., 'PO ~ 5015').
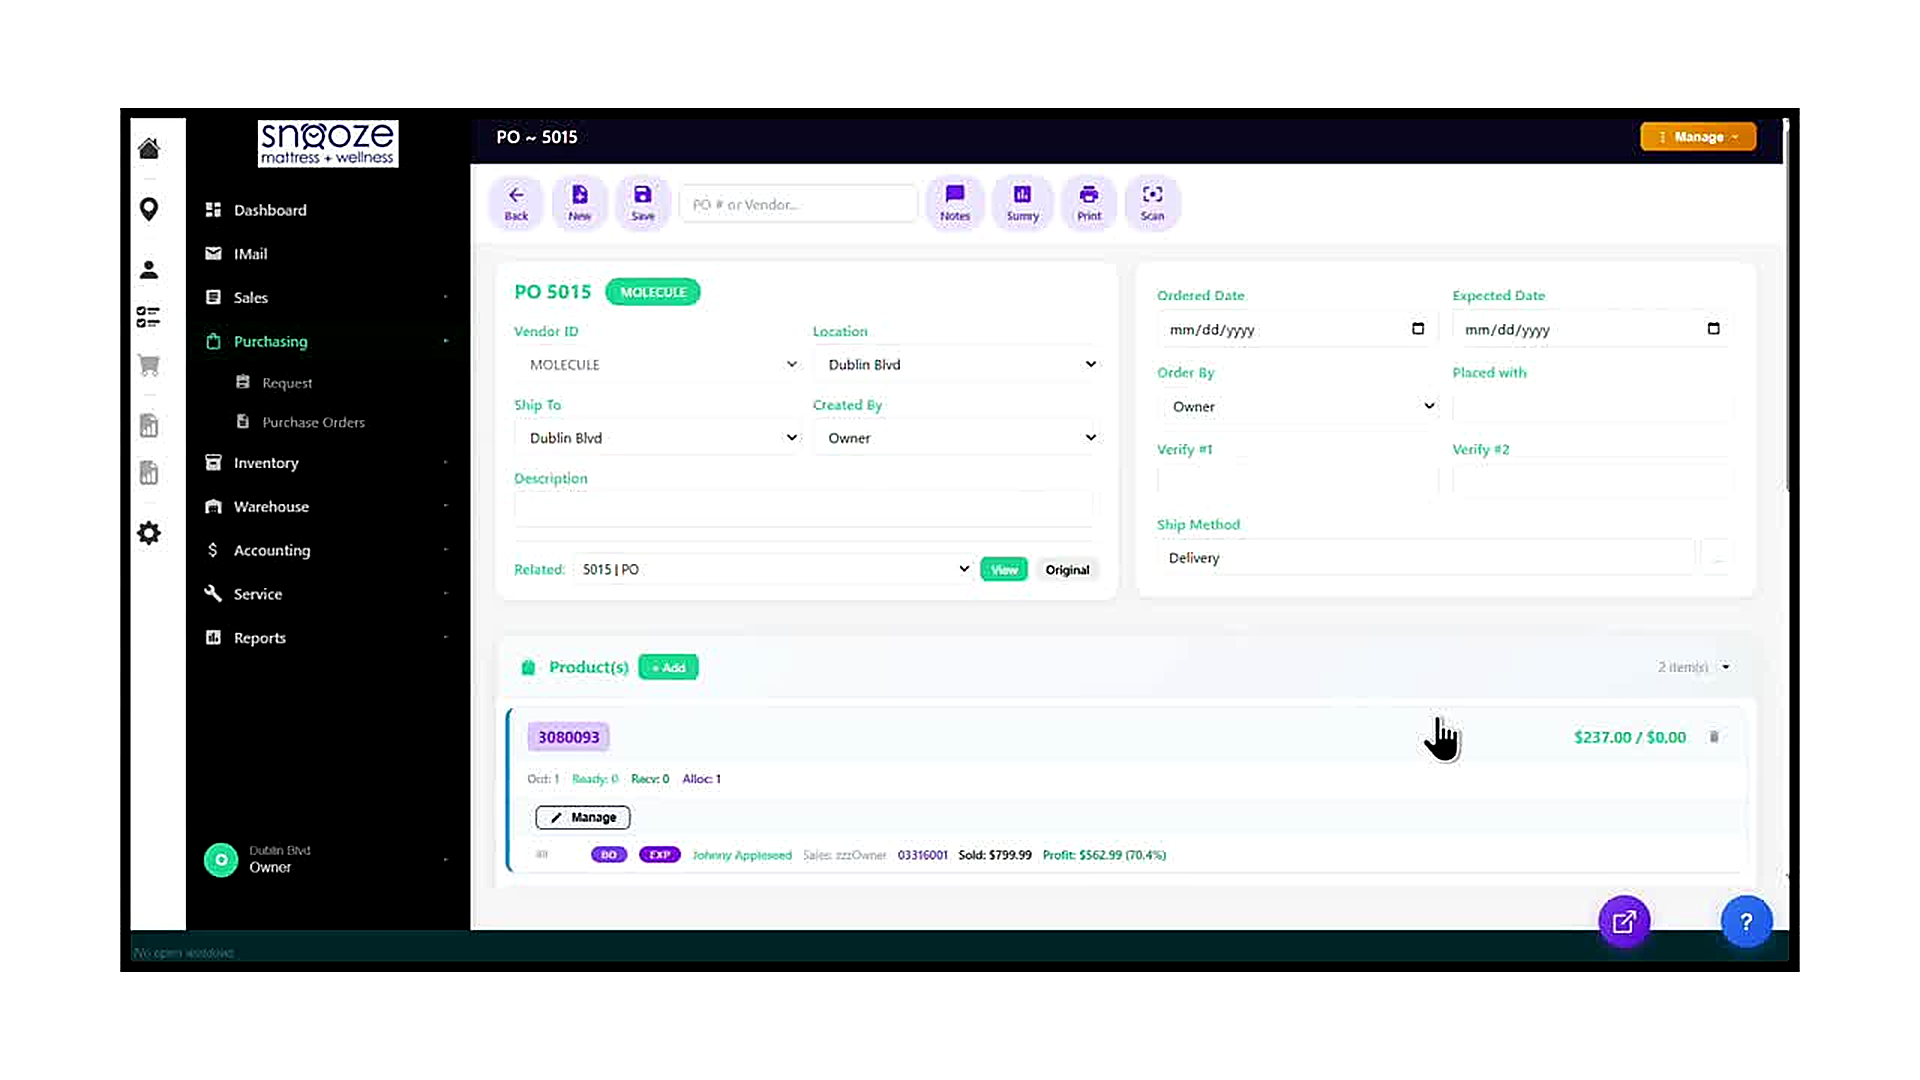
Read the PO Header
The PO header contains the key administrative fields for the order: Vendor ID (the supplier, e.g., MOLECULE), Location (your store), Ship To (delivery destination), Created By, Ordered Date, Expected Date, Order By, Placed With, Verify #1, Verify #2, Ship Method, and Description. The Related field shows the PO number with its current document type (e.g., '5015 | PO'). Before converting, ensure the Ordered Date and Expected Date are filled in.
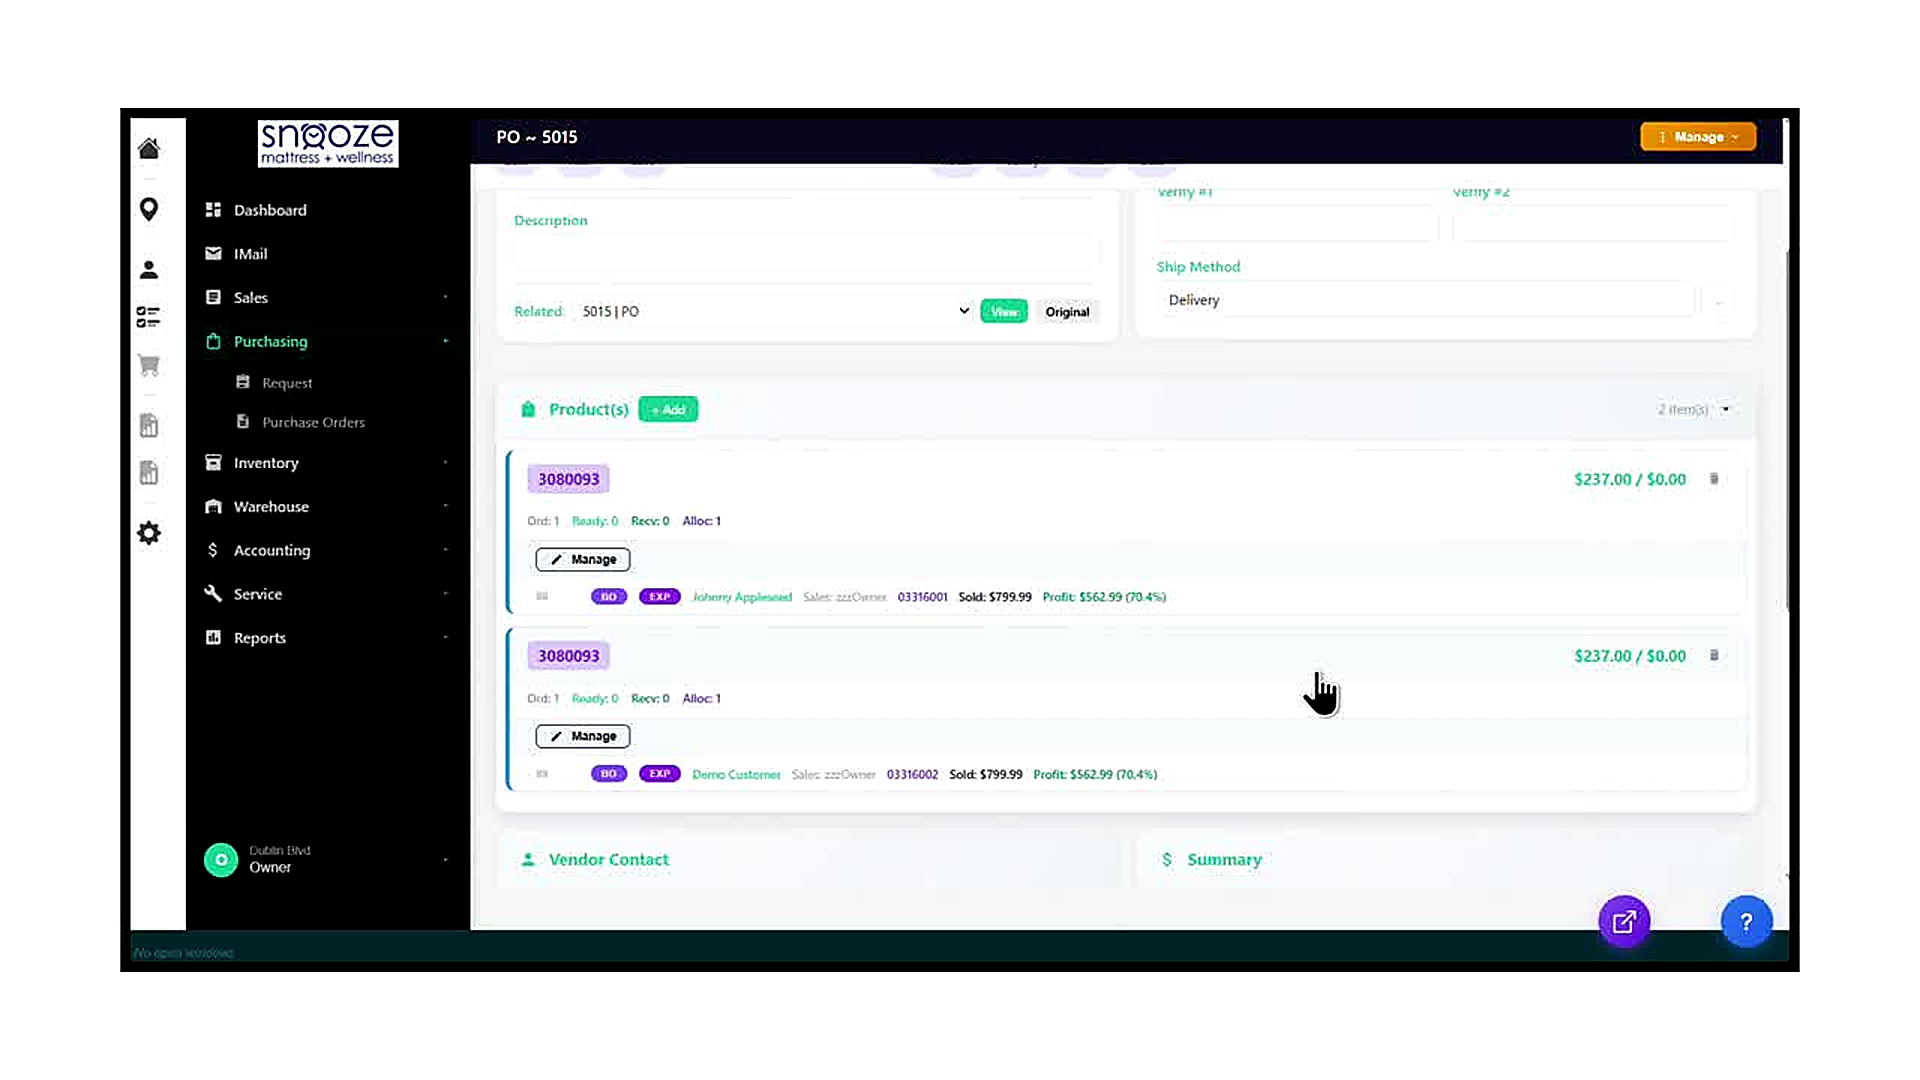
Review the Product Line Items
Scroll down to the Products section. Each product line item shows the model number (e.g., 3080093), the unit cost and total, and the status counters: Ord (quantity ordered on this PO), Ready (staged for receiving), Recv (already fully received), and Alloc (allocated to a customer order). Below the counters, an expanded unit row shows the BO Date button, EXP Date button, the allocated customer’s name, sales rep, order number, sale price, and profit percentage.
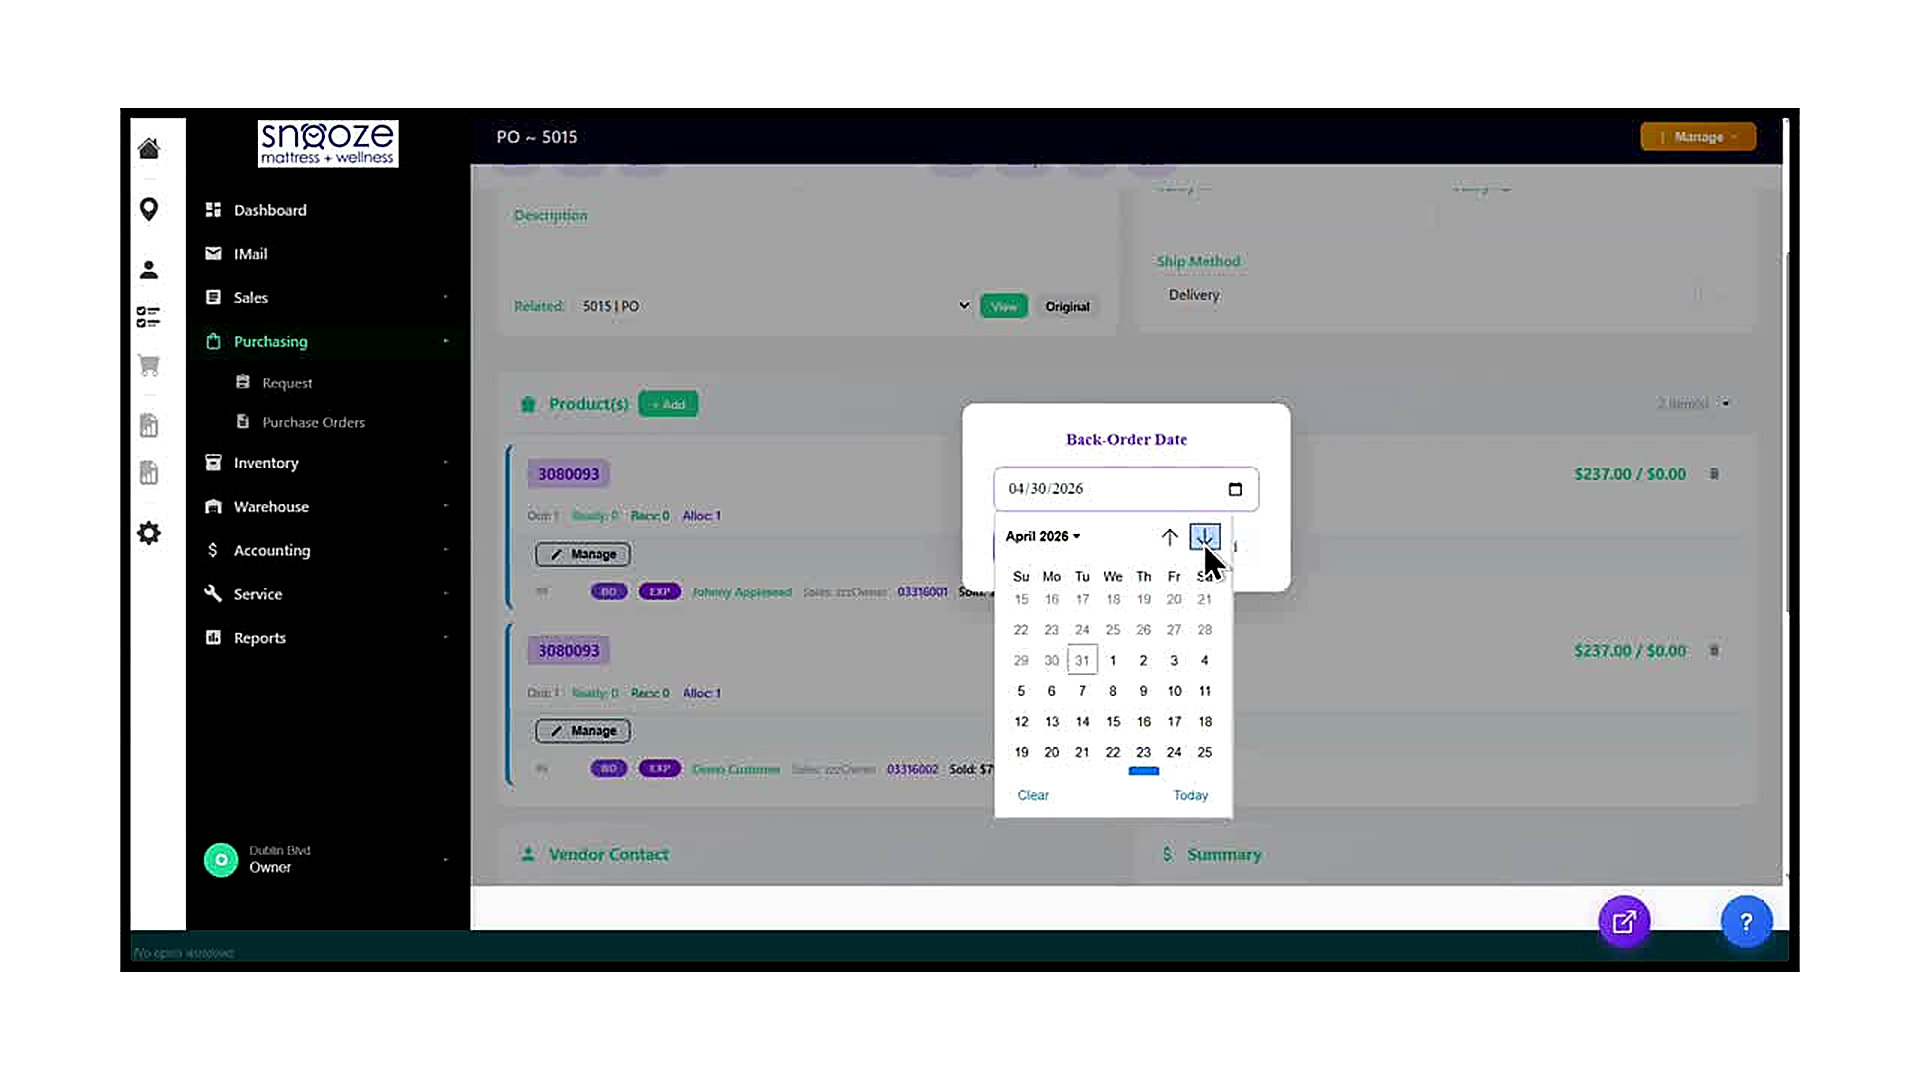
Set the Back-Order (BO) Date
On each product unit row, click the purple 'BO' button to open the Back-Order Date picker. A calendar appears showing the current month. Click the date that represents when this item is expected to be back in stock or available for the customer. After selecting a date, the BO button on the unit row updates to display the chosen date (e.g., 'BO: 4/14/26'). Set the BO date for each unit row that requires one before converting.
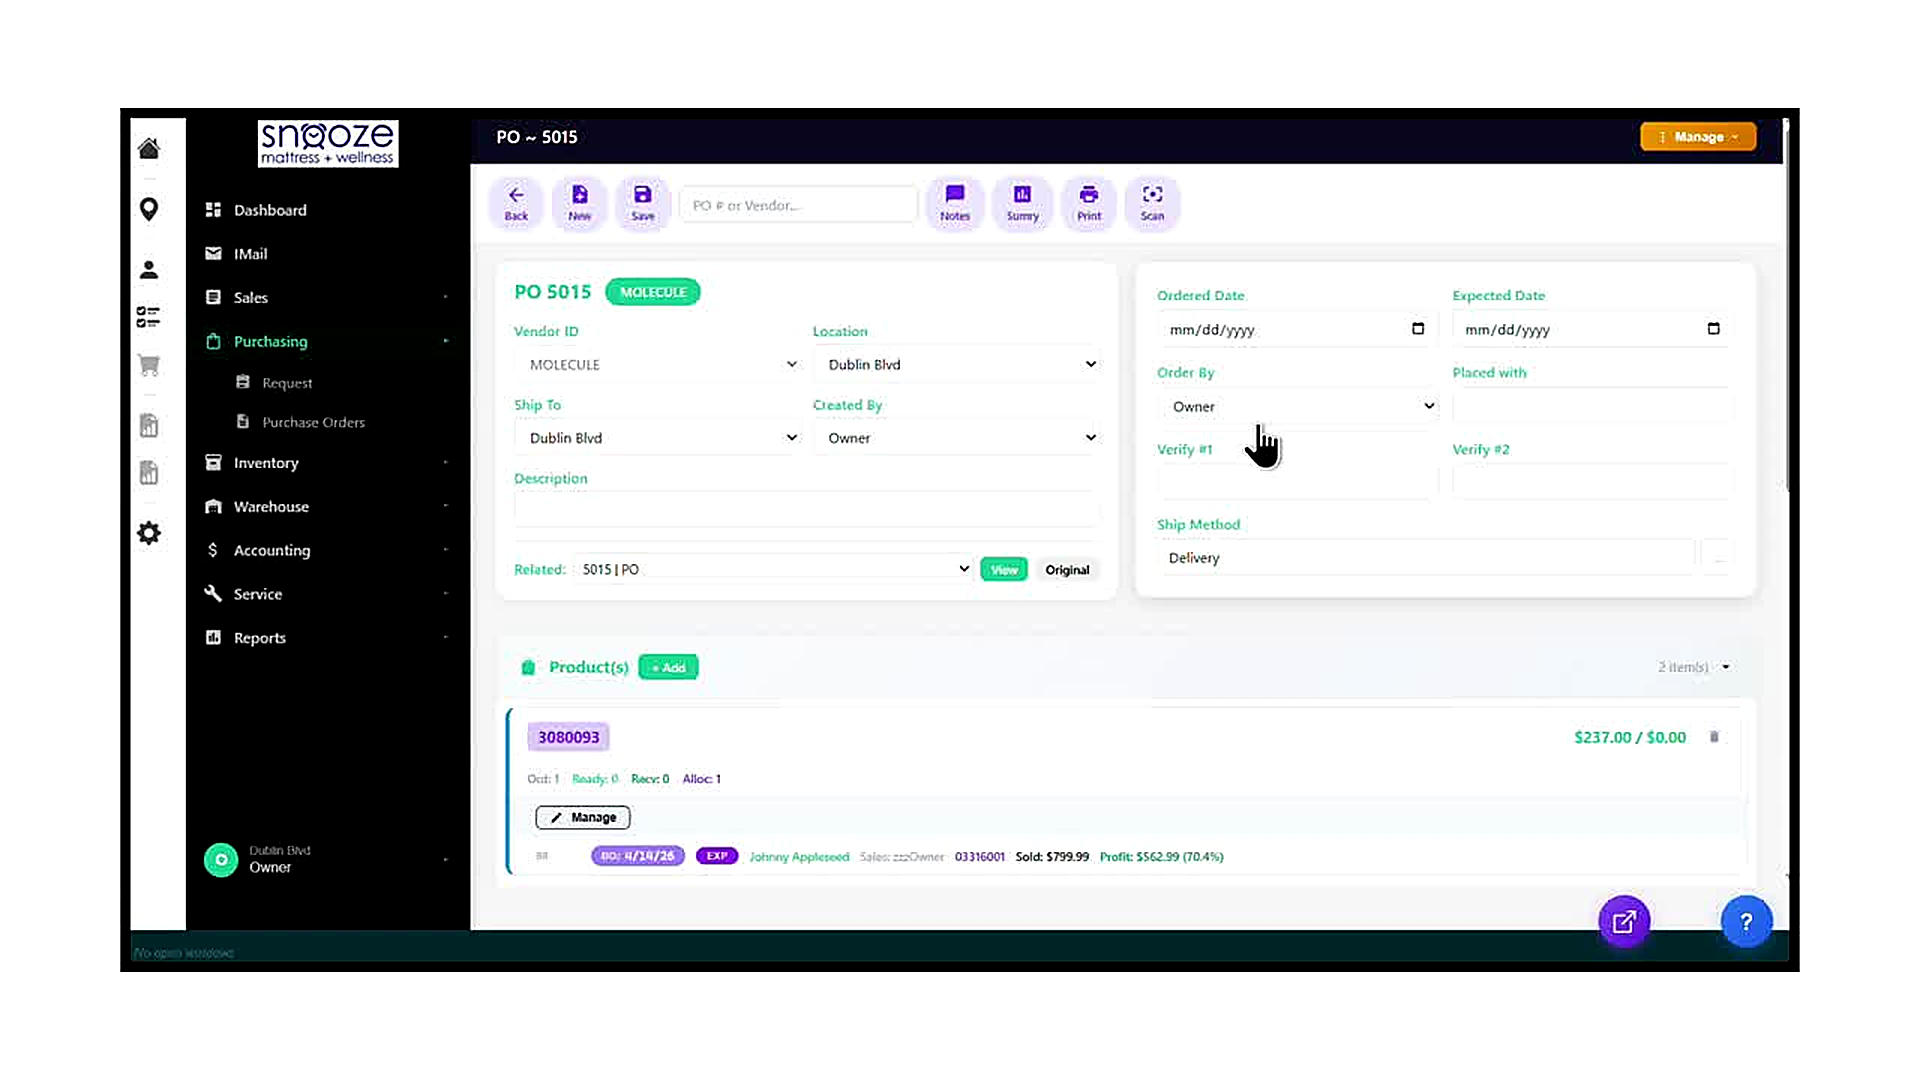
Enter the Ordered Date and Expected Date
In the PO header on the right side of the screen, click the Ordered Date field and enter the date the PO was placed with the vendor. Then click the Expected Date field and enter the date the vendor is expected to ship or deliver the goods. Both dates are required before the Manage menu will allow conversion. Type the date directly or use the calendar icon to select it.
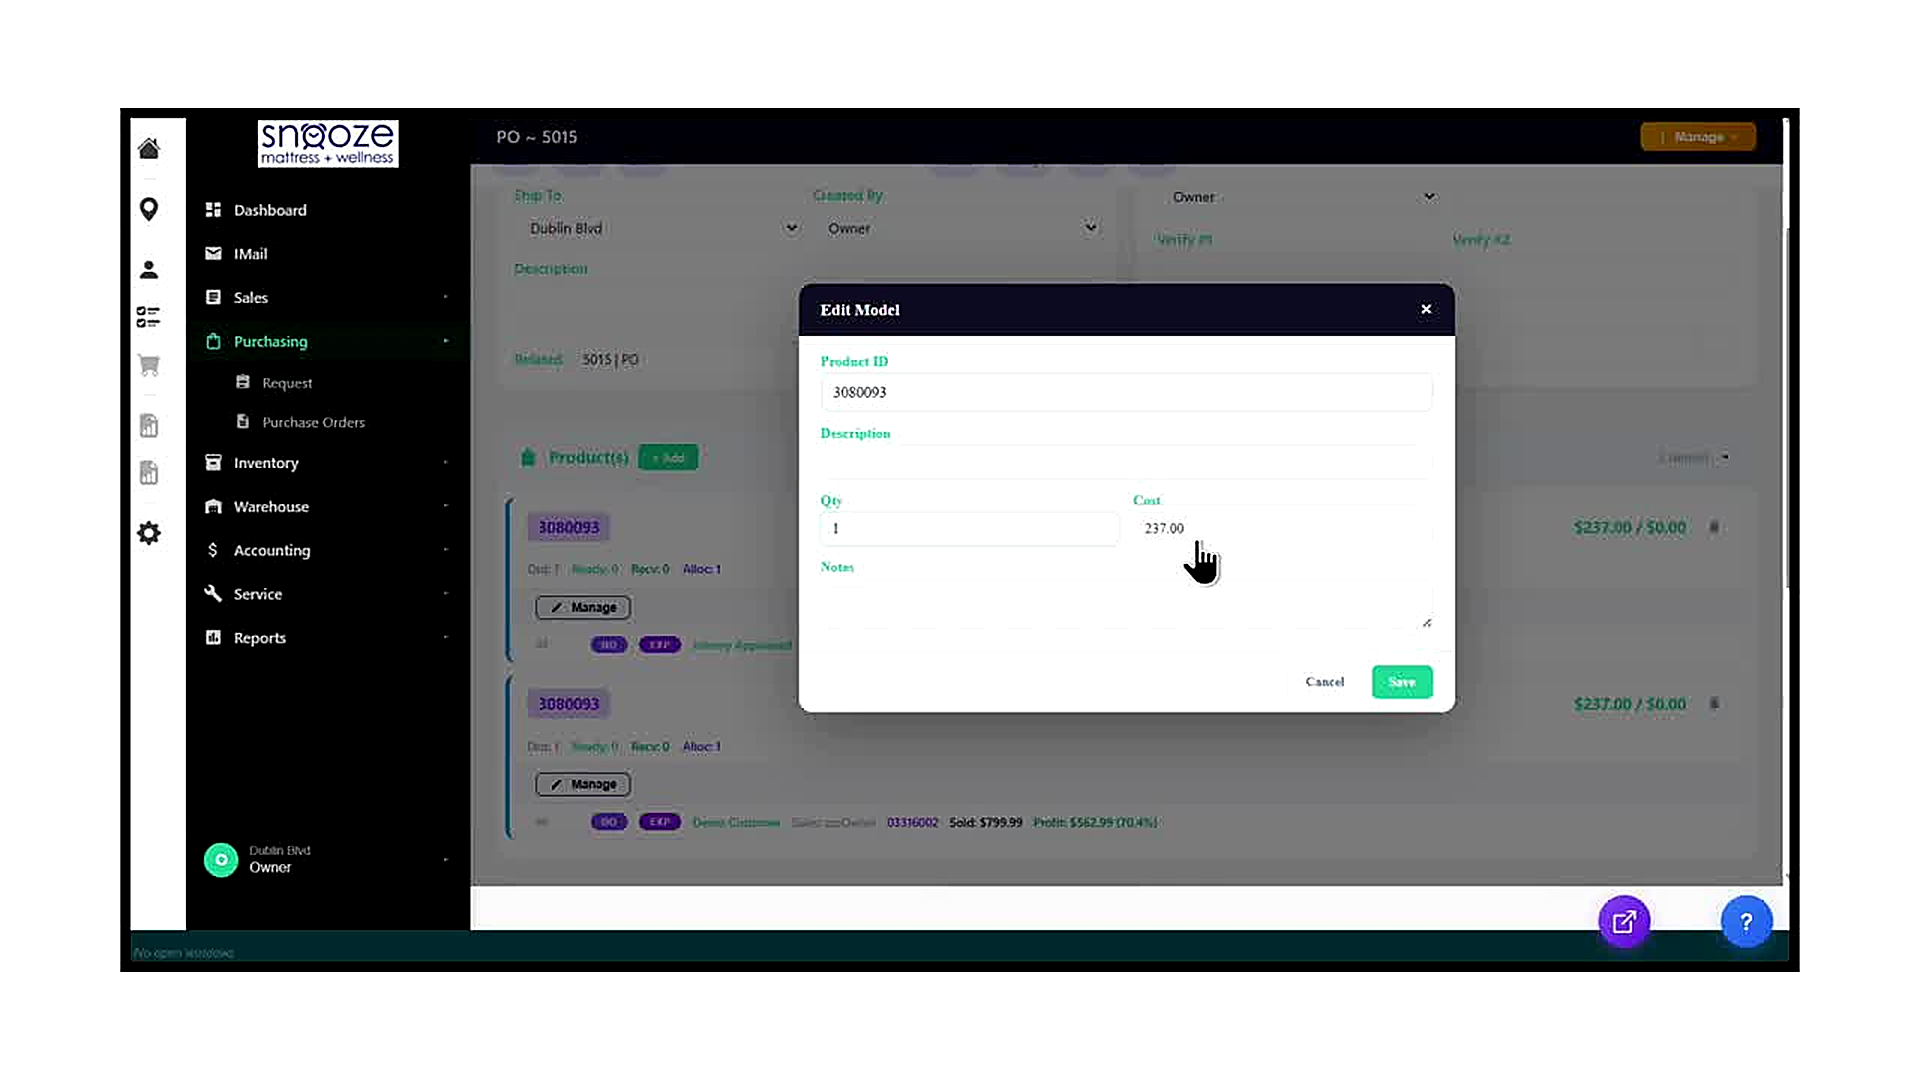
Edit Product Quantity or Cost if Needed
If the quantity ordered or the unit cost needs to be adjusted before converting, click the model number tag (e.g., the teal '3080093' badge) on the product row. The Edit Model dialog opens, showing the Product ID, Description, Qty, Cost, and Notes fields. Update the Qty or Cost as needed to match the vendor invoice, then click Save. Click Cancel to close without changes.

Open the Manage Menu
Once the PO header dates are entered and all product details are correct, click the orange 'Manage' button in the top-right corner of the screen. A dropdown menu appears with three options: 'Convert to Receiving', 'Finalize', and 'Delete'. Click 'Convert to Receiving' to begin the conversion process.
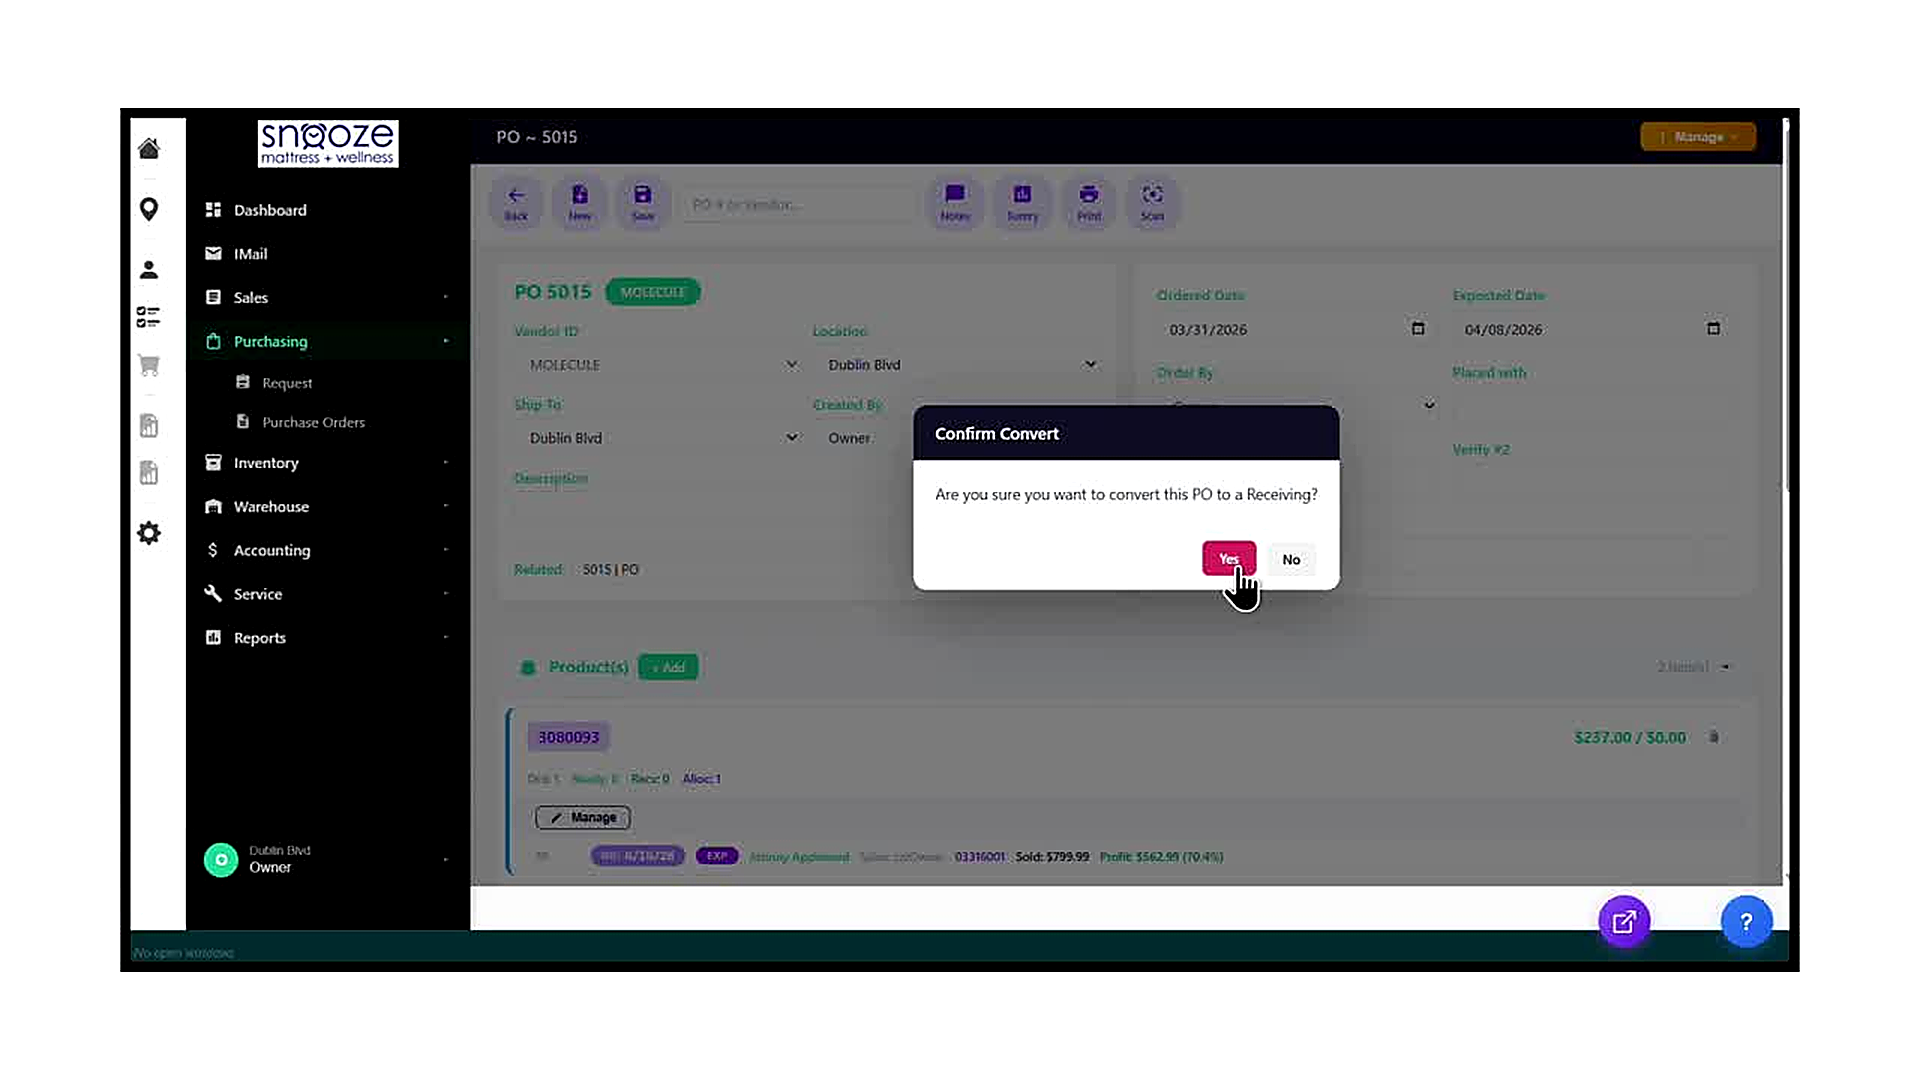
Confirm the Conversion
A confirmation dialog titled 'Confirm Convert' appears, asking: 'Are you sure you want to convert this PO to a Receiving?' Review the question carefully. Click the red 'Yes' button to proceed with the conversion. Click 'No' to cancel and return to the PO without making any changes. Once you click Yes, the conversion is immediate and cannot be undone from this screen.
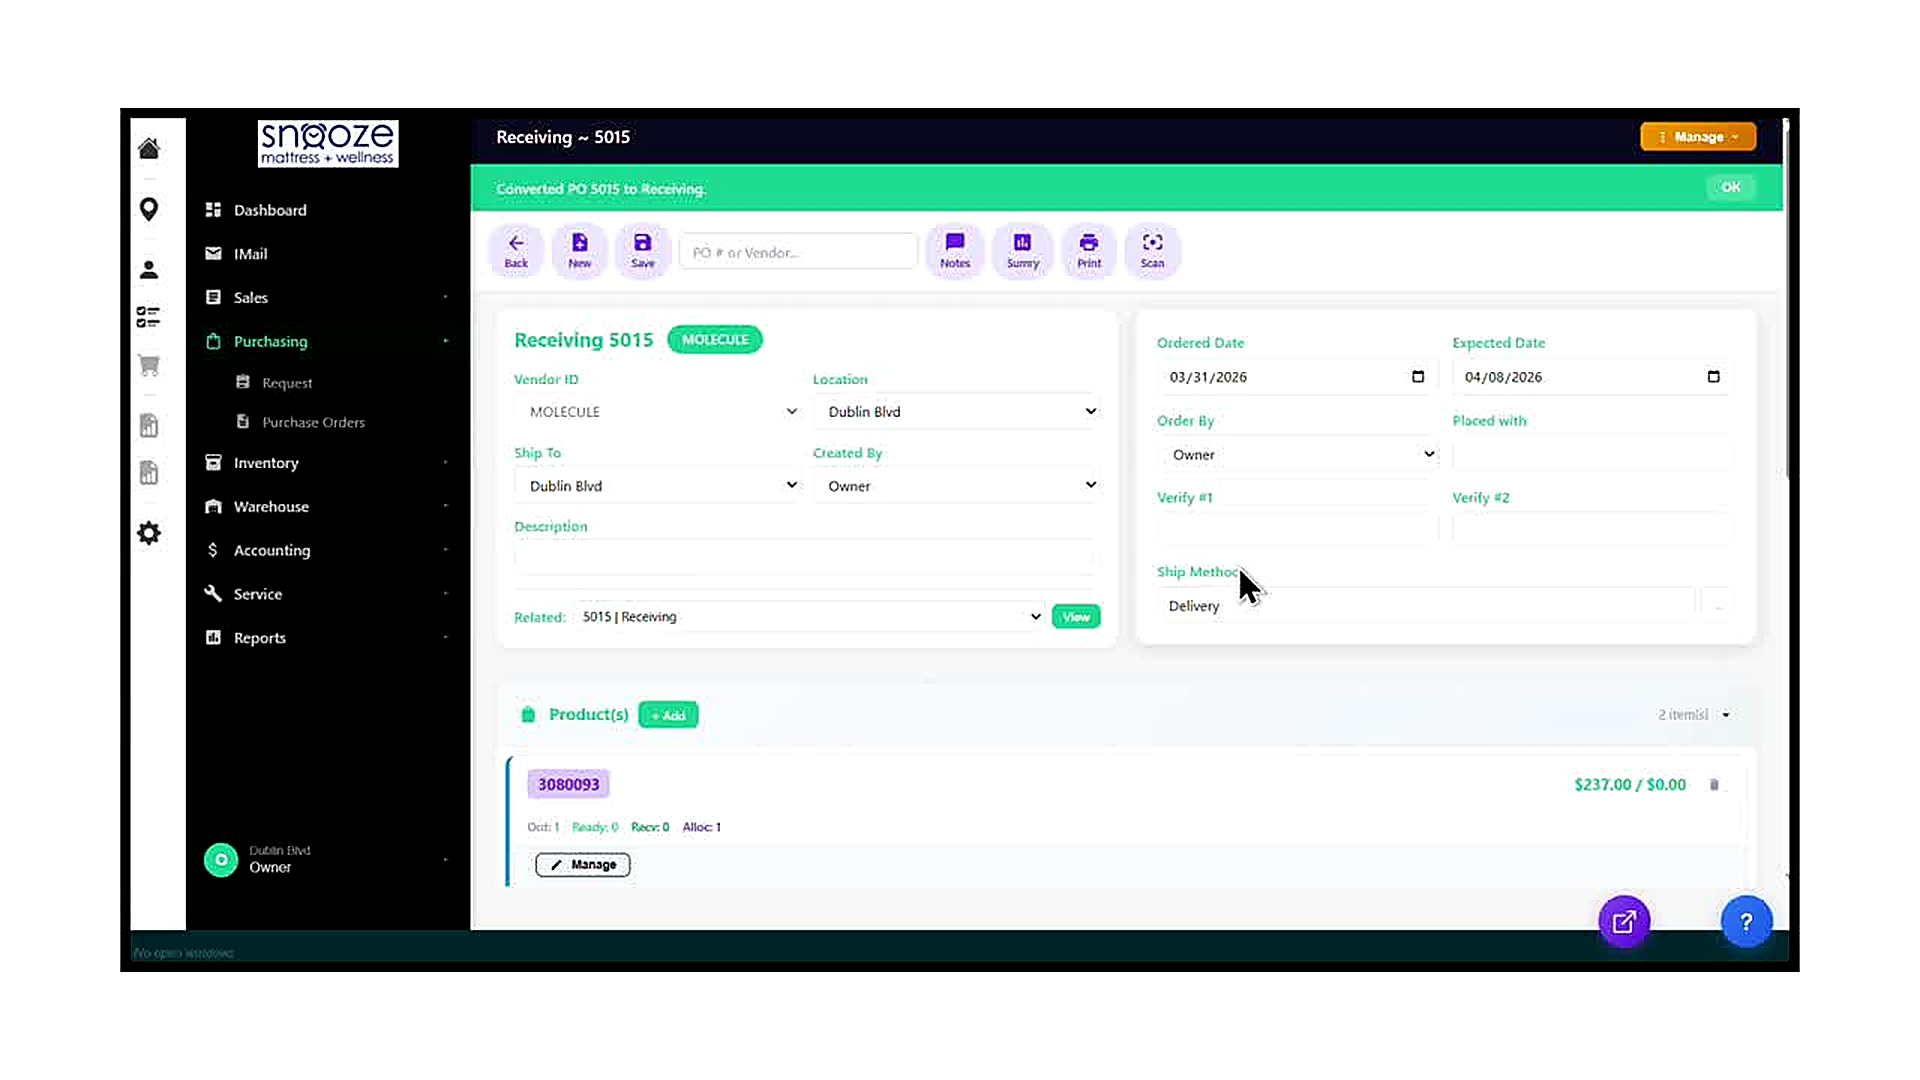
Read the Success Banner
After clicking Yes, the screen immediately updates. A green banner appears at the top reading 'Converted PO 5015 to Receiving.' This confirms the conversion was successful. Click the 'OK' button on the right side of the banner to dismiss it. The banner disappears and you are left on the fully converted Receiving record.
Verify the Record Type Has Changed
Confirm that the conversion was successful by checking three things: first, the screen title at the top of the page now reads 'Receiving ~ 5015' (not 'PO ~ 5015'); second, the header label has changed from 'PO 5015' to 'Receiving 5015'; third, the Related field now reads '5015 | Receiving'. All three of these must reflect 'Receiving' before proceeding to mark items as received.
Confirm the Product Rows Carried Over
Scroll down to the Products section and verify that all product line items from the PO are present on the Receiving record. Each item should show the same model number, Ord count, and allocation details as they did on the PO. The Ready and Recv counters will both be 0 at this stage — they will update as you mark items received in the next step of the receiving workflow.
Receiving Product on a Receiving
About This Guide
This step-by-step training guide covers how to manually receive product on a Receiving record in the WhirlWind Portal. This method is used to receive individual units one at a time directly from the product row — without opening the Serial Numbers panel — and then post all ready units to inventory using the Receive / Post action.
- Navigate to the Purchase Orders screen and find a Receiving record using the search dropdown
- Understand the difference between PO status and Receiving status entries in the search list
- Open and read a Receiving record header: vendor, location, dates, and Related field
- Read the product line item rows and interpret the Ord, Ready, Recv, and Alloc counters
- Understand the unit detail row: Mark Received button, BO Date, EXP Date, serial number, customer, order, and profit
- Click ‘Mark Received’ on an individual unit row to stage it for receiving
- Observe how the Ready counter updates after staging a unit
- Open the Manage dropdown on the Receiving record and select ‘Receive / Post’
- Confirm the posting action in the ‘Confirm Convert’ dialog
- Understand what posting does: it commits all Ready units to inventory and generates an invoice
- Distinguish between Receive / Post and Delete in the Receiving Manage menu
Open the Purchase Orders Screen
From the left navigation bar, click 'Purchasing' to expand the sub-menu, then click 'Purchase Orders'. The Purchase Orders screen opens with an empty form. The toolbar at the top contains the search box labeled 'PO # or Vendor...' — click into this field to open the recent records dropdown.
Identify the Correct Record in the Dropdown
The search dropdown lists your most recently accessed purchasing records. Each entry shows the PO number, vendor name, vendor ID, and the current document status with its date. Records showing 'PO' status have not yet been converted. Records showing 'Receiving' status have already been converted from a PO and are ready for the receiving workflow. Look for the Receiving record that matches the shipment you are processing (e.g., 5015 – MOLECULE, Receiving 03/31/26).
Click the Receiving Entry to Open It
Click the entry in the dropdown that shows 'Receiving' status for the vendor whose shipment has arrived. The system loads the Receiving record. A 'Loading Purchase Order — Please wait while we load the PO form' spinner appears briefly while the record loads. Once complete, the screen title changes to 'Receiving ~ [number]' (e.g., 'Receiving ~ 5015').
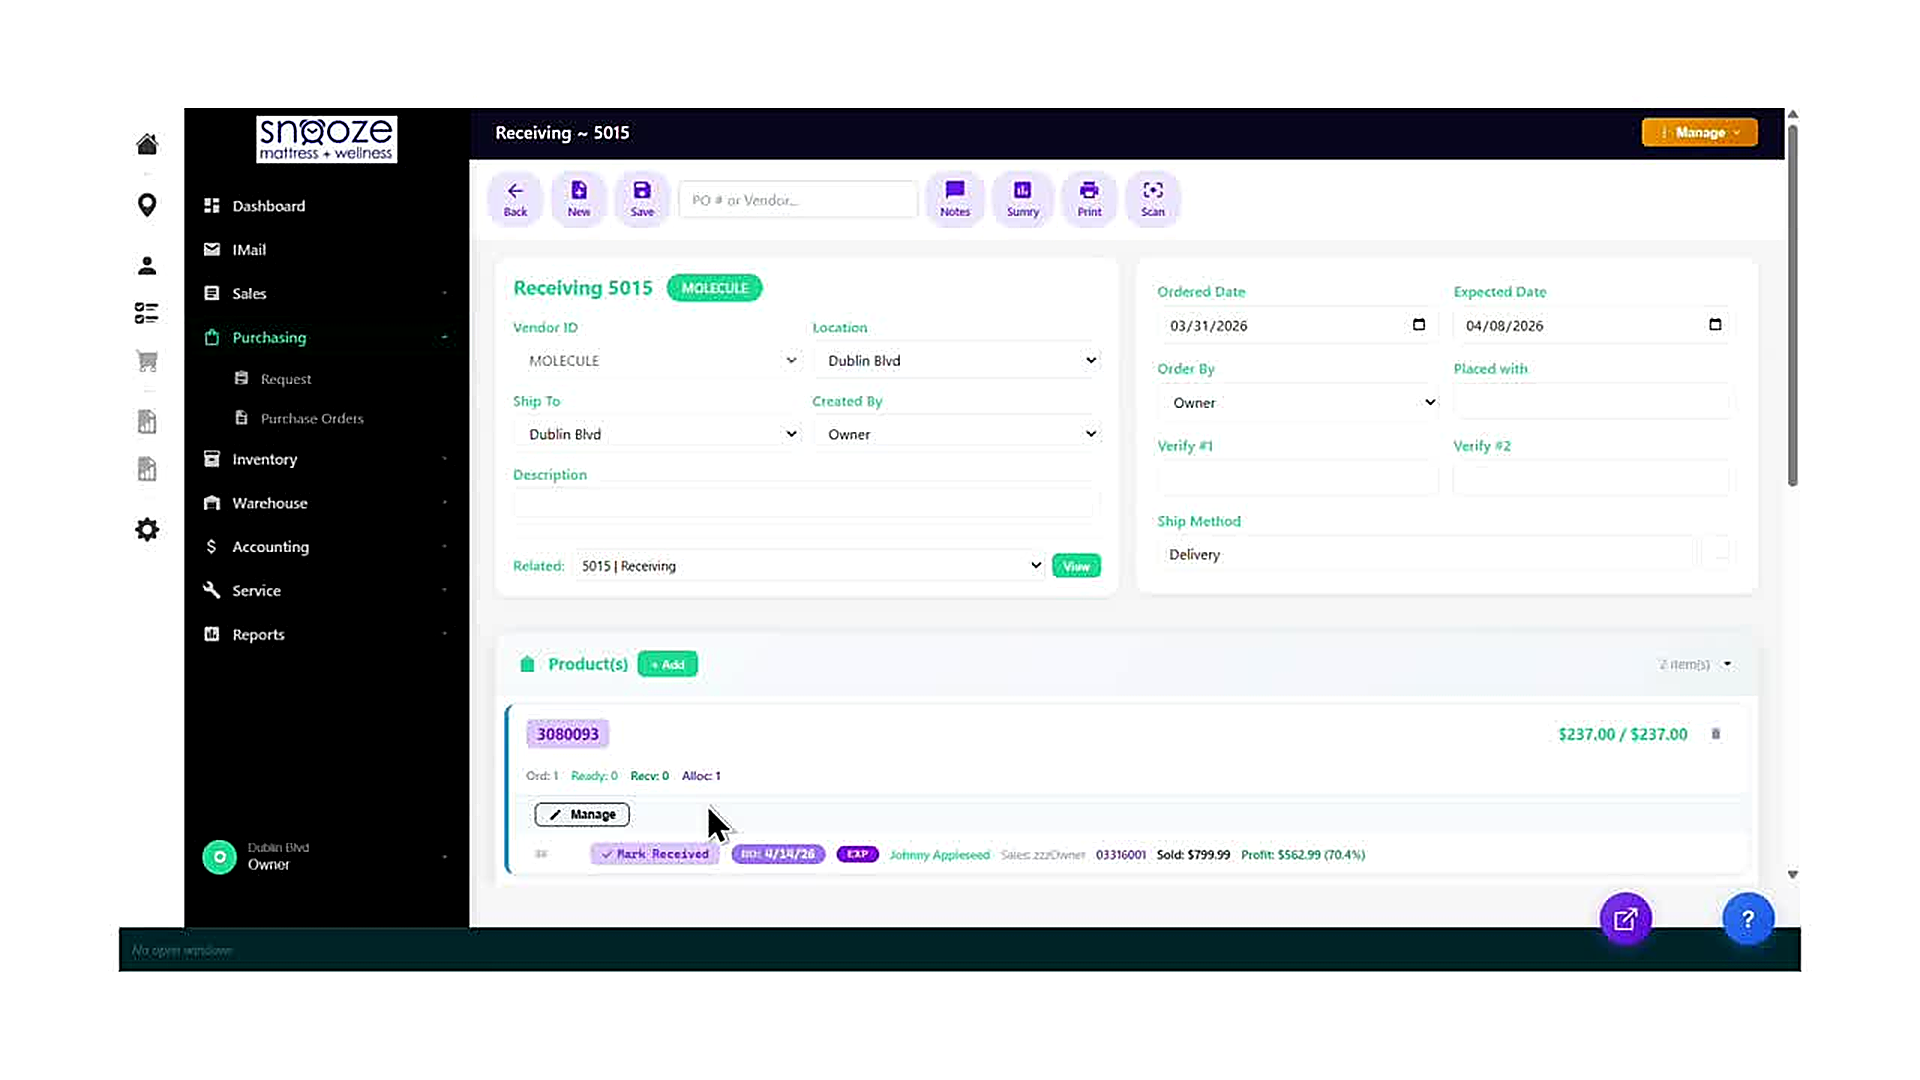
Read the Receiving Header
The Receiving header mirrors the original PO header but with 'Receiving' as the document type. Confirm the Vendor ID, Location, Ship To, Ordered Date, and Expected Date match the physical shipment. The Related field shows '5015 | Receiving' — this confirms the record has been converted from a PO. The View button next to the Related field opens the linked original PO for reference.
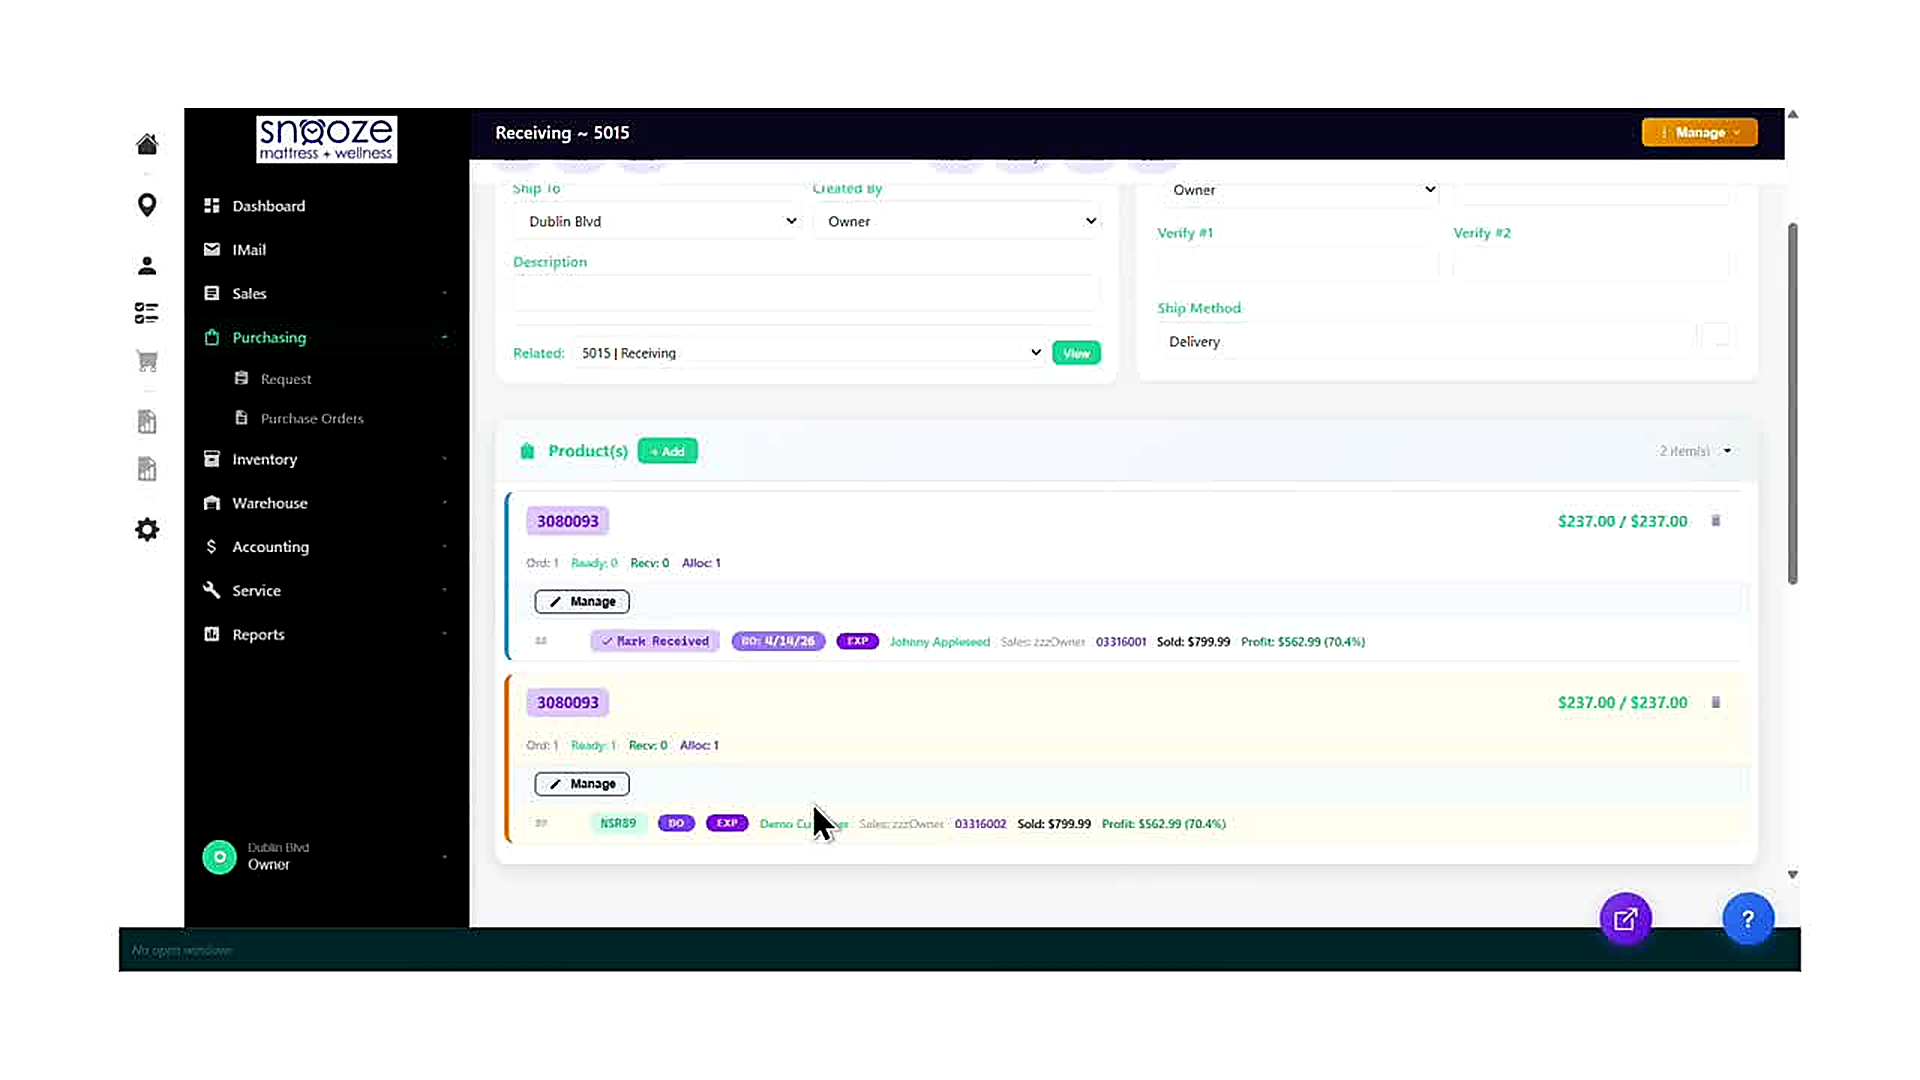
Read the Product Row Counters
Each product line item on the Receiving shows four counters below the model number: Ord (quantity ordered on this Receiving), Ready (units staged and ready to post in this session), Recv (units already posted to inventory in a prior session), and Alloc (units allocated to customer orders). At the start of a fresh receiving session, Ready will be 0 and Recv will reflect any prior posting activity.
Read the Unit Detail Row
Below the counters, each unit row in the Receiving shows: a 'Mark Received' button (green checkmark with text), the BO Date button showing the back-order date if set (e.g., 'BO: 4/14/26'), an EXP Date button, the allocated customer’s name and sales rep, the linked order number, the sold price, and the profit amount and percentage. If a serial number has been assigned, it also appears in this row.
Click 'Mark Received' on the Unit Row
On the unit detail row of the product you are receiving, click the green 'Mark Received' button. This button has a checkmark icon and the words 'Mark Received' as its label. Clicking it stages that specific unit as ready to receive. The button’s appearance changes to indicate the unit has been staged, and the Ready counter on the product row increments by one (e.g., from 0 to 1).
Verify the Ready Counter Updates
After clicking Mark Received on a unit row, look at the counters on the product row above. The Ready count should increase by 1 to reflect the newly staged unit. The Recv count remains unchanged until you post. Repeat the Mark Received action for any additional units on other product rows that you need to receive in this session before posting.
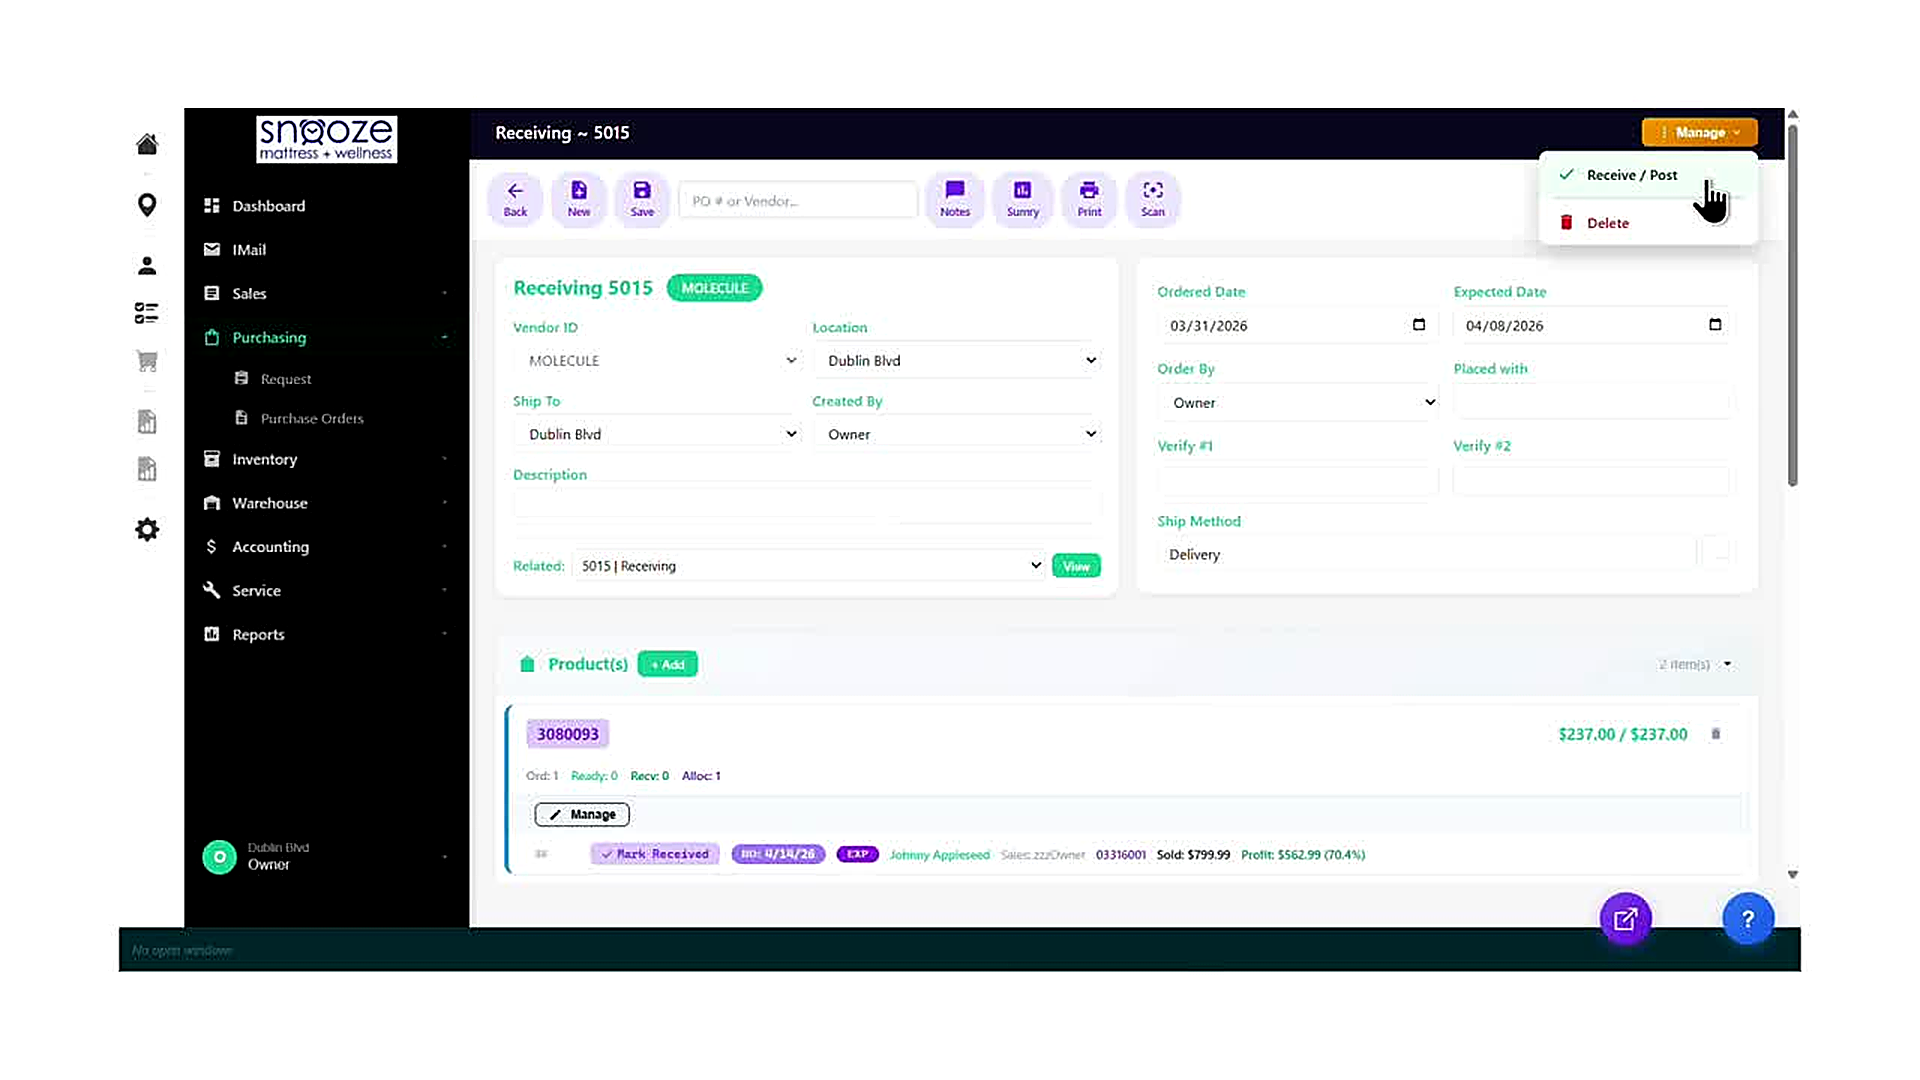
Open the Manage Menu and Click 'Receive / Post'
Once all units you want to receive have been staged (Ready count updated), click the orange 'Manage' button in the top-right corner of the Receiving screen. A dropdown menu appears with two options: 'Receive / Post' and 'Delete'. Click 'Receive / Post' to begin the posting process. This action commits all currently staged (Ready) units to inventory.

Confirm the Post in the Dialog
A confirmation dialog titled 'Confirm Convert' appears, asking: 'Are you sure you want to post this Receiving to create an Invoice?' Read this prompt carefully — posting is a significant accounting action. Click the red 'Yes' button to confirm. Click 'No' to cancel and return to the Receiving without making any changes. Once you click Yes, the system posts all Ready units, updates inventory levels, and generates a vendor invoice.
Verify the Posting Was Successful
After clicking Yes, the system processes the post and the Receiving record updates. The Recv counter on each product row increases to reflect the newly posted units, and the Ready counter resets to 0. The units are now officially in inventory and any allocated units are linked to their respective customer orders. If all units on the Receiving have been posted, the Receiving record is considered complete.
Marking Multiple Items as Received
About This Guide
This step-by-step training guide covers how to mark multiple items as received on a Receiving record in the WhirlWind Portal. This process is used when a vendor shipment arrives at your store and you need to check in all items on the purchase order at once, rather than one at a time.
- Locate and open a Receiving record from the Purchasing menu
- Read the Receiving record header: vendor, location, ship to, dates, and ship method
- Identify product line items and their current status (Ord, Ready, Recv, Alloc counts)
- Click 'Manage' to open the Serial Numbers panel for a product
- Understand the Serial Numbers panel: status bar counters, column headers, and row states
- Distinguish between already-received rows (posted) and rows ready to be selected
- Use the 'Select All' checkbox to select all unselected items at once
- Click 'Mark Received' to stage all selected items for receiving
- Read the confirmation banner and understand the two-step save process
- Click 'Save All' to commit the changes and close the modal
- Verify the updated product statistics on the Receiving record (Ready count increases)
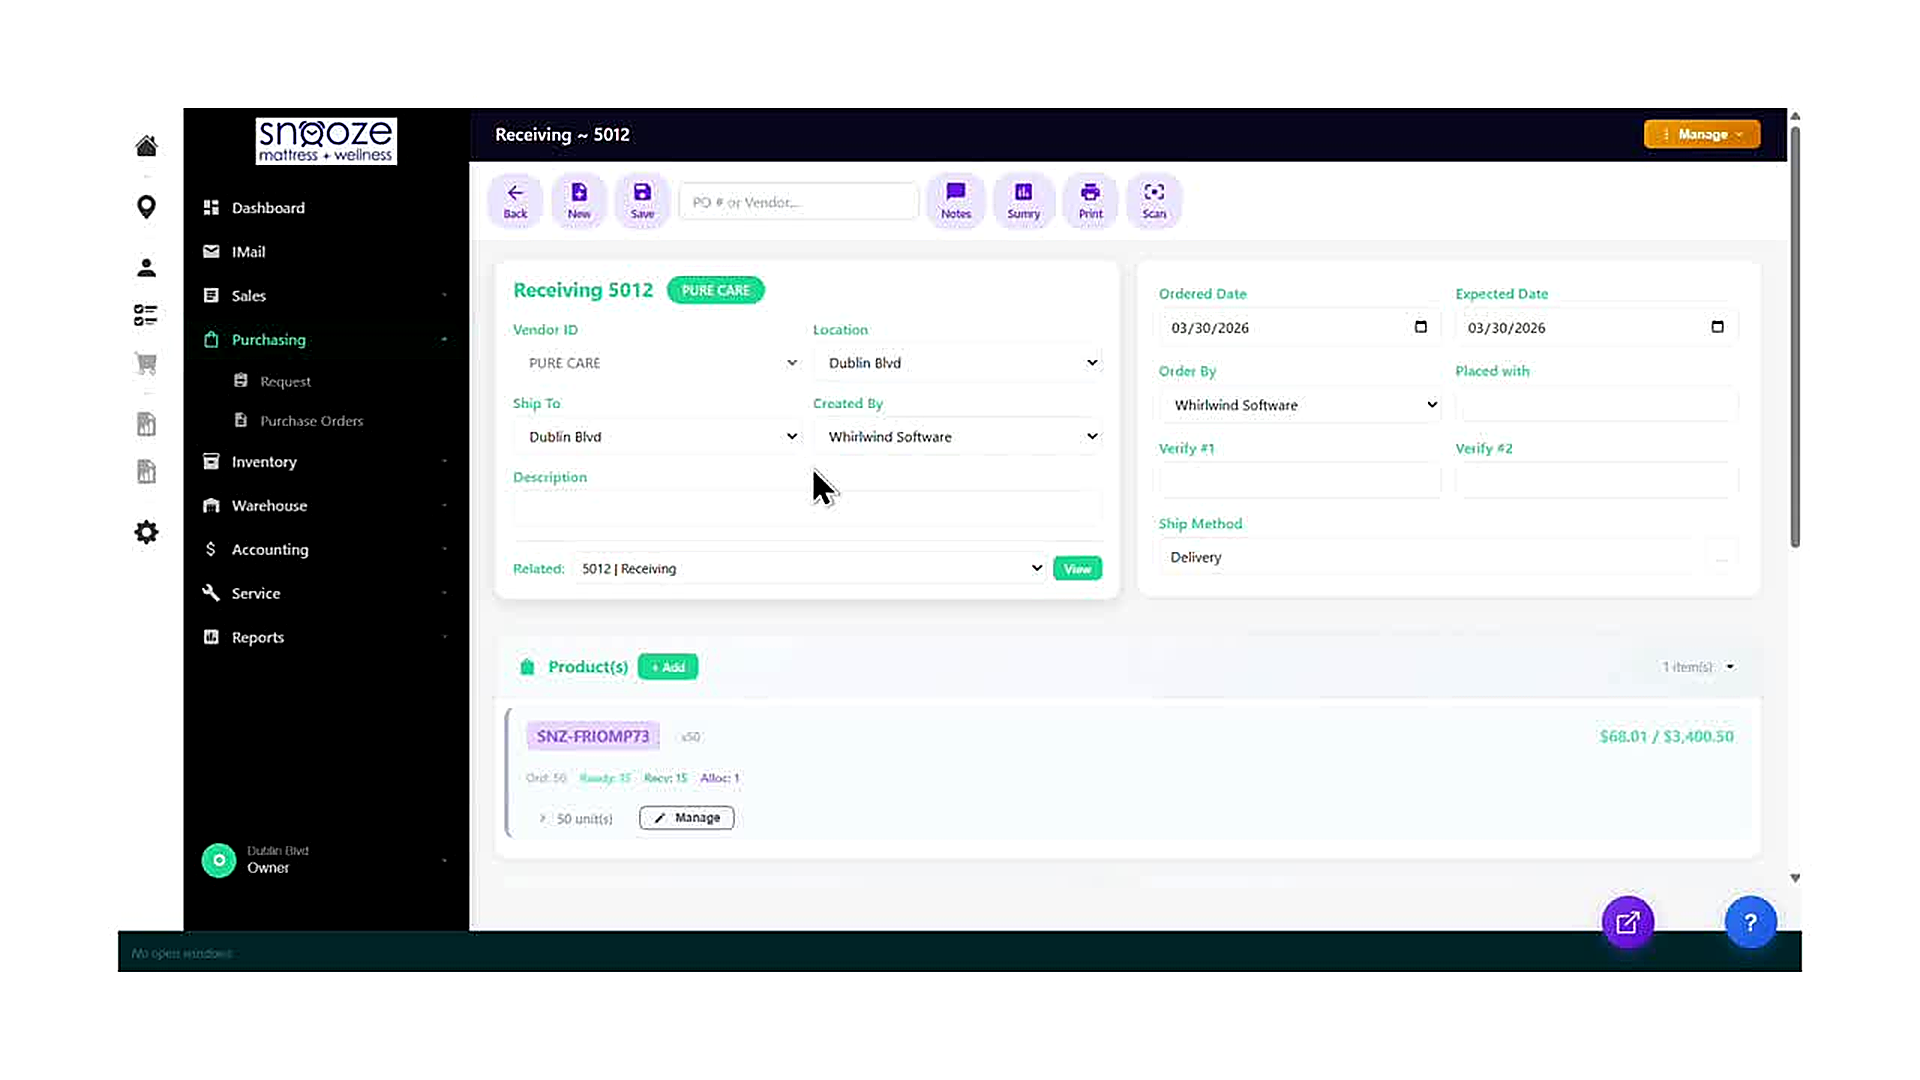
Navigate to the Receiving Record
From the left navigation bar, click 'Purchasing' to expand the sub-menu, then click 'Purchase Orders'. Use the PO # or Vendor search box in the toolbar to find the purchase order associated with the shipment that has arrived. Once the PO is open, locate the Related field near the bottom of the header section. It will display the linked Receiving record (e.g., '5012 | Receiving'). Click the 'View' button next to it to open the Receiving record directly.
Review the Receiving Record Header
The Receiving record header displays the PO number and vendor name badge at the top (e.g., 'Receiving 5012 — PURE CARE'). Below that are the key fields: Vendor ID, Location, Ship To, Created By, Ordered Date, Expected Date, Ship Method, and Description. Verify that the vendor and dates match the physical shipment you have received before proceeding.
Read the Product Line Item
In the Products section below the header, each product on the Receiving shows its model number, version, unit price, and a row of status counters: Ord (quantity ordered), Ready (quantity staged and ready to post), Recv (quantity already posted as received), and Alloc (quantity allocated to customer orders). Click the arrow to the left of the unit count to expand the item and see individual unit details.

Click 'Manage' to Open the Serial Numbers Panel
On the product line item row, click the green 'Manage' button. A modal panel titled 'Serial Numbers — [Model] ([X] units)' opens over the Receiving record. This panel lists every individual unit of that product that is on the Receiving, one row per unit.
Read the Status Bar
At the top of the Serial Numbers panel, a status bar shows four counters: Received (units already fully posted in a prior session), Ready to Receive (units staged in the current session but not yet saved), Not Selected (units still waiting to be selected), and Total (the full quantity on the Receiving). These counters update in real time as you select and mark items.

Understand the Row States
Rows in the Serial Numbers panel appear in two distinct states. Rows that have already been received show their serial number with '(posted)' in gray text and no checkbox — these are locked and cannot be changed. Rows that are ready to be received show a checkbox on the left, purple BO Date and EXP Date buttons, an editable NSR serial number field, and a green 'Allocate' button. Any row with a checkbox is eligible to be marked received in this session.
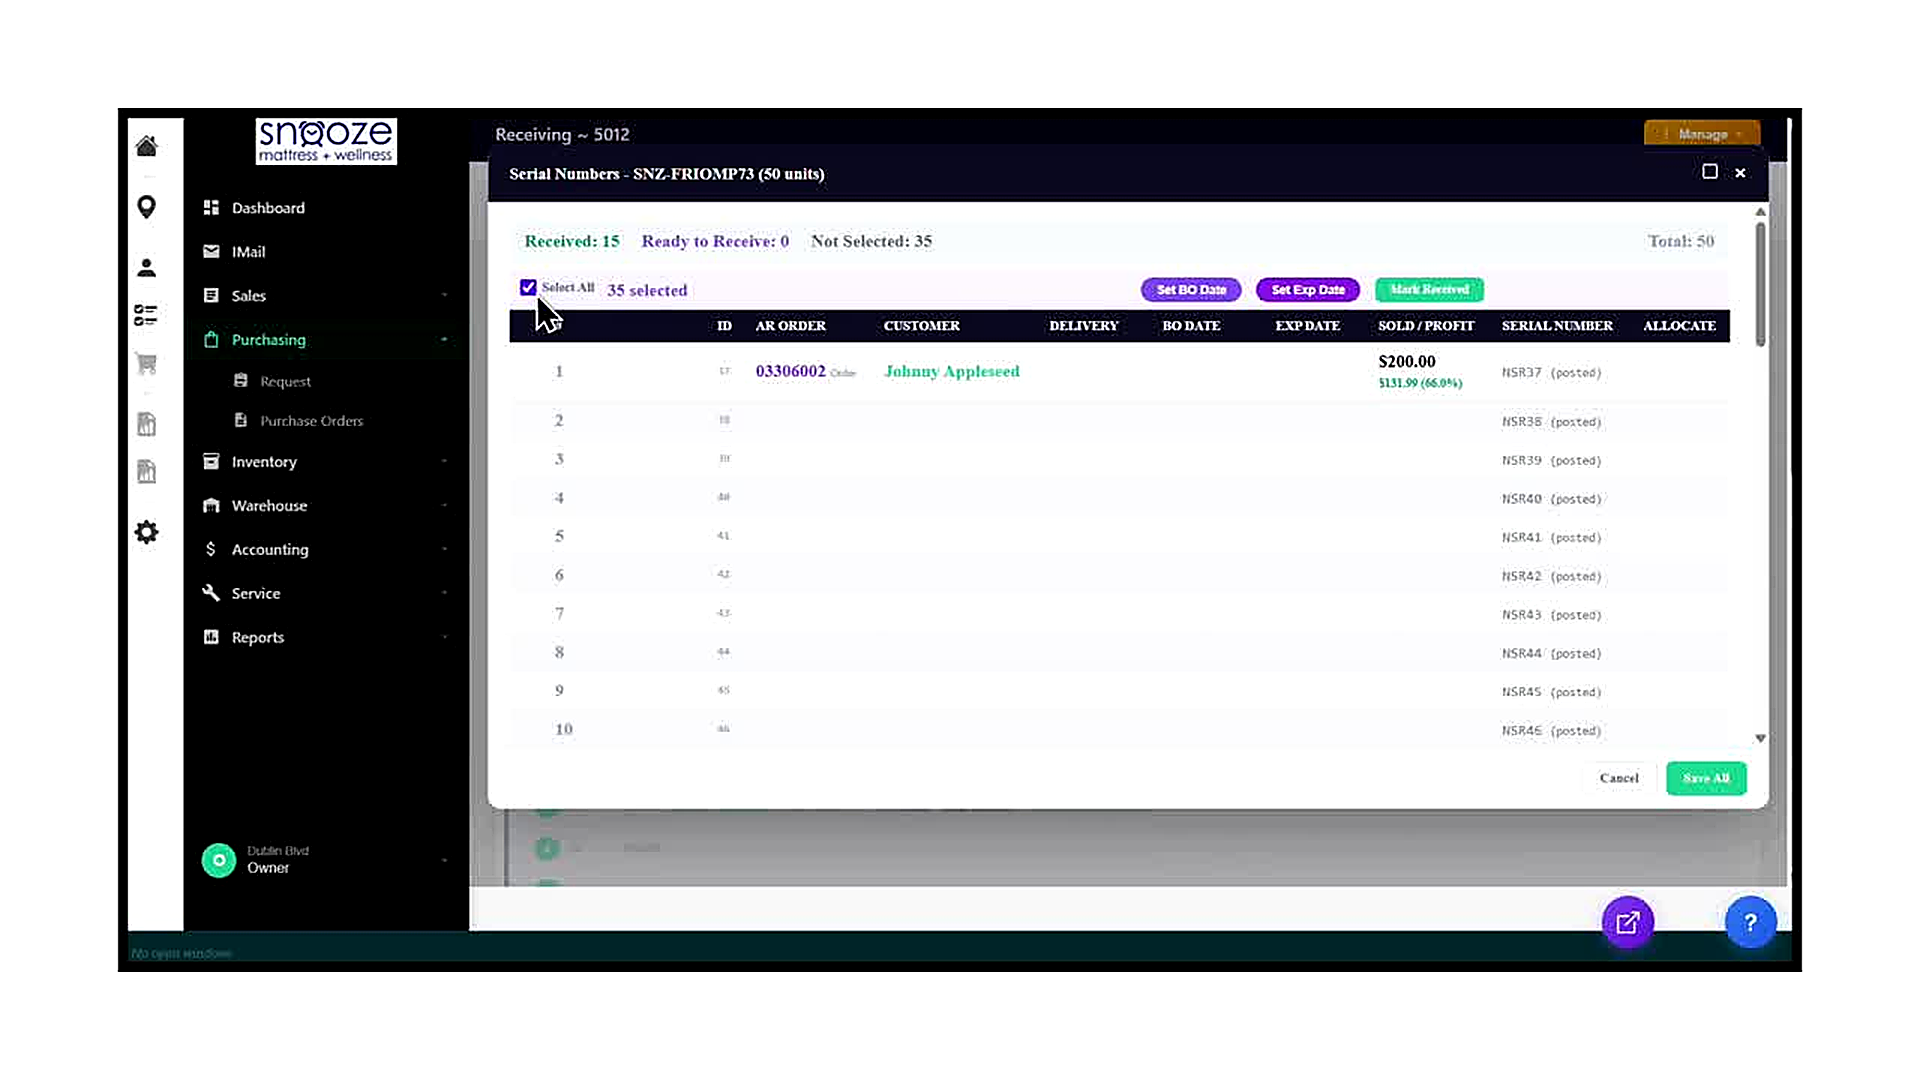
Check the 'Select All' Checkbox
To select every unselected unit at once, click the 'Select All' checkbox in the header row of the table, directly to the left of the column headers. The system immediately selects all units that are eligible to be received (those with checkboxes). A counter appears next to the checkbox showing how many units are now selected (e.g., '35 selected'). Note that already-received (posted) rows are excluded from this selection.
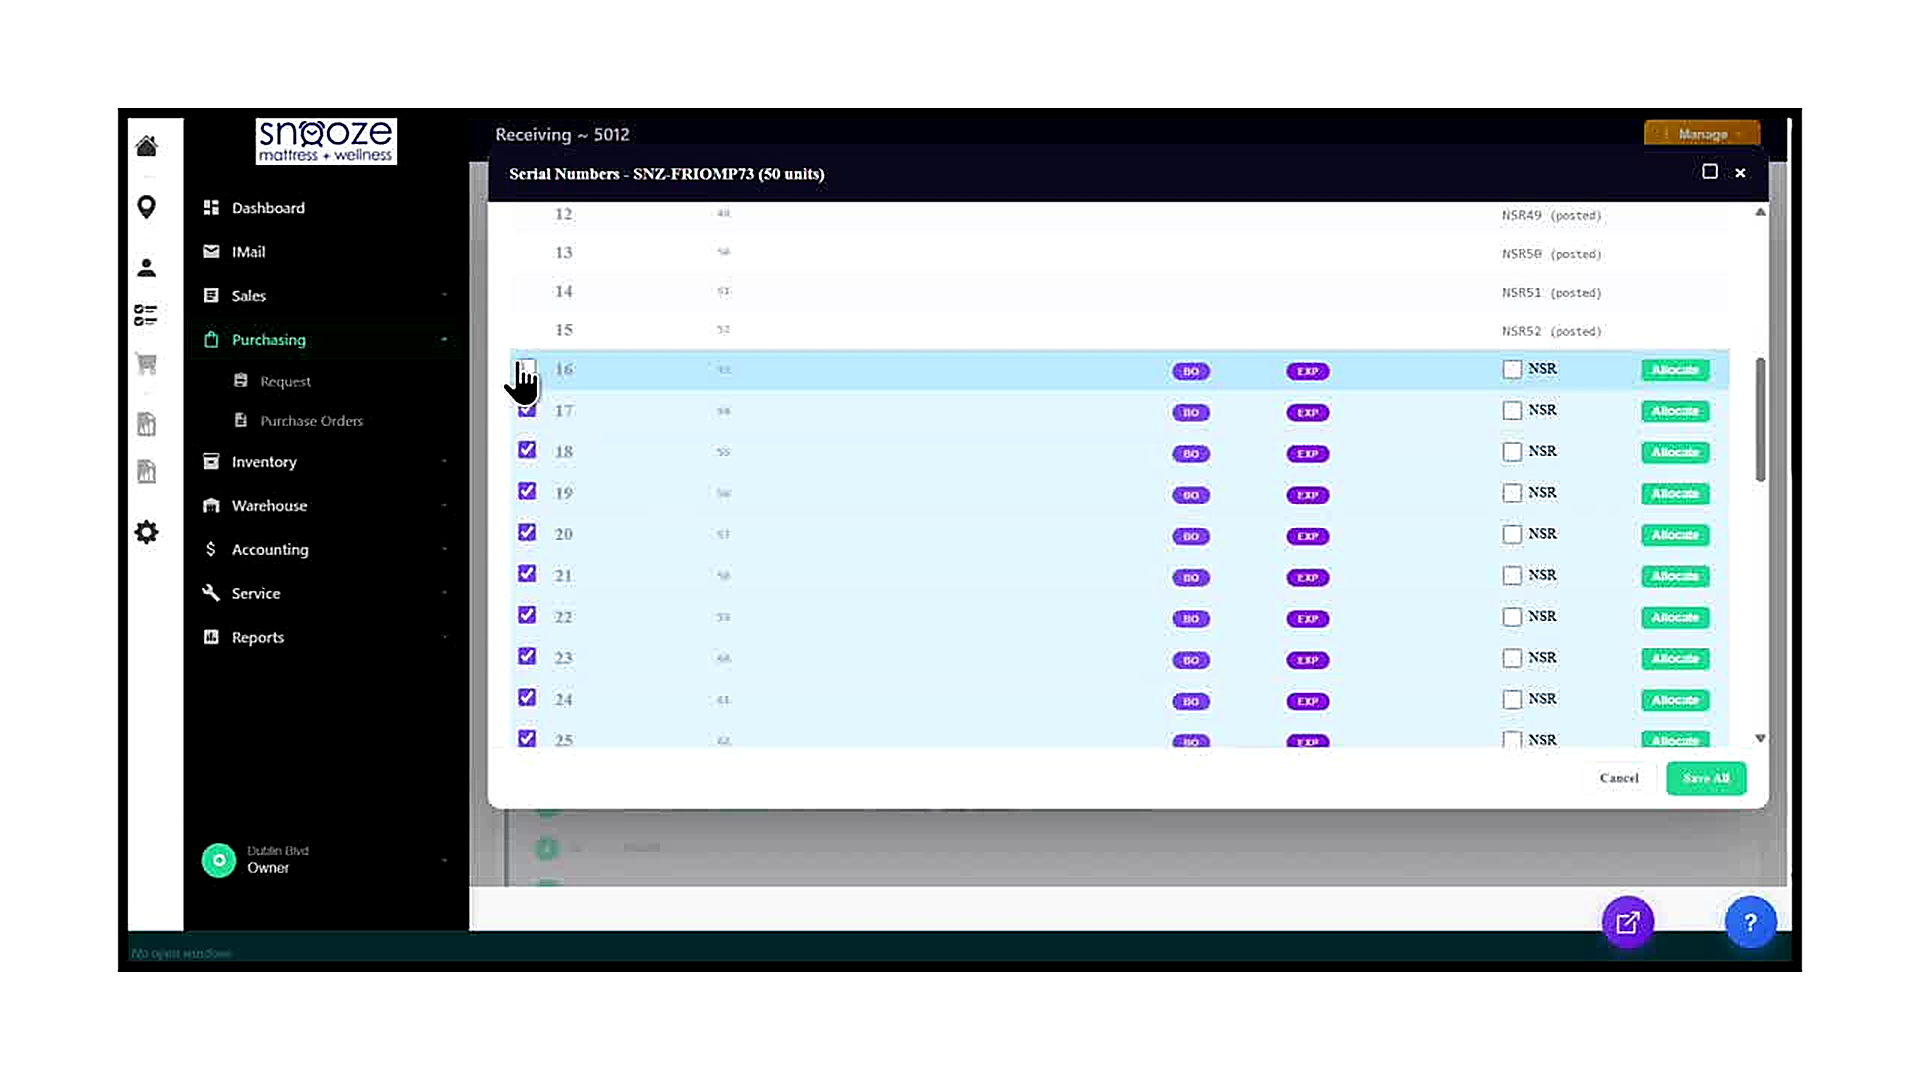
Click 'Mark Received'
With all desired units selected, click the green 'Mark Received' button in the toolbar at the top of the panel (to the right of 'Set BO Date' and 'Set Exp Date'). The system stages all selected units as ready to receive. The row highlights change to indicate they are staged, and the status bar updates: 'Ready to Receive' increases to reflect the number of staged units, and 'Not Selected' decreases accordingly.
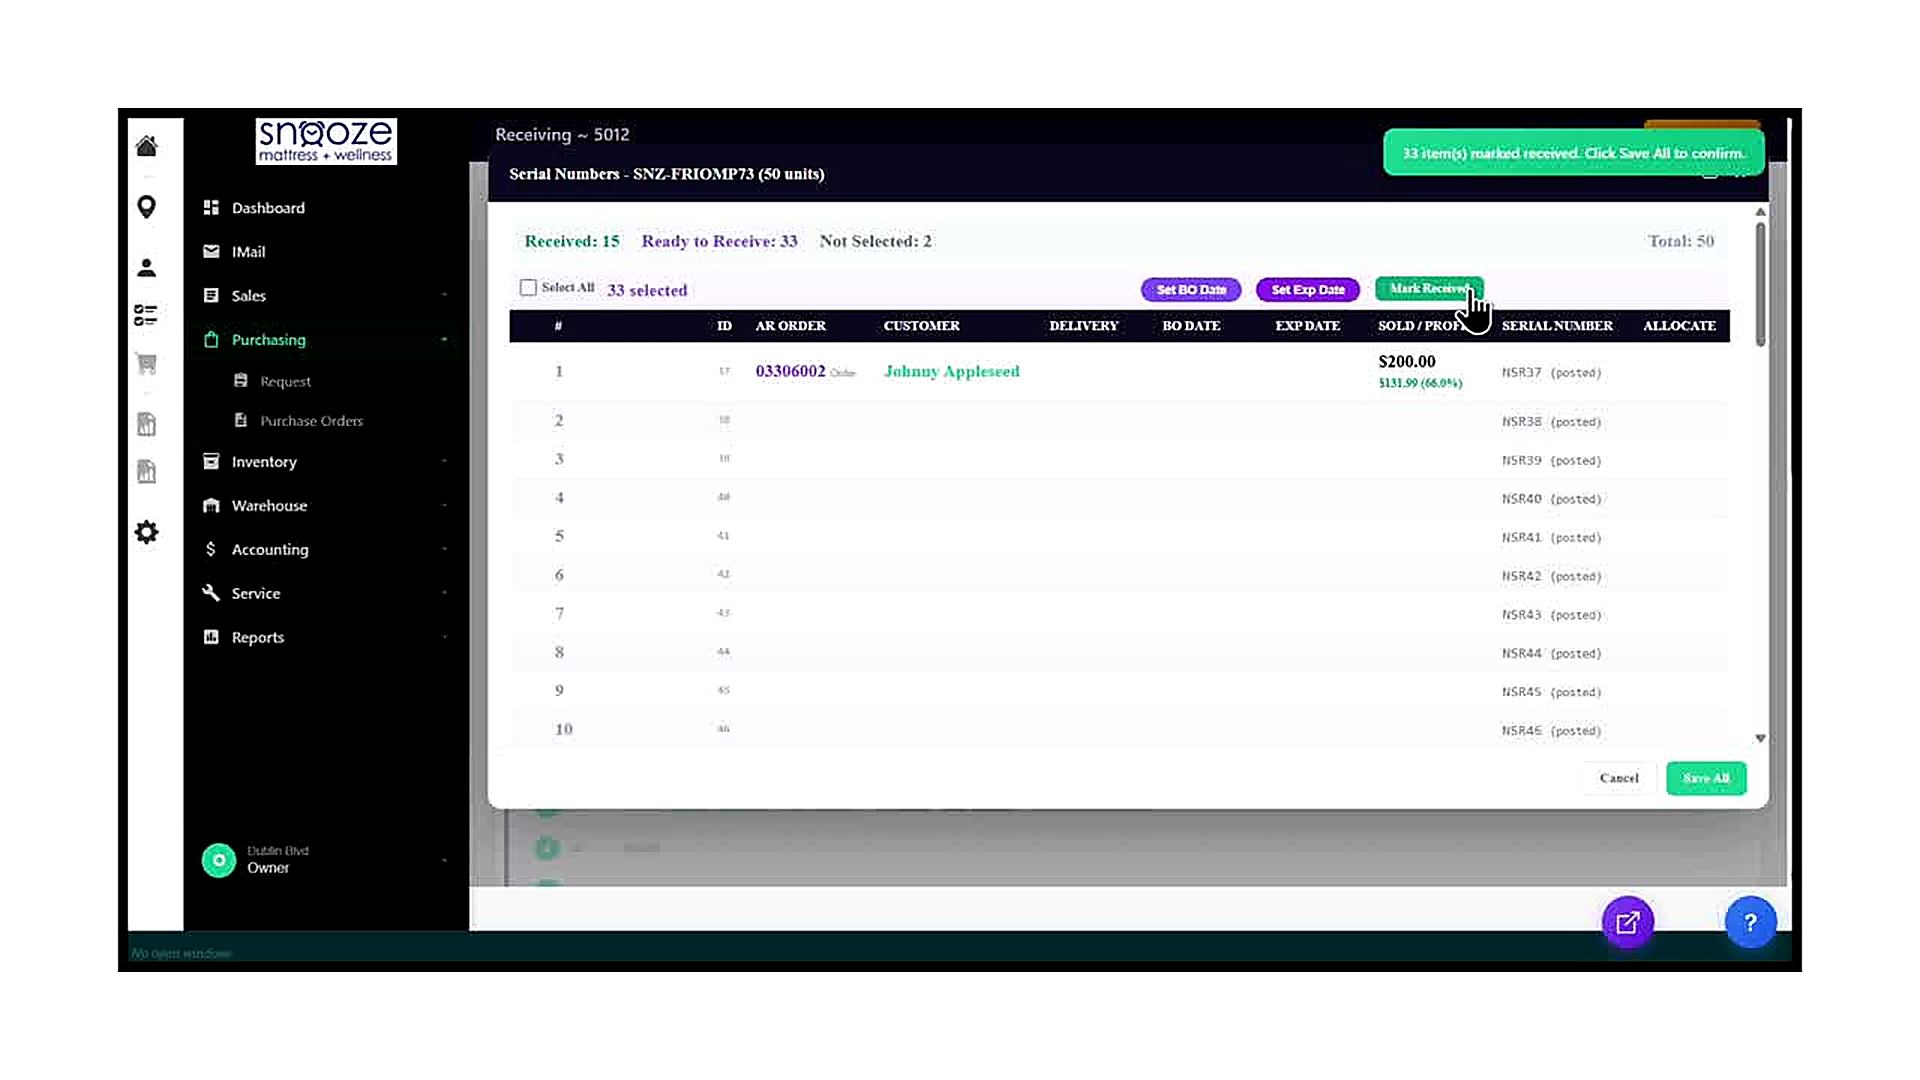
Read the Confirmation Banner
After clicking 'Mark Received', an amber notification banner appears at the top of the screen. It states how many items have been staged (e.g., '33 item(s) marked received. Click Save All to confirm.'). At the same time, the status bar updates to show the new 'Ready to Receive' count. Review these numbers to confirm they match the quantity you intended to receive before saving.
Click 'Save All' to Commit
Once you have confirmed the count is correct, click the green 'Save All' button at the bottom right of the Serial Numbers panel. The system posts all staged units as received, updates the inventory records, and closes the panel. You are returned to the Receiving record.
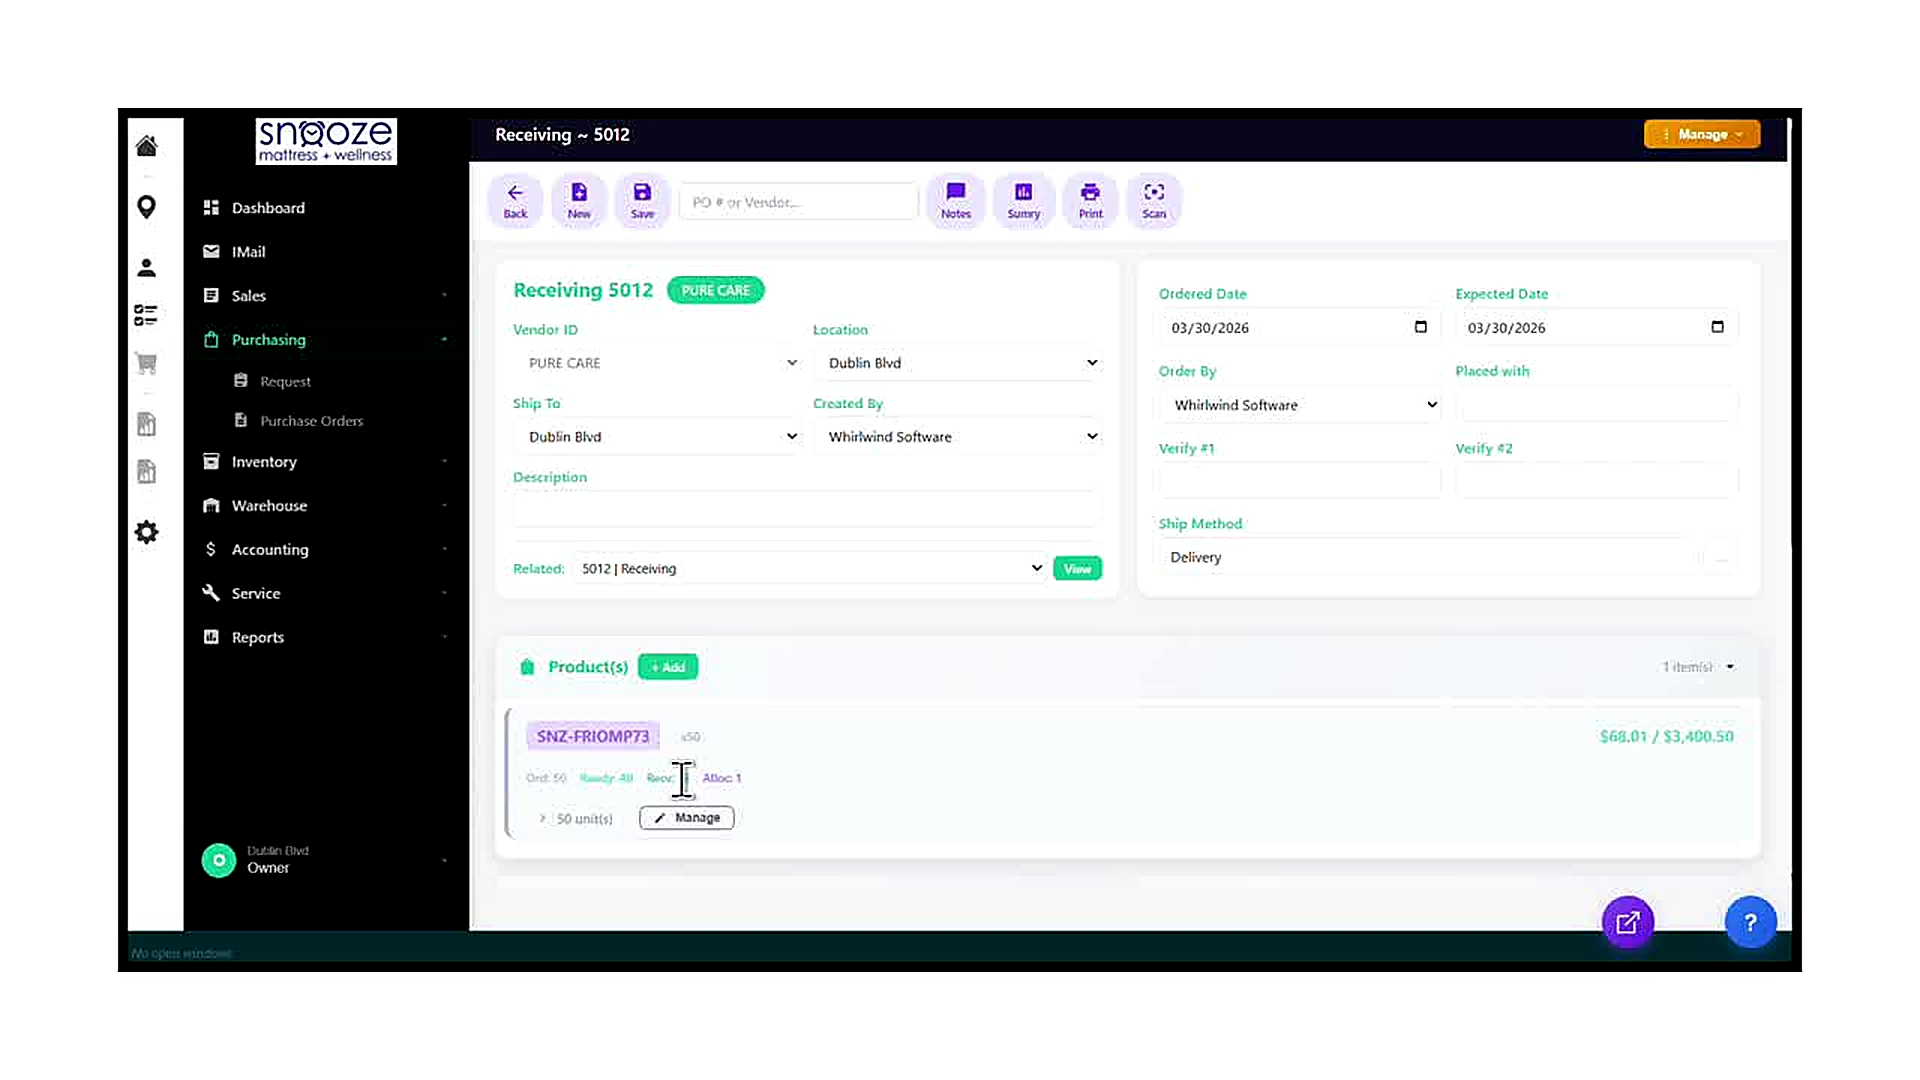
Verify the Updated Product Counters
After saving, the product line item row on the Receiving record updates its counters. The 'Ready' count increases by the number of units just marked (e.g., from 15 to 48). The 'Recv' count reflects the previously posted total and will update on the next full save of the Receiving record. Confirm that the new Ready count matches the number of units in the shipment you intended to process.
Repeat for Additional Products
If the Receiving record contains more than one product line item, repeat the process for each product: click 'Manage' on the next product row, select the units, click 'Mark Received', confirm the count, and click 'Save All'. Each product is managed independently in its own Serial Numbers panel.